










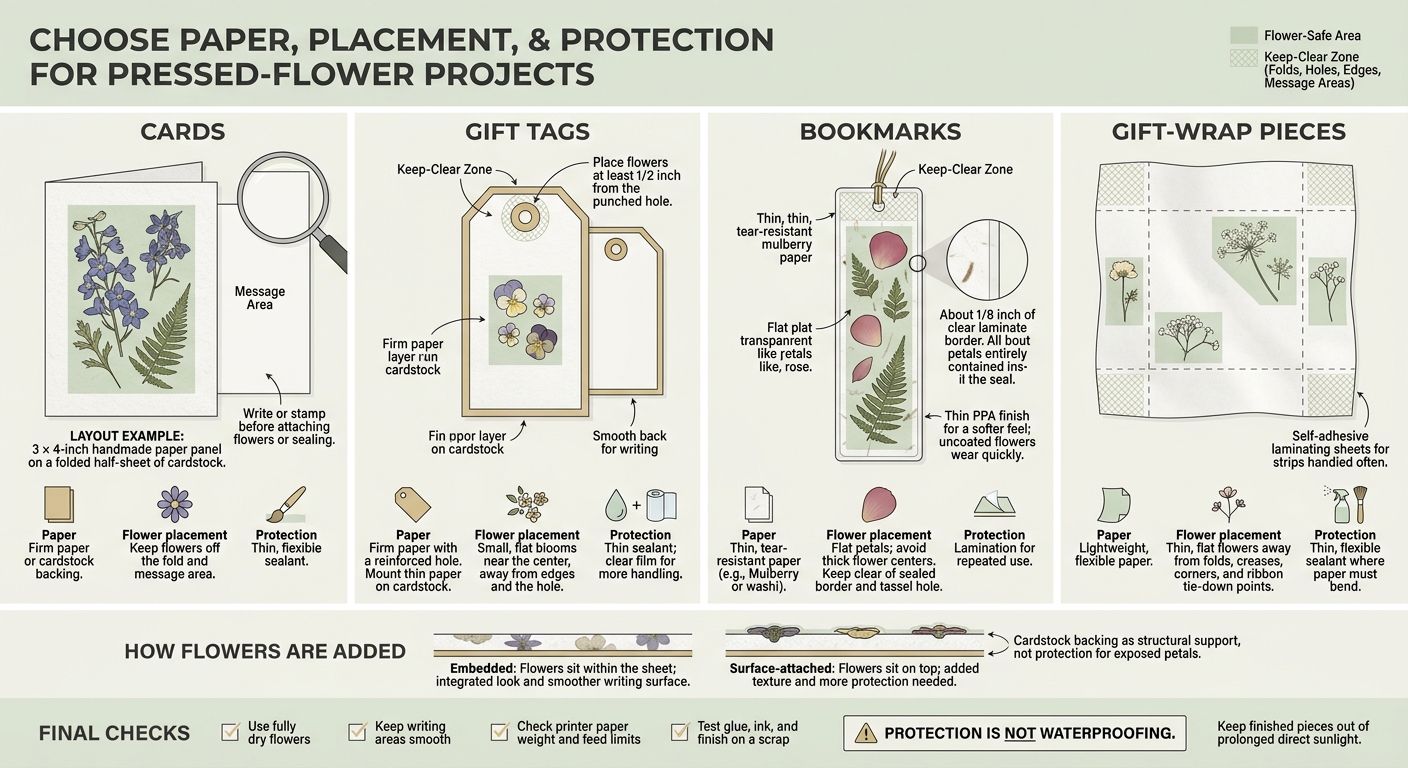
I choose paper and protection based on how the finished piece will be used: firm backing for cards and tags, a slim base for bookmarks, and flexible sheets for gift-wrap pieces. For laminated bookmarks, I leave about 1/8 inch of clear border to keep petals inside the seal.
Quick Comparison
| Project | Paper choice | Flower placement | Protection |
|---|---|---|---|
| Cards | Firm paper or cardstock backing | Keep flowers off the fold and message area | Thin, flexible sealant |
| Gift tags | Firm paper with a reinforced hole | Keep small blooms clear of edges and the hole | Thin sealant; clear film for more handling |
| Bookmarks | Thin, tear-resistant paper | Use flat petals inside the sealed border | Lamination for repeated use |
| Gift-wrap pieces | Lightweight, flexible paper | Keep flat flowers away from folds | Thin, flexible sealant |
I also decide whether to embed flowers in the paper or glue dried flowers onto its surface. Embedded flowers sit within the sheet; attached flowers add texture but need more protection.
My final check: leave writing areas smooth, check printer limits, and test glue, ink, and finish on a scrap. <u>Protection is not waterproofing</u> - and fully dry flowers help avoid trapped moisture, browning, and mold. Using microwave flower pressing is an efficient way to ensure flowers are completely dry before use.
Pressed Flower Paper: Cards, Tags, Bookmarks & Wrap
1. Cards
Paper Weight and Strength
Cards need a firm base to hold up to folding and mailing. Choose sturdy handmade paper, or mount thinner sheets on cardstock. A folded half-sheet of cardstock supports thin handmade paper and helps the card keep its shape in the mail. For texture on the front, center a 3 × 4-inch handmade paper panel, leaving the cardstock to support the fold.
Flower Size and Placement
Arrange flowers before gluing. For those new to the craft, flower pressing for beginners offers a great foundation for creating these keepsakes. Place small blooms near the top or margins, leaving space for a sentiment. Keep flowers away from the fold so the card closes neatly and fits its envelope. Position petals with tweezers, then attach them with small dots of white glue to limit seepage.
Texture and Protection
Keep the textured handmade panel on the front and use the smooth inside for writing. Write or stamp your message before attaching flowers or sealing the card.
Once the glue dries, brush a thin coat of Perfect Paper Adhesive (PPA) over the flowers and foliage. Keep the card flat as it dries thoroughly to reduce curling. The coating adds flexible moisture and UV protection for color retention when mailing.
For bookmarks, use a lighter flower layer and a flatter finish.
sbb-itb-80d8183
Make a Card Using Pressed Flowers
2. Gift Tags
Gift tags need stronger edges and holes than cards because they’re handled, tied, and shipped.
Paper Weight and Strength
Reinforce the hole area. Choose firm handmade paper for a single-sheet tag. If the paper is thin, mount it on cardstock to help it hold up during handling and shipping.
Flower Size and Placement
Choose small, flat blooms such as violas or forget-me-nots.
Place the blooms near the center, away from the punched hole and edges.
Texture and Protection
Uncoated tags retain the most texture, but they’re easier to damage. A thin PPA coat protects exposed petals during handling. Cardstock backing also creates a smoother surface for writing. This technique is similar to the process used for a DIY pressed flower card.
Bookmarks need even flatter flowers and a slimmer finish.
3. Bookmarks
Bookmarks sit between pages, so they need thinner paper than cards and tags.
Paper Weight and Strength
Choose thin, fiber-rich paper, such as mulberry or washi, to keep bookmarks slim and resistant to tearing.
Flower Size and Placement
Place individual tulip or iris petals flat with tweezers. Thick flower centers trap air and weaken the seal during lamination. Keep the botanicals inside the paper’s edges, leaving enough room for a clean seal.
With the botanicals flat, the finish helps determine how often you can use the bookmark.
Texture and Protection
For frequently used bookmarks, lamination creates a smooth surface that won’t snag. Trim it to leave about 1/8 inch of laminate border, then burnish to remove bubbles.
Prefer a softer feel? Apply a thin PPA finish instead of laminating. Uncoated flowers wear quickly, so save them for keepsakes.
Gift-wrap pieces need more coverage and flexibility.
4. Gift-Wrap Pieces
Gift-wrap pieces need paper that bends easily, not paper that holds its shape.
Paper Weight and Strength
Choose lightweight, flexible paper for wrapping. This project calls for the most flexible paper of the projects covered here, since heavier paper resists folds and creases.
Flower Size and Placement
Use thin, flat flowers like forget-me-nots to keep the wrap low-profile.
Thick flower centers and layered blooms add bulk and interfere with folds. Test a small scrap first before working on the full piece.
Texture and Protection
Gift wrap gets handled and folded, so the finish matters as much as the paper weight. Uncoated paper leaves flowers exposed to damage from handling.
For narrow strips and corner details, apply a thin coat of Perfect Paper Adhesive (PPA) with a small brush. Choose self-adhesive laminating sheets for strips that get handled often, and liquid sealant for areas where the paper still needs to bend.
Flower Size and Placement
Match the bloom to the layout. Place flowers where each format has room, keeping writing areas and attachment points clear.
| Format | Placement rule |
|---|---|
| Cards | Keep the message panel clear and flowers off the fold. |
| Gift tags | Place flowers at least 1/2 inch from the punched hole, leaving room for ribbon or twine. |
| Bookmarks | Keep the piece flat, with petals clear of the laminate border and any tassel hole. |
| Gift-wrap pieces | Keep flowers away from creases, folded corners, and ribbon tie-down points. |
Thick flower centers can trap air under laminate or sealant. Before pressing, separate thick blooms into petals or halves so they lie flat.
Next, decide whether to embed the flowers in the sheet or attach them to its surface. Wet pulp gives an integrated look and a smoother writing surface. Let the sheet dry fully before storing it. Surface attachment adds visible texture and lets you place flowers precisely, but the flowers need protection during handling.
A Microfleur microwave flower press dries flowers quickly. Follow its heat-and-cool cycle, and attach flowers only when they're fully dry. Trapped moisture can cause browning and mold.
Once the flowers are dry, paper texture and finish affect how well the piece holds up.
Paper Texture and Protective Finishes
Once you’ve chosen the flower size and placement, pick a paper surface and finish that can handle the intended use. Smooth sheets work well for writing and printing. Lightly textured sheets add character, while heavy texture suits bold lettering and needs enough adhesive to bridge surface gaps. Deckled edges change only the border - the sheet itself can still be smooth. Flowers attached to the surface need more protection than flowers embedded in the paper.
Before printing, check your printer’s paper weight and feed limits. A smooth, clean paper surface helps reduce jams and poor ink absorption.
| Finish or support | Best use | Tradeoff |
|---|---|---|
| Uncoated paper | Keeps the natural texture and matte look. | Exposed flowers remain vulnerable to rubbing and moisture. |
| Thin compatible sealant | Adds protection without laminate bulk; Perfect Paper Adhesive (PPA) stays flexible. | Needs time to dry and may darken petals or change the texture. |
| Clear film or lamination | Protects pieces that get handled often. | Can look plastic; heat may affect flower color, and uneven areas can leave air gaps. |
| Cardstock backing for support | Strengthens thin handmade paper. | Adds weight and thickness but doesn’t protect the flower face. |
Match protection to handling, not just the project name. Use the lightest option that suits how the piece will be used.
| Handling level | Lightest useful choice |
|---|---|
| Cards: mailing | Thin compatible sealant. |
| Gift tags: more handling | Clear film with a sealed border for stronger protection. This method is similar to creating DIY pressed flower stickers for custom stationery. |
| Bookmarks: repeated use | Lamination with about 1/8 inch of clear border. |
| Gift-wrap pieces: folding | Thin compatible sealant to keep bulk down. |
Apply sealant lightly with a small brush. Too much adhesive can stain delicate petals. With self-adhesive covers, use a scraper or craft stick to gently push bubbles outward.
Test the ink, adhesive, and finish on a scrap of the same paper before sealing the final piece.
Protection is not waterproofing. Sealants and covers may limit moisture exposure, but they don’t guarantee a waterproof piece or prevent botanical colors from fading. Keep finished pieces out of prolonged direct sunlight.
Conclusion: Choose Paper and Finish for the Use
Use the comparisons above to choose paper weight, flower placement, and finish that fit the final format.
| Requirement | Paper structure | Flower placement | Finish |
|---|---|---|---|
| Folded card | Sturdy cardstock base | Place flowers on the front, away from the crease | Flexible sealant such as PPA |
| Wrap’s broad flexibility | Thin, flexible paper | Use flat flowers away from planned folds | Thin, flexible sealant |
| Frequent handling | Slim, flat bookmark base | Keep blooms flat so they won’t snag pages | Lamination for repeated use |
| Holes or attachments | Reinforced tag paper | Leave the punch area clear | Light protective coating |
Keep card interiors and tag backs smooth so they’re easy to write on. For more advice on achieving the best results, see these flower pressing tips.
FAQs
How can I tell if pressed flowers are fully dry?
With a Microfleur microwave flower press, flowers are usually fully dry and ready to use in just a few minutes. Follow the recommended microwave intervals - generally 30 to 90 seconds, depending on the blooms’ size and thickness.
Pressing flowers in a heavy book takes longer. Allow one to two weeks for them to dry properly.
How do I fix curled flower paper?
To prevent or fix curling in flower paper, use just a tiny amount of adhesive to attach pressed flowers or foliage. Go easy on wet glue - too much moisture can make the paper curl. Keep finished projects flat while they dry completely to help the paper stay smooth and hold its intended shape.
How should I store finished flower paper crafts?
Store your finished flower paper crafts flat to prevent curling. If you’ve added pressed flowers, a sealant like Perfect Paper Adhesive gives them a flexible, archival-safe, moisture-resistant finish that helps protect them during handling.
For long-term storage, choose a dry spot away from direct sunlight. This helps preserve the vibrant colors you achieved with your Microfleur press.





















