










If you want wedding favors that guests may keep, pressed flower bookmarks are a simple pick: they look pretty, fit many wedding colors, and still have a clear use after the event.
I’d keep the process short and repeatable. Pick small flowers that press flat, test how the colors change after drying, make one sample bookmark first, then finish the full batch with the same layout. A common bookmark size is about 5.9 x 1.97 inches, and sealed options like lamination help with water marks, bent petals, and wear.
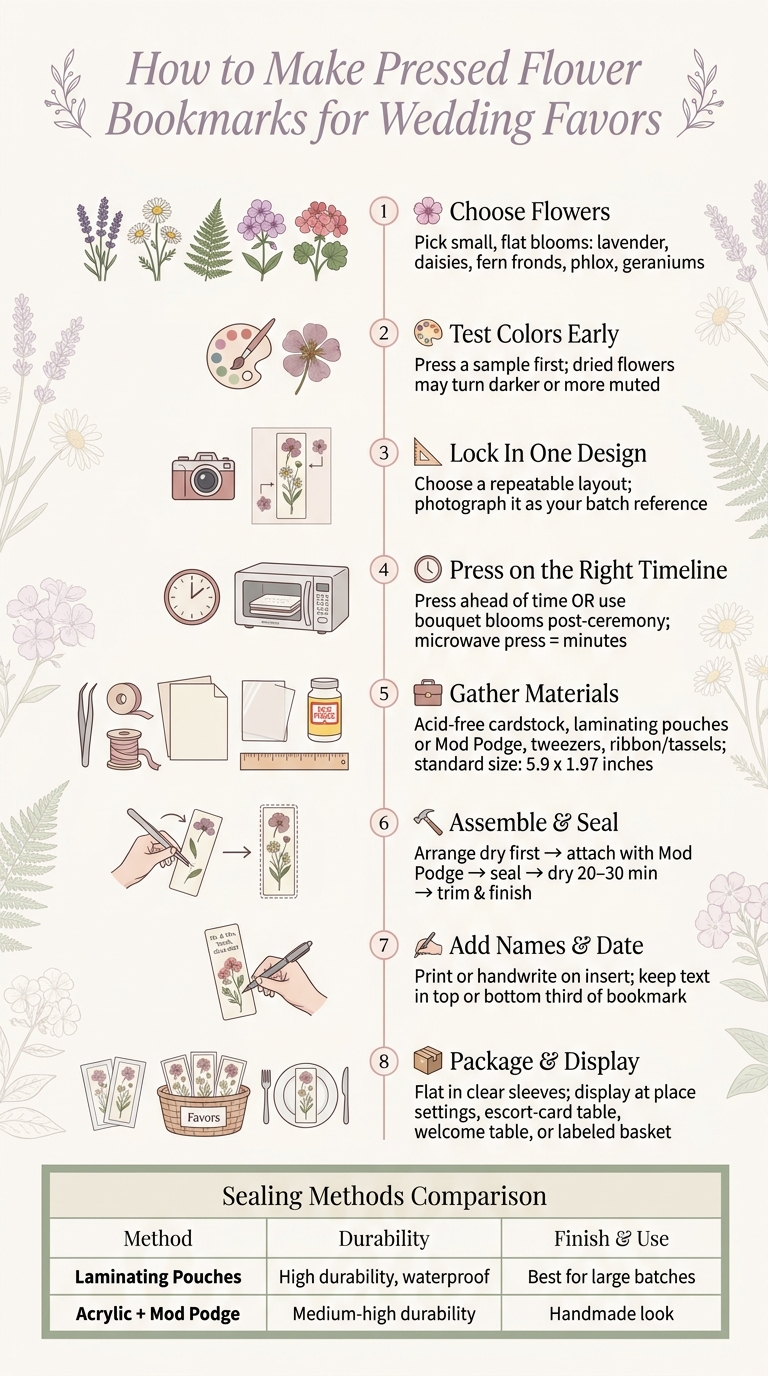
Here’s the full plan in one glance:
- Choose flowers that press flat, like lavender, daisies, fern fronds, and small leaves
- Test colors early, since dried flowers can turn darker or more muted
- Pick one design you can make again for each guest
- Press flowers ahead of time using microwave flower pressing for faster results or use bouquet blooms after the ceremony
- Build one sample first to check trim, seal, and text placement
- Add names and the wedding date on an insert or small tag
- Pack and store flat in a cool, dry place until the event
- Set them out where guests will see them, like place settings or the escort-card table
A few small choices do most of the work here: flat flowers, a narrow layout, and a clean seal. That’s what keeps the favors neat, readable, and easy to hand out at the reception.
How to Make Pressed Flower Bookmarks for Wedding Favors
Choose your flowers and plan the bookmark design
Pick small, flat flowers and greenery that press well
Start with small, flat blooms and slim greenery that suit a bookmark’s narrow shape. Good options include phlox, lavender, daisies, geraniums, herbs, clematis, fern fronds, and oak leaves.
When you gather flowers, pick them while they’re fresh and at their best. Skip anything wilted, damp, or showing signs of disease. And yes, the practical part matters too: get permission before cutting from private property or public land. Once you’ve picked your flowers, press them in a single layer right away so the bookmark stays flat and easy to seal.
After you’ve chosen the flower types, settle on a layout you can repeat across the whole batch. That small decision saves a lot of time later.
Match your pressed flowers to the wedding color palette
Next, line up your flower layout with the wedding palette.
Pressed flowers can shift in color, sometimes more than you’d expect. A fresh bloom may look perfect at first, then dry a shade darker, lighter, or a bit muted. So it’s smart to press a small test sample before making the full batch. That gives you a clear look at how the colors change and whether they still fit the wedding palette.
A few simple design routes tend to work well:
- A monochromatic palette
- One focal flower with one neutral leaf
- A small mix of complementary accents
Pick a design you can remake fast for every guest, then photograph the final layout to use as your batch reference.
Press flowers on the right timeline for your event
Once the design is locked in, decide when to press the flowers.
You can press flowers ahead of time if you want a consistent look across the full set. Or, if the goal is a keepsake, you can press bouquet blooms right after the ceremony. For a faster option, a microwave flower press from Microfleur can dry flowers in minutes while helping preserve color.
sbb-itb-80d8183
Gather materials and assemble the bookmarks
Materials list for durable bookmarks
Once your flowers are pressed and your layout is mapped out, it’s time to pull your supplies together. A handy bookmark size is about 5.9 inches by 1.97 inches, though you can tweak that based on your base material or paper trimmer.
Pick materials that look neat and can last as keepsakes. You’ll need:
- Fully pressed flowers and flat greenery
- Base: acid-free cardstock, decorative paper, or pre-cut acrylic/plastic bookmark blanks
- Sealing: clear laminating pouches, self-adhesive laminating sheets, or Mod Podge in matte or gloss finish
- Tools: scissors or a paper trimmer and fine-tip tweezers
- Finishing: ribbon or tassels
Fine-tip tweezers matter here. They make it much easier to move thin, delicate petals without ripping them.
Here’s a quick look at the main sealing options:
| Sealing Method | Durability | Best For |
|---|---|---|
| Laminating pouches | High, waterproof | Large batches, sleek finish |
| Acrylic + Mod Podge | Medium-high | Handmade look |
How to assemble each bookmark step by step
Before you make the full batch, put together one test bookmark. It’s a simple way to check the seal, make sure the edges trim cleanly, and see how the finish looks.
- Cut the base: Cut your base to the bookmark size that fits your design. If you’re using acrylic blanks, peel off the protective backing from both sides first.
- Arrange without glue: Lay out the flowers dry before attaching anything. Then take a photo of the arrangement so you can repeat the design if needed.
- Attach the flowers: If you’re using Mod Podge, brush on a thin coat first, then place each flower with tweezers. Keep the petals flat and avoid stacking them.
- Seal the design: Let the base coat dry for 20–30 minutes, then add the top coat. If you’re laminating, slide the bookmark into the pouch and run it through the machine. Let it cool before trimming.
- Trim, punch, and finish: Trim the edges, then add ribbon or a tassel to finish the piece.
After sealing and trimming, add names and dates before packaging the favors.
Add names and dates, then package the batch
Add names, the wedding date, or a short message
A bookmark favor feels more complete once you add the names, wedding date, or a short note. Print or handwrite the text on a white or colored cardstock insert before sealing. Keep the top or bottom third for the wording, and leave the flowers in the rest of the space so the design stays slim and easy to read.
Short wording usually looks best. The couple’s names and date work well, or you can add a simple thank-you line. If you’d rather use a tag, thread a small paper tag or ribbon through the top hole. After you settle on the wording, use that same layout for the rest of the batch.
How to batch-produce, sort, and check quality
The easiest way to make a full batch is to work in small, repeatable steps. Start by sorting your pressed flowers by color and size. Then line up your bookmark bases so everything is ready to assemble. Small batches help you keep the flower placement neat before you seal each one.
Give each bookmark a fast quality check before packaging:
| Quality Check | What to Look For |
|---|---|
| Dryness | Flowers are fully pressed and the surface is completely dry and non-tacky |
| Seal | Edges are fully covered and no flowers are lifting at the corners |
| Text | Names and dates are correct and readable |
| Attachment | Ribbon or tassel is securely looped through the hole |
Place the finished bookmarks in clear sleeves or a flat gift box. Then store the full stack flat in a cool, dry place until the wedding day. Once they’re packed and ready, you can move on to display ideas for the reception.
Display the bookmarks at the wedding and store them safely
Display options that fit your reception layout
Once the bookmarks are assembled and packaged, the next step is deciding where guests will pick them up. That choice matters more than it seems. If the display is easy to spot and simple to reach, more guests will take one.
A shallow tray near the escort-card table is a smart pick because guests can grab a bookmark while finding their seat. A labeled basket near the guest book also works well, especially for casual or rustic receptions. If you're hosting a formal seated reception, placing one bookmark on each plate or tucking it into a folded napkin gives each guest their own copy right away.
| Display Location | Setup Requirements | Guest Access | Best Suited Wedding Style |
|---|---|---|---|
| Place Setting | One bookmark per plate or napkin | Direct and personal for every guest | Formal, sit-down receptions |
| Escort-Card Table | Shallow trays arranged in flat rows | High; guests pick one up with their seating card | Organized, classic, or traditional |
| Welcome Table | Arranged next to a guest book or open decorative books | High visibility at the entry point | Vintage, thematic, or library-themed |
| Labeled Basket | Decorative basket with a "Please Take One" sign | Casual grab-and-go | Rustic, outdoor, or bohemian |
After you choose a display, protect the favors until guests take them. Put out only the finished bookmarks in clear sleeves so people can pick one up without touching the flowers. Keep the display away from direct sunlight and follow flower pressing tips to help prevent fingerprints, moisture, and fading. A tassel or ribbon also helps, since guests can lift the bookmark without putting their fingers on the pressed flowers.
Conclusion: Keep the process simple and consistent
Pick one layout, protect the favors during display, and keep the full batch flat until guests pick them up.
How to Make a Pressed Flower Bookmark | Which Press Works Best?
FAQs
How far in advance should I make pressed flower bookmarks?
You can make pressed flower bookmarks as early as you want because dried flowers store well for later use.
If you're using a Microfleur microwave flower press, you can press blooms in just minutes and use them that same day. That gives you room to plan the way you want - either make your wedding favors well ahead of time or wait until the event is closer.
What flowers hold their color best after pressing?
Some flowers hold their color better than others when pressed. Zinnias are a standout here because they tend to stay bright, even after drying. White lisianthus also presses well and gives you a clean, classic look.
A microwave flower press like Microfleur can help with color retention too. Because it dries flowers fast, it helps lock in more of their natural pigment.
How do I keep bookmark favors from bending or fading?
Use a Microfleur microwave flower press if you want to dry flowers fast and keep more of their color. When you put the bookmark together, don’t stack the flowers on top of each other. That extra bulk can make the bookmark bend.
Seal the design with a clear adhesive sticker or a coat of Mod Podge. That helps guard it from moisture and keeps the flowers from lifting. If you want it to last longer, add a clear acrylic sealer or use laminate pouch-style bookmarks.





















