










I keep pressed flower gift tags simple: fully dried flowers, sturdy paper, and a thin layer of glue. Start with a 2 × 3½-inch tag, and leave room for the name and string hole.
Here’s the process I follow:
- Press flowers until they feel dry and papery - book pressing usually takes 2–4 weeks, but microwave flower pressing offers much faster results.
- Arrange the pieces, glue them down, and let the tag dry flat before adding a thin sealing coat.
- <u>Let everything dry completely</u>, then reinforce and punch the hole, add string, and write the name.
- Store finished tags flat in a dry place away from sunlight.
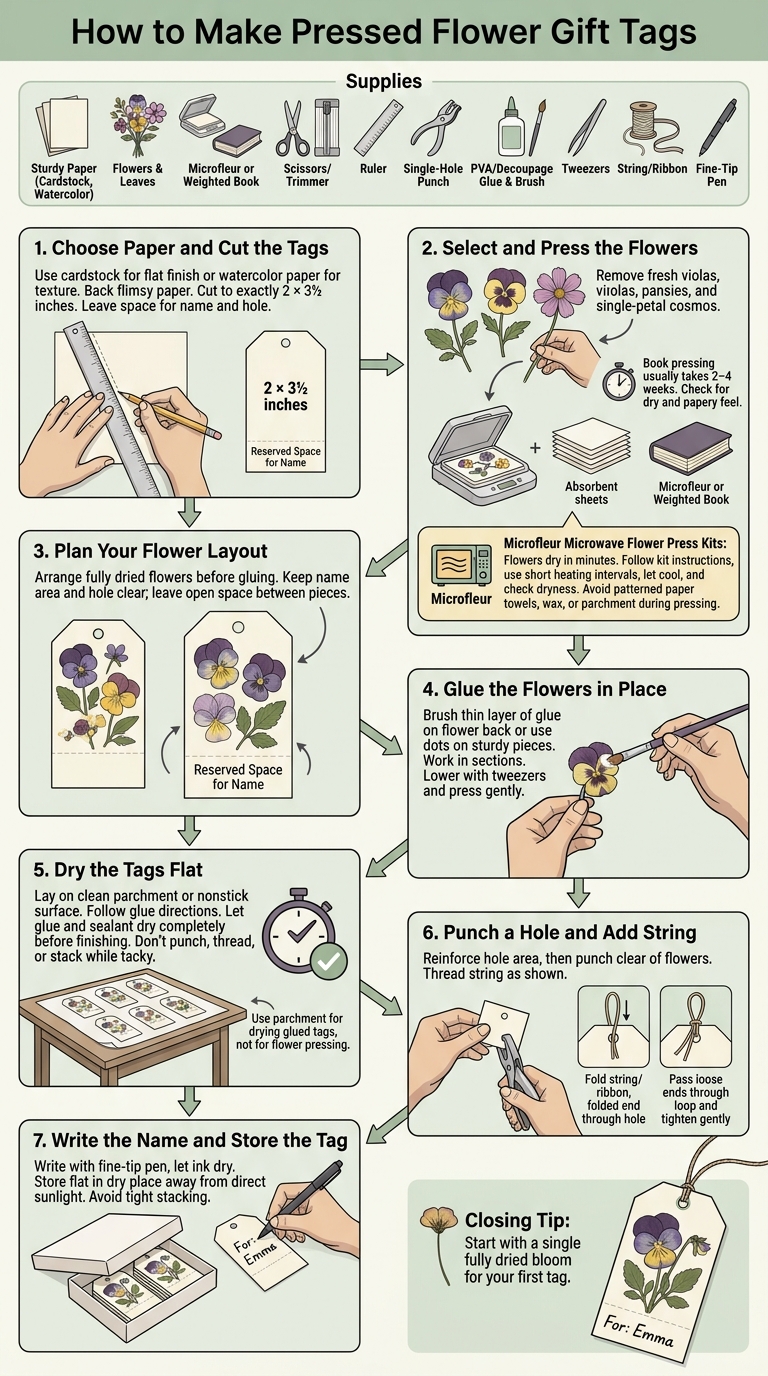
How to Make Pressed Flower Gift Tags
DIY Pressed Flower Gift Tags for Christmas & Holiday Gift Giving
sbb-itb-80d8183
Gather Your Tag-Making Supplies
Gather thick cardstock, watercolor paper, or sturdy handmade paper, plus flowers and leaves. You’ll also need a flower press, scissors or a paper trimmer, a ruler, a single-hole punch, PVA craft glue or decoupage glue, a small paintbrush, tweezers, and string or ribbon.
Step 1: Choose Paper and Cut the Tags
Choose cardstock for the flattest finish or watercolor paper for a sturdy tag with some texture. If thick handmade paper feels flimsy, back it with cardstock.
Measure and cut tags about 2 × 3½ inches, leaving enough room for a handwritten name.
Step 2: Select and Press the Flowers
Choose suitable flowers and foliage like small blooms without blemishes, petals, and thin leaves.
Violas, pansies, and single-petal cosmos are suitable choices.
Pick flowers after the dew dries, and press only fully dry pieces. Remove bulky stems and centers, then tuck the pieces between absorbent sheets in a flower press or weighted book. Check them periodically and replace any damp sheets. Book pressing usually takes 2–4 weeks.
Avoid patterned paper towels and wax or parchment paper, which interfere with even drying.
For faster results, Microfleur microwave flower press kits dry flowers in minutes while helping preserve their color. Follow the kit instructions and use short heating intervals. Let the flowers cool, check that they feel dry and papery, and lift them with tweezers.
Arrange the dry flowers on the tag before gluing them down.
Arrange and Glue the Flowers
Step 3: Plan Your Flower Layout
Review these flower pressing tips to ensure your blooms are perfectly prepared before you begin.
Keep the name area and string hole clear. Stick to a simple layout, leaving open space between the pieces.
Step 4: Glue the Flowers in Place
Use white craft glue or decoupage glue. Apply a thin layer with a small paintbrush only where each flower will sit. For sturdier pieces, you can add small dots of glue to the back instead. Work in small sections to prevent curling.
Use tweezers to lower each piece into place, then press gently.
Step 5: Dry the Tags Flat
Lay the tags flat on clean parchment paper or a nonstick surface. Drying time depends on glue thickness and humidity, so follow the package directions. Don't punch, thread, or stack the tags while they still feel tacky.
Once the first coat dries, brush on a thin sealing coat.
Finish and Personalize the Tags
Let the glue and sealant dry completely before adding the finishing details.
Step 6: Punch a Hole and Add String
Use a small cardstock scrap to reinforce the hole area. Then punch a small hole near the center of the top edge, keeping it clear of the flowers.
Fold the string or ribbon in half and push the folded end through the hole. Pass the loose ends through the loop, then tighten gently.
Step 7: Write the Name and Store the Tag
Write the name in the reserved space with a fine-tip pen. Let the ink dry before storing the tag. If you are new to this craft, check out these flower pressing tips for beginners to improve your results.
Store the tags flat in a dry place, away from direct sunlight. Avoid stacking them so tightly that the petals get crushed.
Conclusion: Start with a Single Flower
Keep your first tag simple. Use one fully dried bloom to make a flat, gift-ready tag that’s easy to personalize. Try more detailed tags as your technique improves.
FAQs
How can I prevent my tags from curling?
Start with a sturdy base, such as card stock or handmade paper. Apply adhesives or sealants in a thin, even layer - too much moisture can warp the paper. Keep layered flower designs simple to limit bulk that can cause buckling.
For a protective finish, use a flexible, archival-safe sealant to help the flowers hold their shape and stay intact.
Will sealing keep my flowers from fading?
Sealing can help reduce fading, but the type of sealant matters. UV-resistant sealants offer the best protection against fading over time. Specialized sealants can also guard against moisture, while standard sealants mainly keep flowers from lifting and protect them from physical damage.
For vibrant color from the start, a Microfleur microwave flower press dries flowers quickly while preserving their natural color.
How can I keep petals from breaking?
Use tweezers, not your fingers, to pick up and arrange delicate pressed flower petals. When removing flowers from your press, take your time and gently loosen any petals stuck to the paper or fabric liners. If you’re using fabric liners, lightly stretch the fabric in opposite directions to help release the petals safely.
Apply glue gently, using just a small amount on the back of each petal.





















