










Cloudy resin after sanding usually needs finishing - not replacing. I’d start by cleaning off the dust or slurry and letting the piece dry before sanding more.
Here’s how I’d choose the next step:
- Even surface haze: Refine the scratches with finer grits, up to 3,000, then polish.
- Deep scratch lines: Go back to a grit that removes them before moving finer.
- White film or streaks: Wash away residue and dry the surface.
- Soft or tacky resin: Stop and check the cure time and mix ratio.
- Cloudiness beneath the surface: More sanding won’t fix trapped bubbles or defects inside the resin.
My rule: <u>fix the cause before removing more resin</u>. Once the scratches are gone, I’d polish or apply a compatible clear top coat - and stop before reaching embedded flowers or other inclusions.
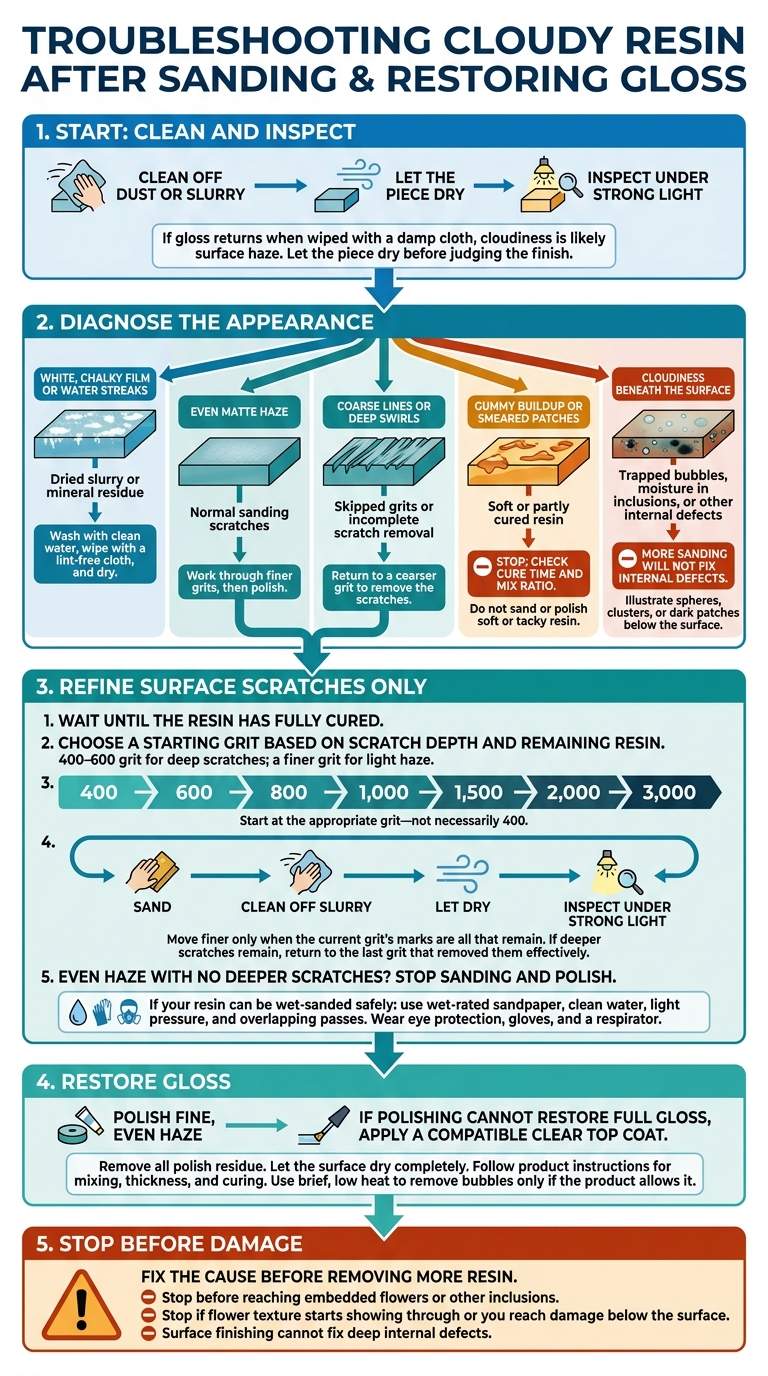
Cloudy Resin After Sanding: Diagnose and Fix
My epoxy resin is still foggy, polishing compound did nothing, please help!
sbb-itb-80d8183
What Causes Cloudy Resin?
Check the surface under strong light. Sanding haze looks like an even matte layer that changes as you tilt the piece. Trapped bubbles, moisture in flowers or other inclusions, and other internal defects look like spheres, clusters, or dark patches beneath the surface. These won’t sand out.
Normal Sanding Haze or Skipped Grits?
Look for coarse lines that interrupt the finer scratch pattern. They usually mean you skipped a grit or didn’t fully remove scratches from an earlier grit. Uneven pressure can cause patchy haze. Shiny low spots show where the abrasive didn’t reach.
Wipe the piece with a damp cloth. If the gloss returns, the cloudiness is likely surface haze. Let the piece dry before judging the finish.
Water Residue or Soft Resin?
Residue from wet sanding can look like sanding haze. Soft resin, on the other hand, smears and gums up the abrasive. If that happens, stop sanding and check the cure time and mix ratio before continuing.
| Appearance | Likely cause | Next action |
|---|---|---|
| White, chalky film or water streaks | Dried slurry or mineral residue | Wash with clean water, wipe with a lint-free cloth, and dry. |
| Even matte haze | Normal sanding scratches | Work through finer grits, then polish. |
| Coarse lines or deep swirls | Skipped grits or incomplete scratch removal | Return to a coarser grit to remove the scratches. |
| Gummy buildup or smeared patches | Soft or partly cured resin | Check cure time and mix ratio. |
Cloudiness that stays below the surface after cleaning and drying points to an internal defect.
How to Remove Sanding Marks
Check Full Cure and Choose a Starting Grit
If sanding haze is causing the cloudiness, fix the scratch pattern first. Wait until the resin has fully cured before sanding. Start with 400–600 grit for deep scratches or a finer grit for light haze. Choose based on scratch depth and how much resin remains. If flowers or other inclusions sit close to the surface, take care not to sand through the resin covering them.
Remove Scratches Before Moving to a Finer Grit
Work through the grits in order: 400 → 600 → 800 → 1,000 → 1,500 → 2,000 → 3,000. Each grit should remove the scratches left by the previous one. If your resin can be wet-sanded safely, use wet-rated sandpaper, clean water, light pressure, and overlapping passes. Wear eye protection, gloves, and a respirator.
Clean Off Slurry and Let the Surface Dry
After each grit, wipe away the slurry with a clean, lint-free cloth. Let the piece dry, then check for leftover scratch lines under strong light. Move to the next grit only when the current grit’s marks are all that remain. If you still see deeper scratches, return to the last grit that removed them effectively.
After the final grit, check for even haze with no deeper scratches. Then move to polishing.
How to Restore Gloss Without Over-Sanding
Once the scratch pattern is gone, stop sanding and switch to finishing.
Polish Fine, Even Haze
If the scratches are gone but a fine, even haze remains, polishing may bring back the gloss. Do not polish resin that’s still soft or tacky.
Use a top coat only if polishing cannot restore full gloss.
Apply a Compatible Clear Top Coat
A compatible clear top coat can restore gloss without more sanding, especially over a shallow low spot. A thin doming layer uses the resin’s surface tension to form a smooth, rounded finish.
Remove all polish residue and let the surface dry completely before coating. Follow the product’s instructions for mixing, thickness, and curing. To remove bubbles, apply brief, low heat only if the product allows it.
Know When to Stop Sanding
Over-sanding is worse than a soft haze. Stop if flower texture starts showing through or you reach damage below the surface. Surface finishing cannot fix deep internal defects.
If the surface softens, smears, or stays tacky, stop and let the resin cure fully.
Conclusion: Clean, Refine, and Finish
Normal sanding haze comes from fine scratches. Wait until the resin fully cures, then use each finer grit to remove the previous grit’s marks. Clean away slurry between passes.
Once the surface is clean and dry, restore gloss with polish or a compatible clear top coat. Stop sanding before you reach the embedded flowers.
FAQs
How can I tell if I skipped a sanding grit?
Watch for deep, visible scratches that remain after switching to a finer grit. If cloudiness or uneven marks persist as you sand, the previous grit didn’t fully remove the scratches left by the grit before it. For a smooth finish, move through sanding grits in small steps rather than making large jumps.
Why does my resin stay cloudy after cleaning and polishing?
Cloudiness often means deeper scratches from coarser grits haven’t been fully removed. Sand thoroughly with each grit to remove the marks left by the previous one. Moisture or sanding residue can also leave a hazy film, so clean the surface completely between stages.
If the cloudiness remains, the polish may not suit the surface. You may also need a final clear topcoat to seal it and restore transparency.
Can a clear top coat rescue over-sanded resin?
Yes. A thin resin top coat can fix over-sanded or cloudy pieces by filling microscopic scratches and restoring a smooth, crystal-clear finish. After sanding, clean the surface and remove all dust before applying a new coat of resin.
For this step, choose a high-quality, low-viscosity resin, such as Hand Crafter LED UV Resin available at Microfleur. It cures quickly, stays clear, and leaves a smooth surface that isn’t sticky.





















