










If your resin jewelry turns cloudy after sanding, the cause is usually tiny surface scratches - not ruined resin. In most cases, I can fix it by checking whether the haze is only on the surface, then wet-sanding in order, polishing, and using a thin clear coat only when the piece is clean, dry, and fully cured.
Here’s the short version:
- Cloudy after sanding usually means sanding haze
- If the haze disappears when wet, it’s often just surface scratching
- If the resin is sticky, milky inside, or full of trapped bubbles, polishing won’t fix it
- Skipping grits is a common reason haze stays behind
- Most pieces need a full path from about 400–600 grit up to 2,000–4,000 grit
- Polish brings back shine, but only after the scratch pattern is refined step by step
- A clear top coat helps with minor surface ripples, not deep or internal problems
A few facts matter here. Sanding leaves marks that scatter light, which is why the surface looks dull. And when people stop too soon or jump from a coarse grit to a fine one, those deeper scratches often stay put. That’s why a resin piece can look worse before it looks clear again.
If I were explaining it to a friend, I’d put it like this: first check if the problem is on the resin or in the resin. Then fix the surface in order - clean water, light pressure, no skipped grits, and careful polishing. That’s what brings the clarity back.
This article walks through that exact process in plain terms, so you can tell what kind of cloudiness you have and what to do next.
How to Polish Resin for Jewelry and more - little-windows.com
sbb-itb-80d8183
Check whether the cloudiness is sanding haze or a deeper problem
Before you polish, make sure you're looking at sanding haze and not a defect that goes deeper. That distinction matters. Surface haze can usually be polished out. Internal damage or curing issues can't.
Rinse the piece and inspect it under strong light
Wash the piece with mild soap and water, then dry it with a lint-free cloth. After it's dry, inspect it under bright light from a few angles. If the haze looks even across the surface, that's usually a sign of normal sanding haze.
You can also wet the surface with plain water. If the cloudiness disappears when wet and comes back as it dries, you're dealing with surface haze.
Feel for scratches, ridges, pits, and uneven spots
Run your fingertips lightly across the piece. If you notice scratch lines, ridges, pits, or uneven areas, the surface still needs more leveling. In that case, go back to a lower grit.
If the piece still feels sticky, or if it looks milky or cloudy inside the resin, stop sanding and figure out what's causing it first.
Signs of problems that polishing will not fix
Use this quick guide to rule out issues polishing can't solve.
| Sign | Likely Cause | Can Polishing Fix It? |
|---|---|---|
| Sticky or tacky surface | Uncured resin | No - re-cure under a portable UV lamp or add a fresh thin coat |
| Milky haze around flowers or botanicals | Moisture trapped inside the casting | No - the piece likely needs to be remade |
| Patchy clouding on the back | Tape adhesive residue | No - wash with soapy water and remove residue first |
| Tiny bubbles visible inside | Trapped air bubbles | No - surface polishing won't reach internal voids |
| Yellowish tint throughout | UV damage or age | No - use a UV-stabilized resin for future pieces |
A soft or sticky surface usually means the resin is undercured and needs more time before finishing. Milky haze around botanicals is often a sign of trapped moisture, which is why using properly dried flowers is essential. When flowers or botanicals hold moisture, that haze can show up inside the casting.
Once you know what's causing the cloudiness, move to the fix that matches the problem in the next step.
Wet-sand through a full grit progression without skipping steps
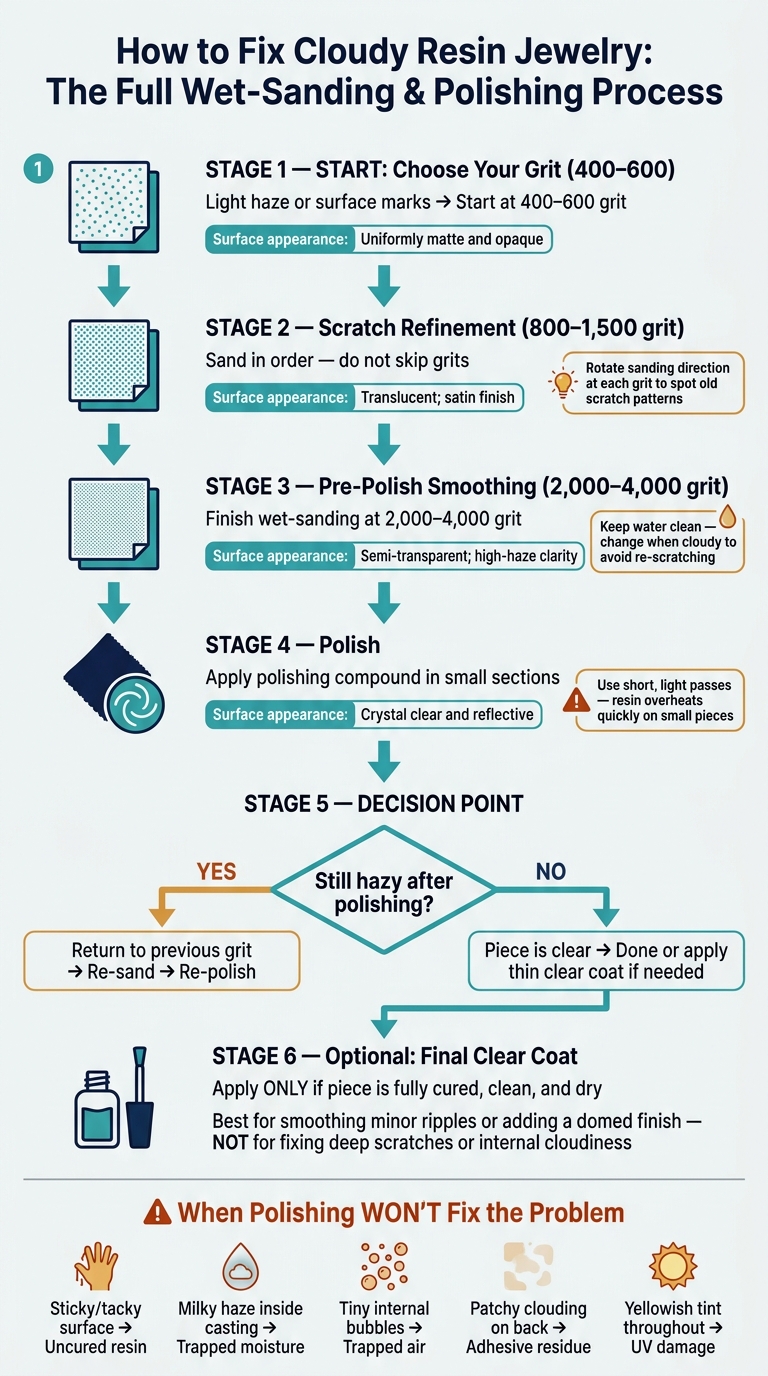
How to Fix Cloudy Resin Jewelry After Sanding: Step-by-Step Guide
If the cloudiness is only surface haze, you can fix it by sanding in order. Each grit removes the scratches from the grit before it. Skip a step, and those deeper grooves tend to stick around. Finer grits and polish won't magically erase them.
Use wet/dry sandpaper with water while you sand. The water helps keep heat down and stops the paper from loading up too fast.
Start with the right grit for the surface condition
For normal haze or light surface marks, start at 400–600 grit. Then work upward through 800, 1,000, 1,500, and 2,000 grit, in that order. If you're working on small pieces, go a bit further and finish at 3,000 or 4,000 grit before polishing.
Keep water and abrasives clean during sanding
Clean water matters more than people think. Murky water can carry rough particles right back onto the surface, which means new scratches while you're trying to smooth things out.
Rinse the piece often, change the water once it starts to look cloudy, and inspect the surface between grits before moving on. If the sandpaper starts to clog or stops cutting cleanly, swap it out.
Use light pressure and shift direction at each grit
Let the sandpaper do the work. Pushing harder doesn't make the job go faster. It usually leaves uneven marks and builds friction heat.
Sand with a light touch, and rotate your sanding direction slightly each time you switch to a new grit. That's a simple trick, but it works. It helps you spot the old scratch pattern so you know when it's gone. Once you can't see those earlier scratches anymore, you're ready for the next grit.
Grit progression reference table
| Grit Range | Main Purpose | Expected Surface Appearance |
|---|---|---|
| 400–600 | Leveling and removing light marks/haze | Uniformly matte and opaque |
| 800–1,500 | Scratch refinement and smoothing | Translucent; "satin" finish |
| 2,000–4,000 | Preparation for polishing | Semi-transparent; high-haze clarity |
| Polishing Compound | Restoring final shine | Crystal clear and reflective |
Once the surface looks evenly satin-smooth, move on to polishing compound.
Polish the resin to restore shine
Once the final grit leaves an even satin finish, it’s time to bring the gloss back. Don’t worry if the resin still looks dull right after sanding - that’s normal. Just make sure the piece is completely clean and dry before you start polishing.
Polish in small sections and check your progress often
Before polishing, wipe away dust and fingerprints with a clean, lint-free cloth. Then work in small sections. That makes it easier to stop the moment the shine comes back, instead of overdoing it.
Use a lint-free polishing cloth so loose fibers don’t get stuck on the surface or leave new scratches. A little patience goes a long way here.
Avoid overheating small resin pieces
Use short, light passes as you polish. Resin can heat up fast, especially on small pieces, and too much heat can scorch it or mark the surface.
If haze remains, return to the previous grit
If the piece still looks cloudy after polishing, go back to the previous grit and polish again. Sometimes that haze means the earlier sanding marks weren’t fully removed.
If the haze is still there after repolishing, finish with a thin clear coat.
Clean the piece, apply a seal coat only if needed, and prevent future haze
If polishing leaves behind a dull film, clean the piece before you decide the finish is ruined. Wash it with mild soap and water, dry it all the way with a lint-free cloth, and use a toothpick to lift any polishing residue from corners and edges.
When a final clear coat can help
A thin seal coat can help, but only in the right situation. Apply it only to a fully cured, clean, dry piece if you want to smooth small ripples or add a domed finish.
Polishing vs. a final clear coat: a quick comparison
| Polishing | Final Clear Coat | |
|---|---|---|
| Best for | Removing haze, scratches, and surface dullness | Smoothing minor ripples and creating a domed finish |
| Can fix | Sanding marks and surface-level cloudiness | A satin surface on a clean, fully cured piece |
| Cannot fix | Physical shape or volume changes | Deep scratches, trapped moisture, internal cloudiness |
| Key requirement | A full grit progression without skipping steps | A perfectly clean, dry, fully cured surface |
How to avoid cloudy results on future pieces
Once the piece is clean and dry, the smartest move is to stop haze before it starts on the next pour. Let the resin cure all the way before sanding. Wet-sand in order without skipping grits. Change the water often so loose abrasive particles don't drag back across the surface and leave new marks.
For pressed-flower jewelry, the flowers need to be 100% dry before embedding. If moisture gets trapped inside the resin, it can lead to internal cloudiness, rotting, or color changes.
Conclusion: Shine comes back when the surface is refined step by step
The main thing is to figure out what kind of problem you're dealing with before you grab a polish or a seal coat. A complete wet-sanding progression removes the scratches that cause dullness. Polishing brings back the gloss. A seal coat only makes sense after the surface is already clean and properly prepared.
Patient, clean, step-by-step finishing is what brings resin jewelry back to clarity every time.
FAQs
How do I tell if the cloudiness is only on the surface?
Do a simple wet test. Wipe the sanded area with a little clean water or a drop of oil.
If the resin turns clear while it's wet, the cloudy look is only on the surface. In plain English, that means the sanding marks are causing the haze, and you can polish it out.
If the resin still looks cloudy or hazy while wet, the issue goes deeper. It may be trapped air bubbles or resin that didn't cure all the way.
What grit should I start with on resin jewelry?
Start with a lower-grit sandpaper to smooth out surface flaws and level the piece. For resin, a common place to begin is 400- or 600-grit.
Then move through finer grits in order. Each step removes the scratches left by the one before it. Finish with a polishing compound to bring the shine back.
When should I use a clear top coat instead of more polishing?
Sanding makes resin look cloudy because it leaves tiny scratches that scatter light. To bring the shine back, sand through finer grits and then use a polishing compound.
Use a clear top coat instead of doing more polishing when you need to fix low spots, tackiness, or concave areas that polishing can't correct. It can also give the piece a smooth, domed, glossy finish.





















