










If I want pressed flowers for a monogram today, I’d use a microwave press. If I have days or weeks to wait, air pressing can work.
The big split is simple:
- Microwave pressing: flowers can dry in 60 to 90 seconds in some cases, or about 4 minutes total in short bursts for many setups
- Air pressing: drying can take 3 days to several weeks
- Microwave pressing: tends to keep flowers flatter, stiffer, and brighter
- Air pressing: is easier to set up, but flowers can fade, wrinkle, or dry unevenly
For monograms, that matters fast. Tight letter shapes need flowers that are small, flat, and easy to place with tweezers. If petals curl, stay damp, or turn soft, the letter edges can look messy.
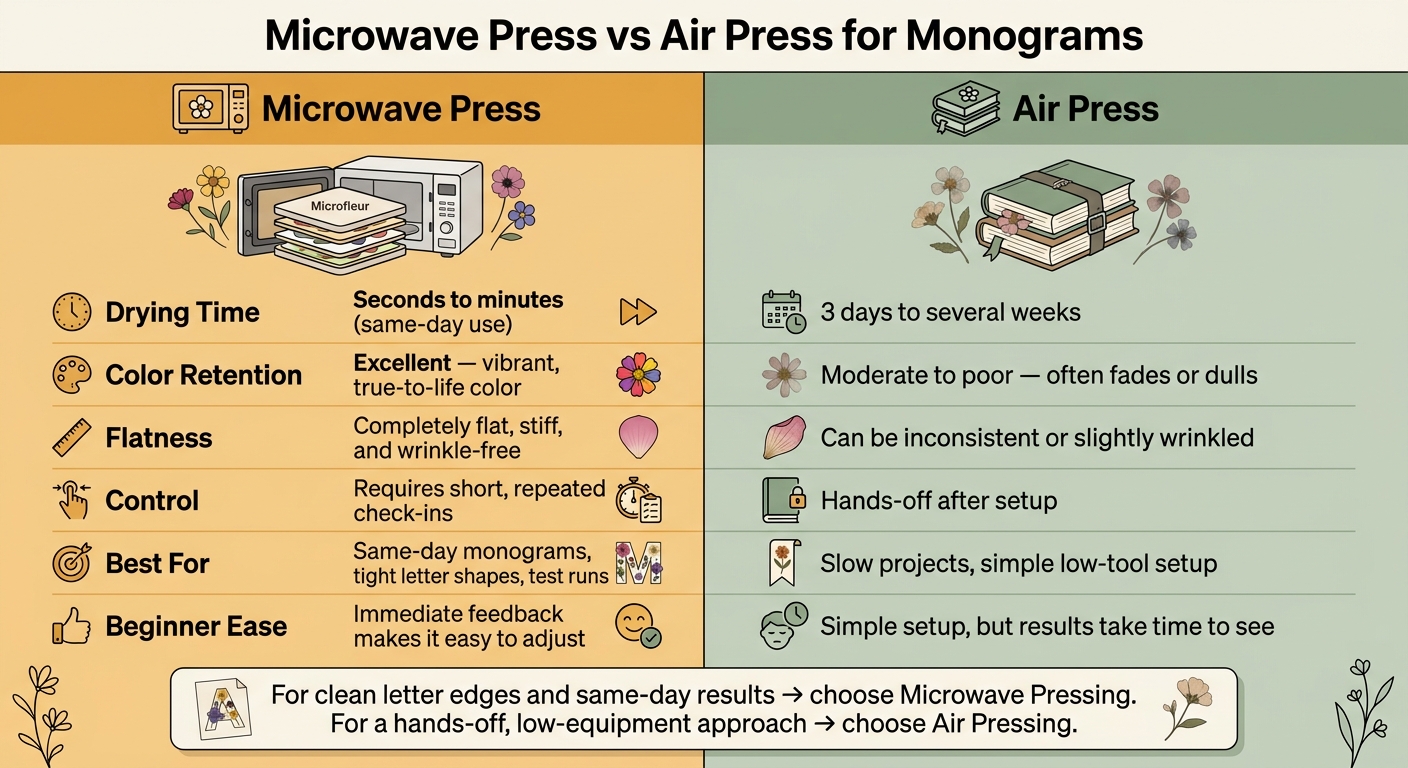
Microwave Press vs Air Press for Monograms: Quick Comparison
How to Dry Flowers in 3 Minutes Instead of 3 Weeks
sbb-itb-80d8183
Quick Comparison
| Factor | Microwave Press | Air Press |
|---|---|---|
| Drying time | Seconds to minutes | 3 days to several weeks |
| Color | Holds color better | More fading is common |
| Flatness | Flatter and stiffer | Can wrinkle or dry unevenly |
| Effort | Needs short check-ins | Set it up and wait |
| Best for | Same-day monograms, test runs, tight letter shapes | Slow projects with simple setup |
Here’s the short version: if speed, color, and clean letter edges matter most, using a microwave flower press is usually the better pick. If you want a low-tool method and don’t mind waiting, air pressing is still a solid option.
I’d read the rest of the guide with one question in mind: how fast do I need my flowers, and how clean do I need the letter shape to look? (Check out these flower pressing tips for more help.)
Microwave Pressing for Monograms: How It Works and What to Expect
Load dry blooms into the press, microwave them in short bursts, and stop once the petals are flat enough to fit tight letter shapes. The big thing here is timing. If you push too far, the petals can get too dry and brittle. The speed is most helpful when your blooms also need to stay small, neat, and easy to place inside a monogram.
The tradeoff is control. In general, thinner flowers give you cleaner results. Use short microwave bursts instead of one long cycle. Start with 20- to 30-second bursts, then check the flowers between each round. After that, continue with 10- to 20-second bursts until the blooms are flat and dry. In a 1,000W microwave, total drying time is often about 4 minutes across all bursts. It can work in 500W to 1,000W microwaves. Lower-wattage microwaves need more time. Those check-ins between bursts matter because too much heat can scorch the blooms.
Thin flowers and foliage, like phlox and ferns, usually fit narrow letter strokes better. Thicker blooms, like roses, need a bit more care and may need extra bursts. As Vermont Pressed Flowers puts it:
"The plant material comes out completely flat, stiff and wrinkle free and the rapid drying keeps the color of flowers so vibrant."
That kind of finish makes placement much easier inside narrow letters.
When Microwave Pressing Makes Sense for Letter Art
Microwave pressing works well when you want fast feedback on color, shape, and fit before you start assembling the monogram. It lets you test pieces fast instead of waiting days to see whether a bloom will work.
Microfleur Press Sizes for Monogram Materials
Press size can make a big difference if you're prepping lots of small monogram pieces. The Microfleur Regular (5" x 5") is a good fit for small flowers, leaves, and single monogram parts. The Microfleur Max (9" x 9") gives you more room for larger blooms or several pieces at the same time.
| Press Model | Size | Best For |
|---|---|---|
| Microfleur Regular | 5" x 5" | Small flowers, leaves, individual monogram elements |
| Microfleur Max | 9" x 9" | Larger blooms, multiple pieces at once |
Both are available at microfleur.com. If you're starting with one initial, the Regular size is enough for most small-flower work. The Max is a better fit for larger initials or batch prep.
Air Pressing for Monograms: How It Works and What to Expect
Air pressing uses absorbent paper or a heavy book plus steady weight to dry flowers slowly into letter shapes. That slow pace matters even more with monograms, where flat pieces and careful placement make all the difference.
Most flowers need several weeks to dry. They’re ready when they feel papery and no longer sticky to the touch.
The downside is pretty simple: you wait longer, and the outcome can vary. Thicker blooms are often the tricky part. Color may fade, and those thicker flowers can dry unevenly. In monogram work, that can soften or blur narrow letter edges.
One small step can save you trouble later: let flowers dry fully before pressing. If there’s water left on the petals, mold can show up.
When Air Pressing Fits a Monogram Project
For monograms, air pressing works best with the flattest plant material. Thin, flat flowers and foliage - like phlox, ferns, and leaves - usually press more evenly and hold cleaner letter shapes. It’s a good fit when time matters less than keeping the setup simple.
Microwave Press vs Air Press: Side-by-Side Comparison
For monograms, the main differences come down to speed, color, and flatness. That’s what shapes the look of your finished letter art. And with monograms, one thing matters more than people expect: how well each method handles narrow letter shapes.
Here’s the side-by-side view:
| Factor | Microwave Press | Air Press |
|---|---|---|
| Drying Time | Seconds to minutes; same-day use | 3 days to several weeks |
| Color Retention | Excellent; vibrant, true-to-life color | Moderate to poor; often fades or dulls |
| Flatness | Completely flat, stiff, and wrinkle-free | Can be inconsistent or slightly wrinkled |
| Control | Requires short, repeated checks | Hands-off after setup |
| Beginner Ease | Immediate feedback makes it easier to adjust | Simple setup, but results take time to see |
For monograms, the real test is simple: does the flower stay clean inside narrow letter strokes?
That’s where these methods start to feel very different. A microwave press gives you fast results, which helps when you’re working with small petals, thin stems, or tight curves inside a letter. You can check the piece, make small changes, and keep going. Air pressing is much slower. It’s easy to set up, but if a petal folds the wrong way or a bloom shifts inside a thin part of the design, you may not know until days later.
If you're choosing between them, start with your deadline.
How to Read the Comparison as a Beginner
If you are just starting out, follow these flower pressing tips for beginners to ensure your first project is a success.
Use microwave pressing when you need fast feedback. Use air pressing when you have time to wait and want a slower, hands-off drying method.
Best Flowers for Each Method and How to Choose for Your Monogram
Once you’ve picked a pressing method, flower shape is what matters most.
For monograms, go with flowers that stay flat, small, and easy to tuck into thin letter strokes. If you’re working with tight initials, small, flat blooms make the job much easier. Thin, papery blooms press cleanly and keep their shape. Flowers with a lot of moisture are harder to manage and more likely to wrinkle or turn brown before they finish drying.
For microwave pressing, good picks include violas, cosmos, zinnias, buttercups, and herbs. They dry fast, hold their color, and press flat enough to sit neatly inside narrow letter shapes. For air pressing, stick with low-moisture blooms so you’re less likely to deal with mold or uneven drying.
Thick flowers like roses or sunflowers can be tricky with either method. For monograms, it’s usually better to press them as single petals instead. Single petals are much easier to place around curves, corners, and narrow spaces.
It also helps to test a few blooms before pressing your full batch. Then press extra pieces so you have backups if some fragile petals tear or curl.
Flowers That Fit Neatly Inside Letter Shapes
Small blooms, single petals, and narrow foliage usually work best. Ferns and slim evergreen sprigs are especially handy because they follow letter edges cleanly and fill gaps without looking bulky.
Which Method to Use Based on Your Timeline
After shape, your deadline is the last thing to check. If you need flowers the same day, use microwave pressing. If you have 2 to 4 weeks and want a low-equipment option, air pressing is the better fit.
FAQs
Which method is better for beginners?
The Microfleur microwave flower press is a good pick for beginners because it’s simple to use and doesn’t ask much from you.
Compared with air drying, which can take weeks and can turn out uneven from one batch to the next, it presses and dries flowers in minutes. That means you can test ideas fast, see what works, and learn as you go. The kits also come with a guide booklet to help you get started.
Can I mix flower types in one monogram?
Yes - you can mix different flowers and foliage in one monogram to get the look you want.
For the best result, press lighter-colored flowers first. Then save flowers with stamens for last, which helps prevent pollen transfer.
Also, make sure all materials are dry before pressing. That helps preserve color and keeps the pieces in good shape.
How do I keep pressed flowers from breaking?
Handle pressed flowers gently once they’re dry. At that point, they’re delicate and stiff, so they can crack if you rush.
A little prep helps. Start with fresh, dry flowers, and keep extra moisture out of the process to help reduce breakage.
If you’re using a microwave flower press, be careful not to dry the flowers too much. Stick to short, recommended heating intervals instead of one long stretch. Once they’re ready, lift them from the cotton liners with a light touch.





















