










You can press wedding flowers in minutes, but short bursts and careful checks matter more than speed.
I’d boil this guide down to five points: start with dry bouquet pieces, sort flowers by thickness, press in 25–30 second opening bursts, switch to 10–20 second follow-up bursts, and stop as soon as each piece feels flat, dry, and papery. That matters because thick roses, stems, and flower centers dry much slower than thin petals and leaves, and too much heat can brown or scorch them.
Here’s the full picture in plain English:
- Prep the bouquet fast: separate blooms, leaves, and stems soon after the wedding
- Keep all parts dry: no dew, vase water, or damp spots before pressing
- Layer the press the right way: platen, pad, cotton liner, flowers, cotton liner, pad, platen
- Give flowers space: pieces that touch while damp can stick together
- Sort by moisture and thickness: thin fillers dry first; dense blooms need more rounds
- Use short microwave cycles: start around 25–30 seconds, then use 10–20 second checks
- Swap damp liners and pads: wet layers trap steam and slow drying
- Cool before handling: dried flowers tear fast if moved too soon
- Store flat: acid-free paper and dry storage help flowers last longer
One detail I’d pay close attention to: microwave wattage changes results. A hotter microwave may need closer to 20 seconds on the first round, which can make the difference between a clean press and browned petal edges.
If you want a pressed bouquet that still looks close to the wedding-day flowers, this process is less about one long cycle and more about small checks, dry liners, and patience between rounds.
How to Press Flowers in Minutes (Microwavable Flower Press Tutorial - Microfleur)
sbb-itb-80d8183
Prepare the bouquet and set up the microwave press
Start pressing the bouquet as soon as you can after the wedding. Fresh flowers press more cleanly, and any bruises or cracks will show up in the finished piece.
Before you load the press, check that every bloom is fully dry. That means no dew, no rain, and no leftover vase water.
Bouquet prep checklist
First, remove all ribbons, floral tape, and floral foam from the bouquet. Then separate the bouquet into individual parts: blooms, leaves, and stems.
Trim stems so they’re short, and thin out dense flowers like roses and sunflowers so they press more evenly. If a bloom has hidden inner petals, take those out and press them on their own.
Tulips can be cut in half vertically to make two flatter pieces from one flower. For trumpet-shaped flowers, trim off the tubular base before pressing them flat or in profile.
How to layer the press correctly
Set up the press in this order: lower platen (ridge side down) → thick wool/felt pad → cotton fabric liner → flowers → second cotton liner → second wool/felt pad → upper platen.
Use a microwave flower press size that fits each bouquet piece without crowding it. If you’re pressing long ferns or leaves, you can clip two 5-inch presses together side by side.
How to place flowers with proper spacing
Place flowers face down if you want a front view, or on their side if you want a profile view. Leave enough room so petals, leaves, and stems don’t touch or overlap. If damp pieces touch, they can fuse together as they dry.
Next, sort mixed blooms by thickness and moisture so they dry at the same pace.
Sort mixed wedding blooms by thickness and moisture
Once the bouquet is spaced the right way, the next step is making sure the flowers dry at a similar rate. Most wedding bouquets are a mix of thin fillers, leaves, and thick blooms with a lot of water inside. Sort each piece by choosing and preparing flowers based on thickness and moisture before pressing so every batch dries on a similar timeline.
Keep delicate pieces separate from dense flowers
Thin petals, leaves, and filler flowers dry first, so press them away from roses, tulips, and other water-heavy blooms. If you have not pressed a flower before, try one spare or imperfect bloom first before you press the rest of the bouquet.
Remove dry pieces as they finish
After each heating round, open the press and check each piece by touch. A flower is done when it feels flat, dry, and papery. Once it gets there, pull it out. Leave finished pieces in too long and they can scorch.
Thicker stems and dense flower centers need more time. Keep those in the press until they also feel flat and papery.
How different bouquet pieces behave in the press
Use this table during short-round checks to see what to remove first and what still needs more time.
| Bouquet Piece | Drying Behavior | Handling Priority |
|---|---|---|
| Thin Petals & Leaves | Dries very fast; high risk of scorching | High - check after every short burst |
| Flat Small Flowers | Dries at a medium pace; often keeps color well | Medium - can be batched together |
| Dense Blooms (Roses/Sunflowers) | Dries slowly; holds moisture in the center | Low - needs multiple rounds; process separately |
| Thick Stems & Centers | Slowest to dry; can lead to uneven pressure | Lowest - needs the most rounds and frequent pad checks |
Press the lightest-colored flowers first. Save anything with heavy pollen for the last batch of the session.
After sorting by thickness and moisture, move to short heating rounds and check each batch on its own.
Heat in short rounds and cool between checks
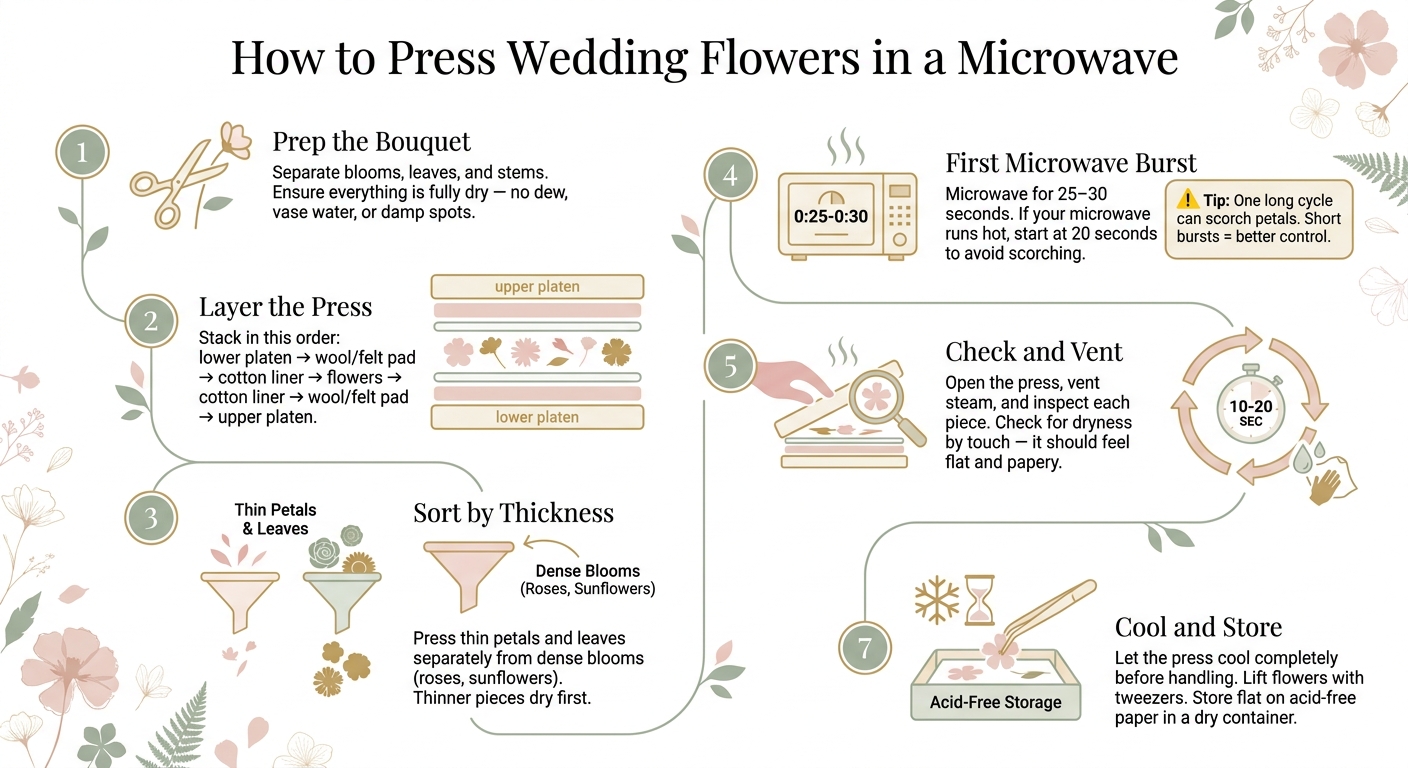
How to Press Wedding Flowers in a Microwave: Step-by-Step Guide
Press each sorted batch in short rounds. Short bursts give you control. One long cycle can scorch petals and overheat the pads. Microfleur warns that overheating is the most common reason flowers, pads, and liners burn. So check the flowers after every burst, and stop as soon as that batch is dry.
Step-by-step short-round heating process
Place the press in the microwave and start with a first burst of 25 to 30 seconds. Adjust that timing based on your microwave's wattage. If your microwave runs hotter, you may need closer to 20 seconds.
After that first round, carefully remove the press, unclip it, and open it to vent steam. Then inspect the flowers for dryness and color retention. If they still need more time, continue with follow-up bursts of 10 to 20 seconds. As the flowers get drier, keep those bursts shorter.
When to swap damp liners and wipe condensation
The pads and liners will get damp as they pull out moisture. At some point, they stop helping and start trapping steam instead. When the pads feel heavy or soggy, switch to a dry set before the next round. Also wipe any condensation from the platens before you put the press back together.
Decision table: what to do based on what you see
Use this table at each check. Go by what you see and feel, not by a set number of rounds.
| What You See or Feel | Likely Cause | What to Do |
|---|---|---|
| Flowers still feel damp | High residual moisture | Continue with a short 10–20 second burst |
| Liners or pads feel heavy or soggy | Saturated with steam | Swap for dry liners and pads before the next round |
| Condensation on platens | Rapid evaporation | Wipe platens dry and vent the press before continuing |
| Flowers feel papery and dry | Drying complete | Stop heating; let flowers cool fully inside the press |
| Browning edges or a "toasted" smell | Overheating | Stop immediately; reduce burst time on future rounds |
| Flowers sticking to cotton liners | Surface moisture | Use a brief burst to release them; keep the liners dry |
When a batch is dry, let it cool all the way before handling it.
Finish, cool, and store pressed wedding flowers
After the last heating round, let the press cool all the way before you open it. If a bloom still feels soft once it's cooled, put it back in for another short burst.
Handle cooled flowers with care and store them flat
Once the press is cool, open it and check each bloom. A flower that's fully dry should feel papery, lie flat, and have no damp spots. As soon as each piece is dry, move it into storage right away to help it keep its shape.
Lift each piece with nylon craft tweezers or clean, dry fingers. Dried petals and leaves can tear easily, so gentle handling helps you avoid damage and keeps oils or moisture from your hands off the flowers. Store the finished flowers flat in a dry storage container.
If you're making keepsakes, mount the flowers on acid-free paper and seal them with clear acrylic resin.
FAQs
Can I press flowers the day after the wedding?
Yes - you can press flowers the day after your wedding.
The Microfleur system is fast enough for same-day pressing, and it also works well the next day. For the best results, make sure the flowers are dry and free of moisture before pressing.
What flowers are hardest to microwave press?
The sources don’t point to any one flower as the hardest to microwave press. Instead, they steer beginners toward lighter, papery blooms with thin parts, such as phlox, calico, and different evergreens.
When you’re dealing with thicker or trickier specimens, it’s smart to test your timing on imperfect flowers or extra foliage first. That way, you can dial in short heating bursts without gambling with the best blooms from your wedding bouquet.
How do I keep pressed wedding flowers from turning brown?
Use the Microfleur microwave flower press when you want flowers to dry FAST, because quick drying helps hold onto color. Start with flowers that are fully dry and have no surface moisture.
Heat them in very short bursts, with short cooling breaks in between. Keep the cotton liners clean too - leftover pollen can stain the next batch and throw off the color. A clear acrylic sealer can also help protect finished pieces from moisture and UV rays.





















