










If you want the short answer: use UV resin for thin flower pendants, and use epoxy for thicker ones. UV resin cures in 1 to 5 minutes per layer, while epoxy usually needs 24 to 72 hours. That one difference affects almost everything else: depth, bubbles, setup, cost, and how much time you have to place petals.
If I were picking between the two, I’d use:
- UV resin for open-back bezels, flat pendants, clear silicone molds, and thin domed topcoats
- Epoxy resin for deep molds, thicker casts, and layered flower designs
- UV resin when I want no mixing and less mess
- Epoxy when I want more time to move flowers before the resin sets
A few facts matter right away:
- UV resin works best in thin layers, about 1–3 mm
- Epoxy gives about 30–60 minutes of working time after mixing
- UV resin often costs about $4.00 per pendant
- Epoxy can be closer to $1.50 per pendant
- Both need fully dry, prepared flowers to avoid clouding and trapped moisture
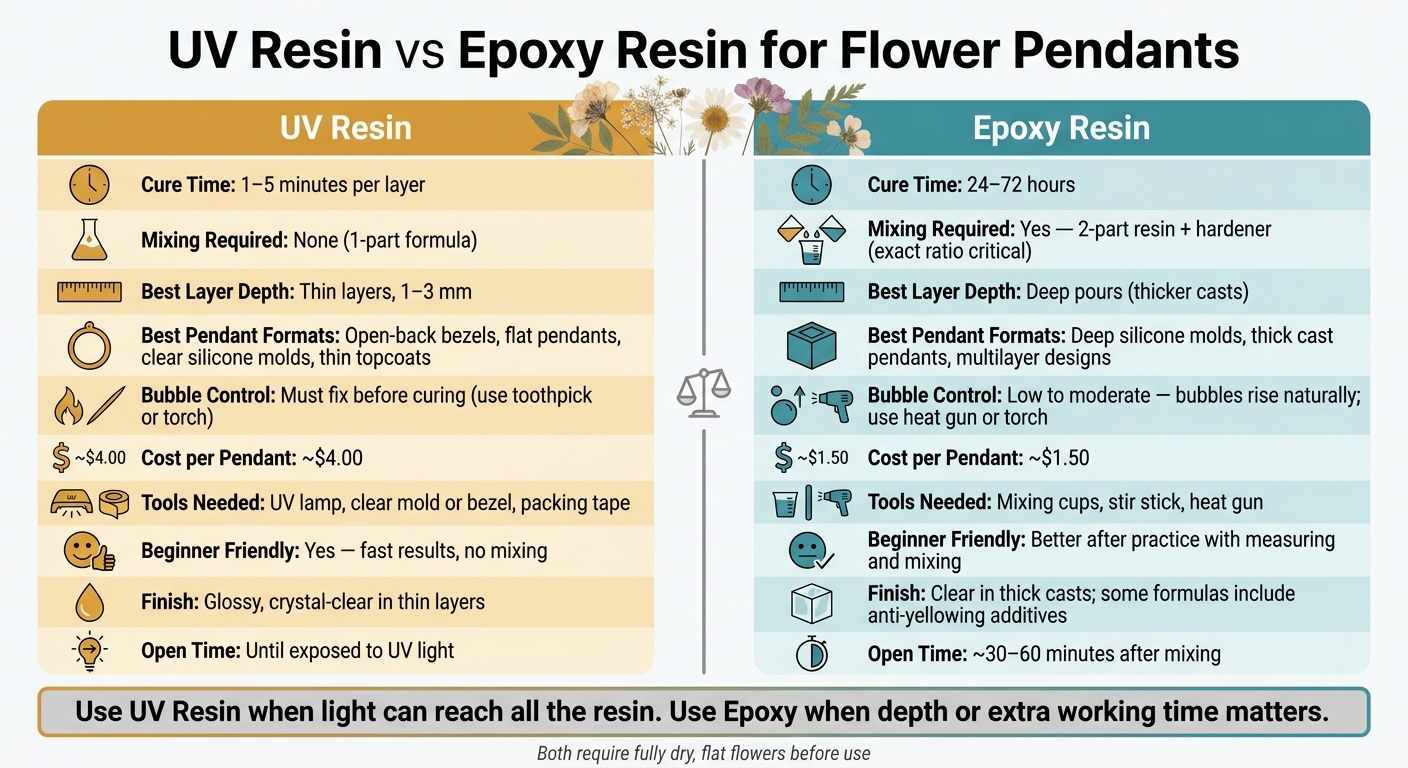
UV Resin vs Epoxy for Flower Pendants: Full Comparison
UV Resin vs. Epoxy Resin Differences and What You Can Make With Each!
sbb-itb-80d8183
Quick Comparison
| Feature | UV Resin | Epoxy Resin |
|---|---|---|
| Cure time | 1–5 minutes per layer | 24–72 hours |
| Mixing | None | Yes, 2-part mix |
| Best depth | Shallow | Deep |
| Best for | Bezels, flat pieces, clear molds | Thick pendants, layered casts |
| Bubble control | Must fix before cure | More time for bubbles to rise |
| Cost per pendant | About $4.00 | About $1.50 |
| Tools | UV lamp, clear mold or bezel | Cups, stir stick, heat gun |
| Best starting point | Beginners making thin pieces | People making thicker pieces |
Bottom line: if light can reach all the resin, I’d start with UV. If the pendant is thick or needs more placement time, I’d switch to epoxy.
UV Resin for Flower Pendants
For small, shallow pendants, UV resin is the easiest place to start. It’s a one-part resin that cures in minutes, so there’s no mixing to deal with.
Cure Time, Layer Depth, and Shallow Molds
Keep each layer around 1–3 mm so the light can reach the resin evenly and harden it all the way through. The safest approach is to build in thin layers: pour a little, cure it, then add the next layer. That helps hold flowers in place before they drift or tilt.
Clarity, Bubble Risk, and Ease of Use for Beginners
Bubbles usually come from air trapped in the flower itself. You’ll often find those little pockets under petals or along the petal edges. A toothpick is handy for teasing that air out before curing, and a quick pass with a lighter or small torch can knock out tiny surface bubbles.
UV resin can cure to a glossy, crystal-clear finish, which makes it a good fit for shallow jewelry pieces. That said, clarity and yellowing resistance depend on the formula. Most UV resins will, over time, pick up a slight yellow tint, although some formulas use additives to slow that change.
One thing to watch: avoid opaque colorants. They can block UV light and leave resin sticky or uncured under the surface.
Best Pendant Formats for UV Resin
UV resin works best for:
- Flat pendants
- Open-back bezels
- Clear silicone molds
- Thin topcoat applications
It also works well for a domed topcoat. In that setup, the resin’s surface tension forms a smooth, slightly rounded finish.
Clear silicone molds are important because UV light needs to pass through the mold to cure the resin evenly. With open-back bezels, you can seal the back with packing tape for the first layer. After that layer cures, flip the piece and cure the back directly to get rid of any sticky spots.
If you need deeper pours or more working time, epoxy is the better next comparison.
Epoxy Resin for Flower Pendants
Epoxy resin is a two-part system that cures through a chemical reaction, not light. For pressed-flower pendants, that makes it a better fit when you need more depth and more time to work.
Cure Time and Pour Depth Options
Epoxy takes 24–72 hours to fully cure, depending on the formula and pour depth. That slower pace can be a big plus. It gives you more time to place petals, adjust small details, and build layered designs without rushing.
Deep-pour formulas work well for thicker pendants and layered flower casts, especially in cases where UV resin falls short because light can't reach far enough into the mold. The slower cure can also help cut heat buildup and leave a smoother finish.
Getting the mix right matters. Whether you measure by volume or by weight, the resin-to-hardener ratio needs to be exact for the cure to finish the way it should. This matters most when you're making a pendant that's thicker than a single UV layer can handle.
Bubble Control, Clarity, and Layered Designs
Once depth is handled, bubbles become the next thing to watch. Because epoxy sets more slowly, bubbles have time to rise after mixing. You can use a heat gun or a small torch to pop bubbles as they reach the surface.
Flower placement helps too. Setting flowers petal side up in the mold makes it easier for trapped air to move upward instead of getting pinned against the mold floor. And if your flowers like to float, thin layers are your friend. Pour one layer, let it partially set, then add the next.
Clarity and resistance to yellowing still come down to the formula you use and the way it cures.
Best Pendant Formats for Epoxy Resin
Epoxy works best for deeper silicone molds, thick cast pendants, and multilayer designs. Its longer open time gives you room to reposition petals before the resin starts to set. To keep the surface clean while it cures, cover the piece with a plastic container so dust and debris don't land on it.
Next, compare UV and epoxy side by side for cost, bubbles, and finish.
UV Resin vs Epoxy: Side-by-Side Comparison
Use this quick comparison to match the resin to your pendant depth, working time, and budget.
| Feature | UV Resin | Epoxy Resin |
|---|---|---|
| Cure Time | 1–5 minutes per layer | 24–72 hours |
| Open Time | Until exposed to UV light | About 30–60 minutes |
| Recommended Layer Depth | Thin layers, about 2–3 mm | Deeper pours |
| Clarity & Finish | Clear in thin layers | Stays clear in thicker casts; some formulas include anti-yellowing additives |
| Bubble Risk | Moderate; bubbles can trap around petals | Low to moderate; bubbles rise naturally |
| Suitable Formats | Open bezels, shallow molds, thin keychains | Deep molds, thick pendants, layered designs |
| Core Tools | UV lamp, clear mold | Mixing cups, stir stick, heat gun |
| Beginner Suitability | Best for beginners - no mixing, fast results | Better after practice with measuring and mixing |
Here’s the simple version: UV resin works best for shallow clear molds, while epoxy is a better fit for deeper casts. After that, the next big choice usually comes down to cost and cleanup.
Cost, Bubbles, and Finishing Trade-Offs
| Resin Type | Approx. Cost per Pendant | Added Equipment | Waste Risk | Time Cost | Finishing Work |
|---|---|---|---|---|---|
| UV Resin | ~$4.00 per pendant | UV lamp, packing tape | Low - no mixing required | Very low (minutes) | Minimal; wipe off tape residue with alcohol |
| Epoxy Resin | ~$1.50 per pendant | Mixing cups, stir stick, heat gun | High - leftover mixed resin is often discarded | High (days) | May need sanding or polishing after demolding |
UV resin costs more per pendant, but it keeps waste low since you don't have to mix a batch first. Epoxy is cheaper per piece, though extra mixed resin often ends up in the trash.
Bubbles are another big difference. With UV resin, you need to clear bubbles before curing starts. With epoxy, you get more time to deal with them as they rise on their own.
Finishing is usually simpler with UV resin too. In many cases, all you need to do is clean off tape residue with alcohol. Epoxy can take more post-cure work, especially if the edges need sanding or polishing after demolding.
Those trade-offs matter. If you want fast, simple projects, UV resin often feels easier. If you're making thicker pendants and don't mind the wait, epoxy gives you more room to work.
Which Resin Should You Start With?
After you compare cure time, depth, and finish, a simple rule works well: start with UV resin for shallow open-back bezels or clear silicone molds, and use epoxy for deeper molds or when you want more working time.
Match Your Resin to Pendant Depth, Mold Type, and Working Time
Use UV resin when light can reach the full layer. Use epoxy when depth or extra working time is the bigger issue.
UV resin needs either a clear silicone mold or an open-back bezel so the lamp can reach all of the resin. If you use an opaque mold, the top may cure while the resin underneath stays sticky or uncured. That’s a common headache with pressed flowers. A pendant can seem hard on the surface, but the resin under the petals may still be soft.
After demolding, flip the pendant and cure the back too. In practice, that makes UV a better fit for shallow, clear setups, while epoxy works better for deeper casts.
Flower Prep and Safety Before You Start
Your flowers need to be fully dry and flat before they go into resin. If they still hold moisture, the resin can turn cloudy, trap water, and leave petals prone to rot or color change.
A microwave flower press, such as Microfleur, can dry and press flowers in minutes. That can help hold onto color before it fades.
For safety, keep it simple and strict:
- Wear gloves and eye protection
- Work in a well-ventilated area
- Follow the manufacturer's instructions for your resin
- Do not finish or wear the pendant until it has fully cured
FAQs
Can I use UV resin in opaque molds?
No. UV resin needs light to cure, so opaque molds are a bad fit.
Use clear silicone molds instead. They let UV light pass through and reach the resin.
Colored or opaque molds can block that light. When that happens, the resin may stay sticky or not cure all the way, even after several rounds under the lamp.
Why do flowers turn cloudy in resin?
Flowers usually turn cloudy in resin for three main reasons:
- They weren't fully dry, which can lead to rot and color fading.
- Air bubbles get stuck between thin, delicate petals.
- Some flowers turn translucent in resin, which can make them look cloudy.
Sealing the flower with glue or a spray before you pour the resin can help protect how it looks.
Which resin is cheaper for beginners?
It depends on your project, your setup, and how much you want to spend. Epoxy resin is often the more budget-friendly option if your main goal is getting more material for your money.
That said, UV resin kits can make more sense for beginners who are starting from zero. Many kits come with a UV lamp, molds, and small tools, so you don't have to buy each item on its own.





















