










Pressed flower resin jewelry works best when I use fully dry flowers, thin resin layers, and enough cure time. If moisture gets trapped, petals can brown, cloud, or form bubbles. Most failed pieces come from those three issues alone.
Here’s the short version:
- I pick small, flat flowers like forget-me-nots, baby's breath, hydrangea petals, lavender, and tiny ferns.
- I make sure flowers are 100% dry before they go into resin.
- I use UV resin for shallow pieces like earrings and small bezels.
- I use epoxy resin for deeper molds and thicker shapes.
- I pour in thin layers, not one thick fill.
- I remove bubbles with light tapping, a toothpick, and brief heat.
- I let the piece cure all the way before sanding, doming, or adding findings.
A few facts matter here. UV resin can cure in about 1 to 5 minutes under a UV lamp, while epoxy resin often takes 24 to 72 hours. That time gap changes how I plan the project. Also, even a small amount of trapped moisture can spoil the finish, so dry flower storage matters just as much as the pour.
If I’m new to this, I start with:
- Shallow pendants and keychains
- Stud or drop earrings
- Open bezels with flat flowers
These are easier because they need fewer layers and give bubbles less space to hide.
Quick Comparison
| Type | Best use | Cure time | Setup | Good for beginners |
|---|---|---|---|---|
| UV resin | Small pendants, earrings, open bezels | 1–5 minutes | No mixing | Yes |
| Epoxy resin | Deep molds, thick shapes, larger pendants | 24–72 hours | Two-part mix | Yes, but with more care |
I’d sum it up like this: dry flowers well, keep the design flat, pour slowly, and don’t rush curing. That’s what gives me clear jewelry with clean edges and flowers that still show up inside the resin.
sbb-itb-80d8183
Choose and Prepare Your Flowers for Resin
Not every flower plays nicely with resin. For earrings, pendants, and bezels, go with flat flowers and small leaves that fit the space without bunching up.
Best Flowers and Foliage for Small Jewelry Pieces
Tiny, flat botanicals are the best match for small jewelry pieces because they sit neatly inside molds and open bezels. Good picks include forget-me-nots, hydrangea petals, daisies, lavender, baby's breath, and small ferns. Small oak or maple leaves can add nice texture too, as long as you press them flat so the finished piece doesn't look bulky.
Thicker flowers take longer to dry, and that makes browning and mold more likely. If a leaf feels too big for your mold, trim it before pressing.
How to Press Flowers So They Stay Flat and Colorful
Once you've picked your blooms, press them right away so they stay flat. Microwave pressing dries flowers fast, which can help hold onto more of their color.
After pressing, keep the flowers in an airtight container until you're ready to use them. That helps stop them from pulling moisture back in.
How to Prep Delicate Petals Before Embedding
Before pouring resin, place the flowers inside the mold or bezel first to test the fit. Trim stems with small scissors, then use precision tweezers to remove extra bulk from the back so the flower lies flat.
Some flowers can turn almost clear once they're in resin. A light coat of Mod Podge or spray sealant can help delicate petals stay visible. Let the sealant dry fully before you add resin.
Once the flowers are dry and trimmed, gather your resin supplies and findings.
Tools, Materials, and Resin Types
Core Supplies for Pressed Flower Resin Jewelry
Get your setup ready before you mix anything. Resin doesn’t wait around, so it helps to have every tool within reach.
You’ll need:
- Pressed flowers (fully dry)
- UV resin or two-part epoxy resin
- Silicone molds or open metal bezels
- Nylon crafting tweezers for placing petals without tearing
- Toothpicks for adjusting placement after pouring
- Heat gun or small torch for clearing surface bubbles
- Mixing cups and stir sticks
- Nitrile gloves
- Wet/dry sandpaper for smoothing edges after demolding
- Jewelry findings - jump rings, earring hooks, chains, and ring bases
A couple of extras can make the process smoother. Rubbing alcohol helps clean metal bezels before pouring. And if you’re using UV resin, a UV curing lamp is required.
Once your supplies are set, the next step is choosing the right resin for the depth of your piece.
UV Resin vs. Epoxy Resin for Jewelry Projects
Use UV resin for shallow pieces and epoxy resin for deeper molds.
| Feature | UV Resin | Epoxy Resin (Deep Pour) |
|---|---|---|
| Cure Time | 1–5 minutes (under UV lamp) | 24–72 hours |
| Mixing | None; pour straight from bottle | 2-part mix required (resin + hardener) |
| Best For | Earrings, small pendants, open bezels | Deep molds, large pendants, 3D shapes |
| Ease of Use | High - beginner friendly | Moderate - precise measuring needed |
If you’re new to this, UV resin is usually the easier place to start. No measuring, no mixing, and a much shorter wait time. After that choice is made, set up a clean work area and get ready to pour.
Microfleur Supplies That Help With Flower Handling and Setup
Microfleur’s Regular Flower Press Kit (5"×5") and Max Flower Press Kit (9"×9") use microwave technology to dry flowers fast, which helps hold color before pigments fade. The nylon crafting tweezers are made for delicate petal work, so it’s easier to place small pieces without crushing them. Microfleur also sells resin supplies, open bezels, and findings for this project.
That kind of setup can save you a lot of fiddling once you start arranging flowers in resin.
Step-by-Step: How to Embed Pressed Flowers in Resin
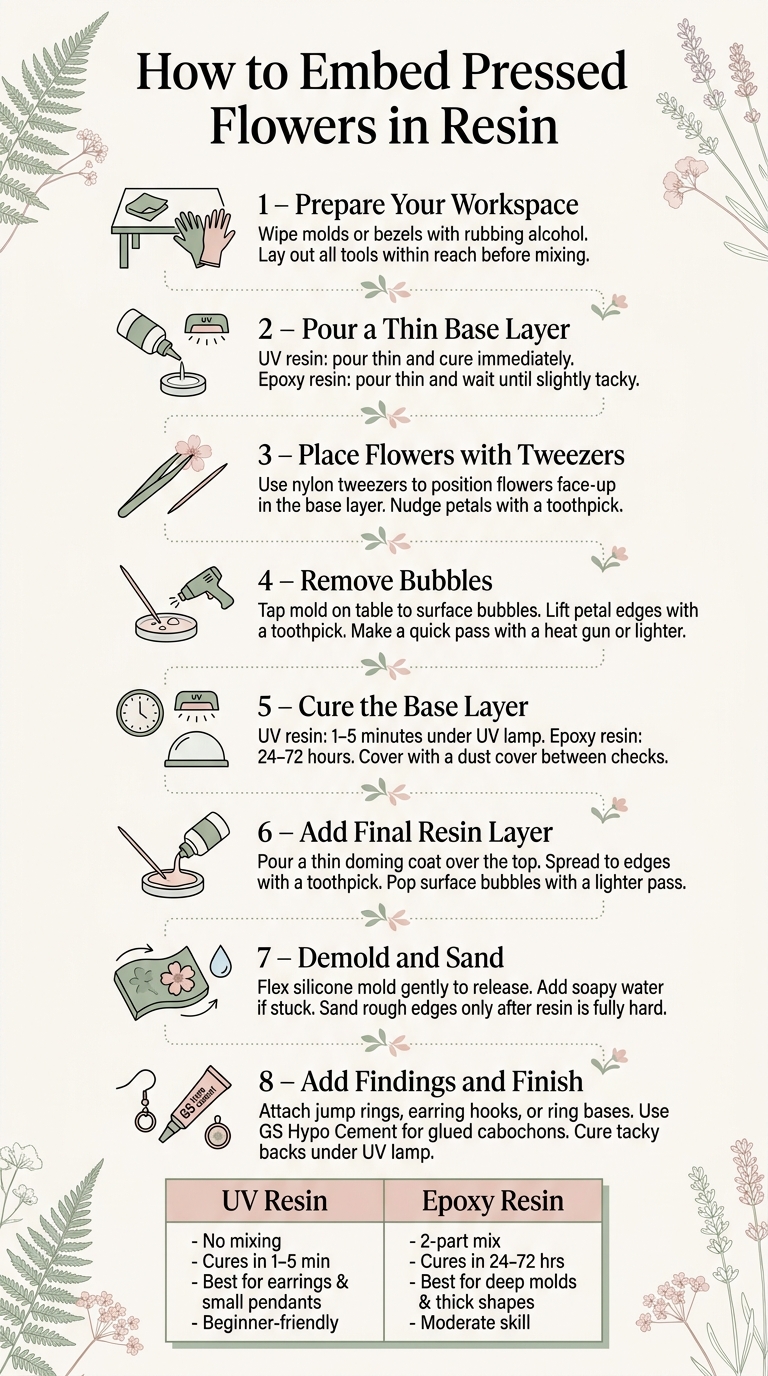
How to Make Pressed Flower Resin Jewelry: Step-by-Step Visual Guide
Set Up Your Workspace and Mix or Pour Resin Correctly
With your flowers ready, begin with a clean mold and a thin base layer. Wipe molds or bezels with rubbing alcohol before you pour. Then place the flowers while the resin is still workable, before it starts to thicken.
If you're using UV resin, cure the first thin layer with the flowers already in place, then add the final coat. If you're using epoxy resin, pour a thin base layer and let it get slightly tacky so it can hold the flowers where you want them.
Arrange Flowers in Molds or Bezels Without Tearing Petals
Use tweezers to move each flower into the base layer. Then nudge stems or petals into position with a toothpick. Be gentle here. If you press too hard, you can leave marks in the finished piece.
In deep silicone molds, place blooms face up. That gives trapped air a better path to escape.
Prevent Bubbles and Keep Colors Visible While Curing
Once the flowers are in place, deal with trapped air before curing. Lightly tap the mold on the table to bring bubbles up to the surface. Then use a toothpick to lift the edges of petals and release any air pockets underneath.
For bubbles on the surface, make a quick pass with a lighter, small torch, or heat gun. Keep the heat moving. If you linger too long, the resin can yellow and thin petals can get damaged.
During the first stage of curing, check the piece every 15 to 30 minutes and pop any new bubbles that rise. Between checks, cover it with a dust cover so dust and hair don't settle into the resin while it cures.
Cure, Finish, and Assemble Your Resin Jewelry
Cure Fully, Demold Carefully, and Fix Rough Edges
Once the flowers are set and the bubbles are out, let the resin cure all the way before you demold it. Don’t rush this part. If you pull the piece out too soon, you can mark the surface or warp the shape.
When it’s ready, flex the silicone mold gently to release the piece. If it sticks, add a drop of soapy water along the edge to help it slide free. It’s a small trick, but it can save you from cracking or bending the piece.
If the edges come out rough or uneven, wait until the resin is fully hard before sanding. Sanding too early can leave scratches that won’t come out later.
Polish, Add Findings, and Seal for a Clean Finish
After sanding, move on to sealing and adding hardware. If you used tape to back an open bezel, the underside may still feel tacky. Flip the piece over, cure the back under a double-sided UV resin light, and then clean off any residue with soapy water and a toothpick.
Once the piece is dry, add a thin doming layer of resin over the top. Spread it to the edges with a toothpick, then make a quick pass with a lighter or torch to pop tiny surface bubbles before curing. This last coat helps smooth out ripples and gives the piece a high-gloss finish.
For findings, use the pre-made holes in bezels or molds, or drill a hole after curing. Then attach your jump rings, earring hooks, ring bases, or chain. If you’re working with heavier parts or gluing resin cabochons to ring bases, use a jewelry-specific adhesive like GS Hypo Cement.
FAQs
How do I know if my pressed flowers are dry enough for resin?
Your flowers need to be completely dry before you add resin. Any leftover moisture can lead to rot, fading, or curing issues.
A simple way to check: the flowers should feel brittle and papery. If they still feel flexible, they probably still have moisture inside.
What should I do if my resin jewelry still has bubbles after curing?
If your resin jewelry has bubbles after curing, add a thin extra layer of resin to help smooth out the surface. Before that layer cures, use a toothpick to pop or lift out any bubbles you can see. Then pass a lighter or small torch over the surface for a moment to clear tiny air pockets.
For future pieces, pour slowly and check the corners and edges before curing. That’s where bubbles like to hide.
How can I keep pressed flowers from fading or turning clear in resin?
Make sure the flowers are completely dry before you embed them in resin. If any moisture is left, the flowers can rot and lose color.
To help keep their color and stop them from turning translucent, use a high-quality flower press. You can also seal delicate petals with a thin coat of Mod Podge or spray sealant before adding resin. When the jewelry is finished, store it in a dark place when you’re not wearing it, since sunlight will fade dried flowers over time.





















