










You can press flowers at home with a few tools, short microwave bursts of 20 to 30 seconds, and simple projects like bookmarks, tags, cards, and frames. If I were starting today, I’d focus on thin flowers, dry blooms, tweezers, and small dabs of acid-free glue.
Here’s the short version:
- I pick flat, dry flowers like pansies, daisies, cosmos, violets, ferns, and ivy.
- I press them in a microwave press using low to medium power with cooling breaks.
- I stop when the flowers feel dry and papery.
- I store them flat in a dark, dry place at 68°F to 72°F.
- I start with small projects: bookmarks, gift tags, greeting cards, and framed art.
- I avoid the big mistakes: too much heat, damp flowers, finger handling, extra glue, sun, and humidity.
A few numbers stand out. Book pressing can take 4 to 6 weeks. A gift tag can take about 5 to 10 minutes to put together. Bookmark glue layers may need about 20 to 30 minutes to dry.
What matters most is simple: keep moisture low, keep layouts simple, and handle petals gently. That’s the whole process in plain terms.
Flower Pressing for Beginners: An Easy Step-by-Step Guide
sbb-itb-80d8183
Pressed Flower Art Basics and the Easiest Way to Start
Pressed flower art is easy to start.
How Pressed Flower Art Works
The process is pretty simple: pick, flatten and dry, then arrange and glue. You choose fresh blooms with no moisture on the surface, place them under pressure between absorbent layers to pull out moisture, and, once they’re dry, arrange and glue them onto paper, cardstock, or inside a frame.
If you're just getting started, thin, flat blooms are the easiest choice. They tend to press better and give you fewer headaches.
One tip that saves a lot of frustration: set your bloom in the exact position you want before you close the press. Once pressing begins, trying to move petals around can tear or crush the flower. It also helps to snap a quick photo before gluing everything down, so you can remember your layout later.
Why Microwave Pressing Works Well for Beginners
A microwave flower press uses short bursts on low to medium power, with cooling breaks in between. That helps protect the flower’s color and lowers the chance of scorching.
"Finally can dry zinnias and retain their color. Other flowers too. I think I have used it every day since I received it." - Denise Krupa, Verified Buyer
The big plus is speed. Beginners can press flowers the same day instead of waiting around. With book pressing or a wooden bolt press, flowers usually need 4 to 6 weeks to dry all the way. Next, gather the basic tools and materials.
Supplies You Need to Start Pressing and Crafting
You only need a press and a handful of basic supplies to get started. Following a few tips for beginners can make the process even more rewarding.
Core Tools for Pressing Flowers
The press does the main job: it keeps flowers flat while absorbent layers and liners draw out moisture. If you want a faster option, a microwave-safe press uses absorbent layers and clips to flatten flowers in much less time.
At the center of your setup are a flower press, absorbent liners, and clips. A smaller press works well for petals and leaves. A larger one gives you more room for bigger blooms or several flowers at once.
Basic Craft Supplies for First Projects
Once your flowers are dry, finishing a simple project is pretty straightforward. You’ll just need:
- Precision tweezers
- Acid-free glue
- Acid-free cardstock or card blanks
- Frames
For bookmarks and cards that need a bit more protection, add a thin sealant.
With those basics in place, the next step is picking flowers that press cleanly.
How to Choose, Press, and Store Flowers Without Ruining Them
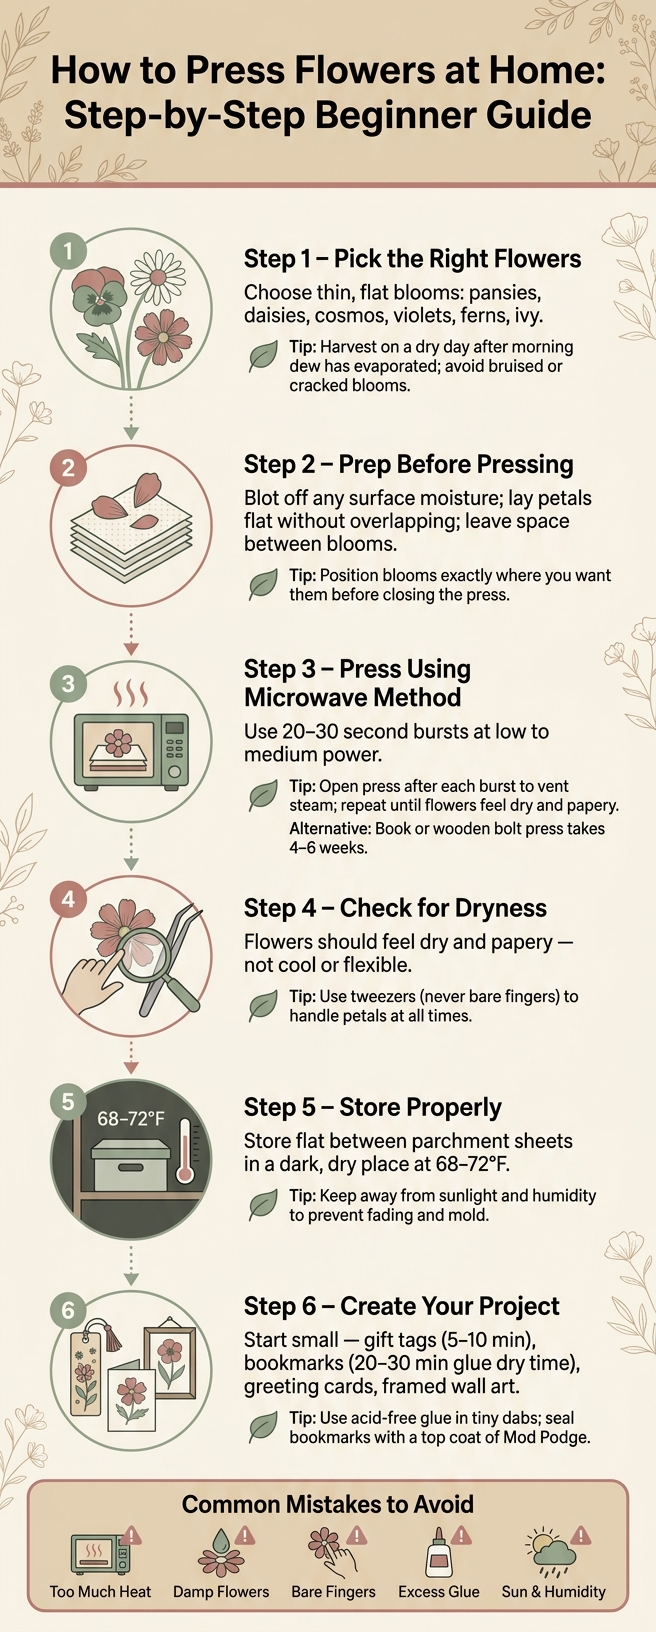
How to Press Flowers at Home: Step-by-Step Beginner Guide
With your tools set, the next step is choosing flowers that will press neatly.
Flowers and Leaves That Press Well
Thin, naturally flat flowers tend to work best. Good starter picks include pansies, daisies, cosmos, and violets. They usually flatten evenly and don’t need much adjustment. Ferns, ivy, and plain herb leaves also press well and give finished pieces a nice bit of texture.
Thicker or fleshier flowers like roses, dahlias, and zinnias are trickier. Their extra bulk can hold moisture, which can lead to mold. If you still want to use them, cut the blooms in half or press single petals on their own to reduce that bulk. Also, be picky when you harvest. A bruise, crack, or dark spot that seems minor on a fresh flower will stand out even more after pressing, so choose the healthiest blooms you can find.
Step-by-Step Microwave Pressing for Beginners
Once you’ve picked your flowers, work fast and keep moisture to a minimum. Harvest on a dry day after the morning dew has fully evaporated. If there’s any moisture left on the surface, blot it off before the flowers go into the press. Lay petals flat, don’t let them overlap, and leave a little space between blooms so moisture can escape well.
Use short bursts in the microwave, about 20 to 30 seconds at low to medium power. After each burst, open or vent the press to let steam out (a microwave flower press kit is ideal for this), then check how the flowers are doing. You’re looking for a dry, papery feel. If a flower still feels cool or a bit flexible, it needs more time. Use tweezers when moving blooms so the oils from your fingers don’t bend or tear thin petals.
How to Store Pressed Flowers and Keep Their Color
Let flowers cool fully, then store them flat between sheets of parchment in a dark, dry place at 68–72°F so they don’t pull moisture back in. When it’s time to use them, handle them with tweezers only.
At that point, they’re set for bookmarks, cards, and framed pieces.
| Problem | Cause | Fix |
|---|---|---|
| Browning/Scorching | Microwave power too high or bursts too long | Use low/medium power and 20–30-second bursts |
| Mold | Flowers were damp when pressed or not fully dried before storage | Harvest on dry days; ensure a papery feel before storing |
| Tearing | Handling petals with fingers | Use fine-tipped tweezers for all movements |
| Fading | Light exposure or slow drying | Store in a dark place; use microwave pressing |
| Breakage | Flowers were too dry or brittle before use | Press blooms as soon as possible after picking |
4 Beginner Projects and the Mistakes to Avoid
Once your pressed flowers are dry, start small. That makes placement easier, cuts down on breakage, and helps you get a feel for how delicate these pieces are.
Bookmarks and Gift Tags
Bookmarks and gift tags are the easiest starting projects because they use small blooms and simple layouts. A gift tag can come together in as little as 5–10 minutes: cut cardstock, punch a hole at the top, thread ribbon through it, and use tweezers to place one or two small flowers on the surface.
Bookmarks take a bit more time, but the process is still straightforward. One solid method is to brush a thin base coat of Mod Podge onto an acrylic bookmark blank, place your flowers face-down into the glue with tweezers, let it dry for 20–30 minutes, and then add a top coat. Sticker-style bookmarks are also a good fit for beginners: place 4–5 small flowers on the bottom adhesive layer, then press the top layer over them to seal.
One small mistake can throw the whole thing off. If you stack flowers inside stickers or laminates, the bookmark may not seal flat and can buckle.
Once you can place small blooms neatly, you're ready for cards and frames.
Greeting Cards and Framed Wall Art
After tags and bookmarks, move on to cards and framed pieces.
Greeting cards are a natural next step. Use a watercolor or cardstock card and lay out your flowers on the surface before gluing anything down, so you can test the arrangement first. When the layout looks right, lift each piece with tweezers, add a tiny dab of acid-free glue to the back, and place it back where it belongs. Then let the card dry all the way before sliding it into an envelope.
Framed wall art works the same way, just on a larger surface. Use acid-free paper as the base to help prevent yellowing over time, and set the full arrangement before adding glue. Apply only small dabs of adhesive to the back of each bloom, then let the piece dry fully.
Gift tags and bookmarks are the fastest projects. Greeting cards need a steadier hand, and framed wall art takes the most care.
Common Beginner Mistakes That Cause Breakage, Browning, and Glue Stains
Most beginner problems come from a few easy-to-fix mistakes.
- Damp flowers can brown or mold in the press.
- Too much heat can brown petals, so use short bursts.
- Bare fingers can break petals and leave oils on the surface, which is why tweezers matter so much.
- Too much glue can leave stains or damage petals.
- Direct sunlight and humidity can damage finished pieces, so store them away from both.
The basic rule is simple: start with small projects, handle blooms with tweezers, use tiny amounts of glue, and keep finished work away from light and moisture.
FAQs
How do I know when a pressed flower is fully dry?
A pressed flower is fully dry when it feels stiff and crisp to the touch and lifts easily from the press. If it still feels soft, bends a bit, or sticks to the page, give it more time.
With standard pressing, drying usually takes two to four weeks. In some cases, it can take four to six weeks. Microwave pressing is much faster and can dry flowers in just minutes.
What should I do if my flowers turn brown or moldy?
Brown or moldy flowers usually point to too much moisture during the drying process. Start with fresh, dry flowers, and make sure there's no dew on them before you press them.
Thick or multi-layered blooms need a bit more prep. Remove some of the extra petals and press those separately. If you're using a traditional press, leave a little space around each flower so moisture can escape instead of getting trapped.
If mold shows up, throw the flowers away. At that point, they likely won't dry the way they should.
How long do pressed flower projects usually last?
Pressed flower projects can last for years if you make and store them the right way.
Keep finished pieces in a dry place, and make sure the flowers are fully dry before you start crafting. Moisture is the main thing that causes trouble here, so it helps to store your pieces away from humidity.
You can also use a sealant like Mod Podge during assembly to help protect delicate blooms over time.





















