










If your pressed flowers come out brown, damp, wrinkled, or uneven, one part of the press is usually the reason. I can boil this guide down to four parts, one layer order, and a short care routine.
Here’s the whole article in plain English:
- Platens sit on the outside. They press the stack flat and let steam escape through vents.
- Pads sit inside the platens. They absorb moisture and soften pressure on petals.
- Liners touch the flowers. They help stop sticking and keep the surface smooth.
- Clips hold the stack tight. If clip tension drops, pressure gets uneven.
- Layer order matters: platen → pad → liner → flower → liner → pad → platen → clips.
- Start with 20 to 30 second microwave bursts. That lowers the chance of scorched pads or liners.
- Most common wear signs are warped platens, thin or scorched pads, wrinkled or stained liners, and loose clips.
- Most common fixes are simple: dry the parts, clean the liners, wipe condensation, and replace worn pieces.
A standard kit usually has 2 platens, 2 pads, 2 liners, and 2 to 4 clips. These components are standard in most microwave flower pressing kits. That means every drying cycle depends on just a few pieces working together. If even one part is off, moisture can get trapped, pressure can shift, and results can slip fast.
Here’s the part most people need at a glance:
| Part | Job | Common problem |
|---|---|---|
| Platens | Hold shape and vent steam | Warping or cracks |
| Pads | Absorb water and cushion petals | Scorching, thinning, dampness |
| Liners | Protect flowers and smooth contact | Wrinkles, stains, tears |
| Clips | Keep pressure even | Loose grip or heat damage |
My takeaway: if I keep each part clean, dry, flat, and tight, I give myself the best shot at flat, dry flowers with fewer marks and less browning.
The Main Parts and What Each One Does During Drying
Vented Platens: Structure, Pressure, and Moisture Release
The outer plates handle two jobs at once: they apply pressure and let steam escape. These rigid vented platens keep flowers flat while built-in vents release moisture during drying. If that steam can’t get out, moisture stays trapped inside, and the flowers can come out soft or discolored.
Before each session, inspect both platens for warping or heat damage. Even a slight warp can lead to uneven pressure.
Pads and Liners: Absorption, Cushioning, and Surface Contact
Wool pads soak up moisture from the flowers and cushion delicate petals so they don’t crack under pressure. If a pad has become thin from repeated use or shows scorch marks, swap it out.
The fabric liners sit right against the flowers on both sides and pull moisture outward into the pads. Keep both liners smooth and flat before you close the press. Wrinkled liners can create uneven contact. Following flower pressing tips for assembly ensures the best results.
Once moisture passes through these inner layers, the clips keep the whole stack tight.
Clips: Steady Compression Across the Press
Clips keep the stack closed and maintain the pressure that holds flowers flat through each microwave cycle. Place them evenly on opposite sides of the platens instead of bunching them in one area. Replace any clip that no longer grips well or shows heat distortion.
Even pressure across the stack comes down to two things: where the clips are placed and whether the clips are still in good shape.
sbb-itb-80d8183
How to Press Flowers in Minutes (Microwavable Flower Press Tutorial - Microfleur)
How to Assemble the Press in the Right Layer Order
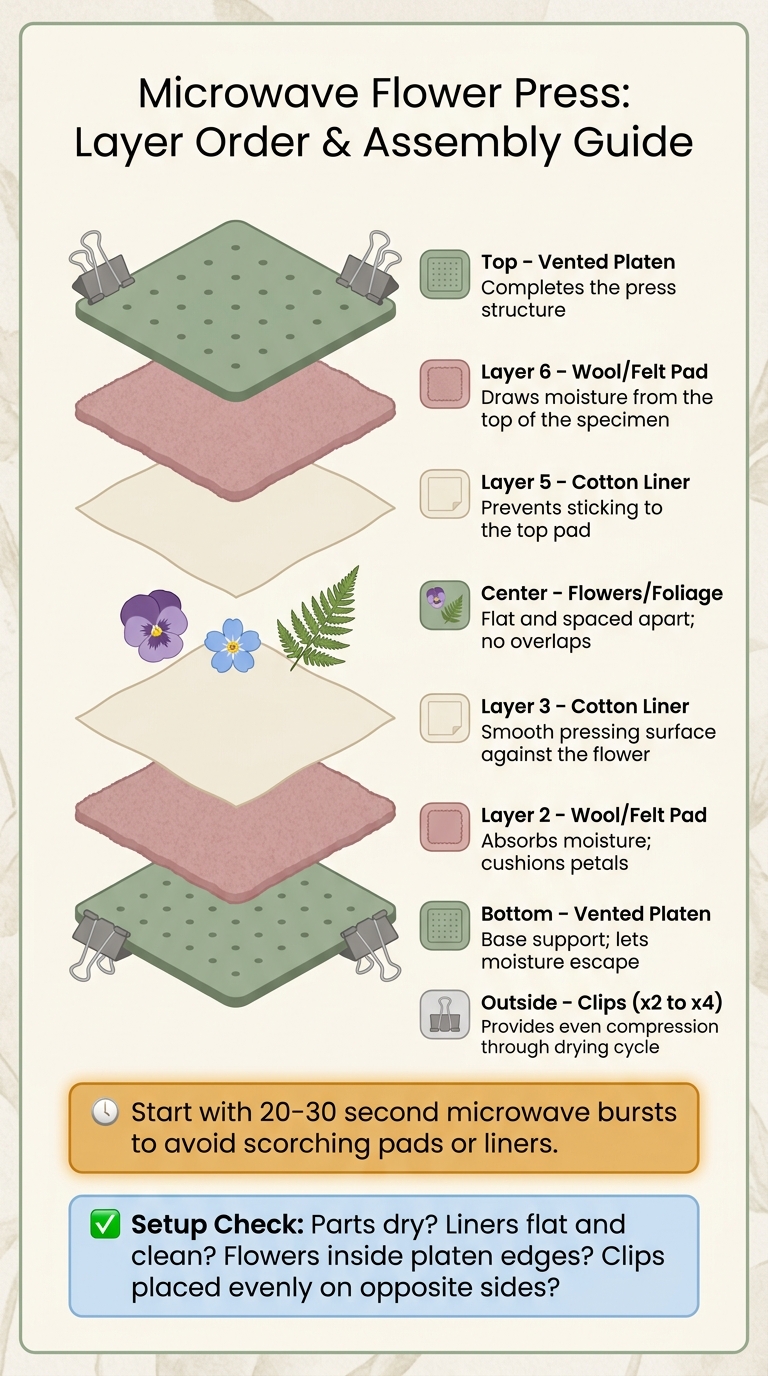
Microwave Flower Press: Layer Order & Assembly Guide
Build the press in layers. Once you know what each part does, putting it together becomes pretty simple. This method provides fast, simple, and beautiful results compared to traditional pressing.
Step-by-Step Layer Sequence
| Layer | Component | Why It Matters |
|---|---|---|
| Bottom | Vented Platen | Base support; lets moisture escape |
| 2 | Wool/Felt Pad | Absorbs moisture; cushions petals |
| 3 | Cotton Liner | Smooth pressing surface against the flower |
| 4 (Center) | Flowers/Foliage | Flat and spaced apart; no overlaps |
| 5 | Cotton Liner | Prevents sticking to the top pad |
| 6 | Wool/Felt Pad | Draws moisture from the top of the specimen |
| Top | Vented Platen | Completes the press structure |
| Outside | Clips | Provides compression through the drying cycle |
Setup Check Before Each Microwave Cycle
Once the stack is in place, take a few seconds to check it before microwaving. Make sure every part is dry, the liners are clean, the flowers stay inside the platen edges, and the pads and platens line up properly. Place the clips evenly on opposite sides so the pressure stays balanced.
Start with 20–30 second bursts. That helps you avoid scorching the pads or liners.
Maintenance, Wear Signs, and When to Replace Parts
After-Use and Before-Use Care
Once the press is set up the right way and you've mastered pressed flower projects, good results come down to simple care: keep every part clean, dry, and flat. After each session, separate the layers and let them dry all the way. Damp pads and liners can hold moisture inside the press, and that can ruin the next press.
After each microwave burst, wipe any condensation off the platens with a dry cloth. Then brush away debris and pollen from the liners and pads before you put everything away. Before your next session, take a quick look at the setup. Make sure the pads are dry, the liners are flat, and the clips still snap shut. That small check can stop a lot of repeat problems before they start.
Cotton lawn liners tend to stain and hold onto pollen, so wash or replace them once buildup starts transferring onto new flowers. To clean them, hand-wash the liners and lay them flat to dry. After they dry, iron them or lightly mist them with water and press them inside the Microfleur to get the surface flat again.
Liner Wear Table and Replacement Guidelines
The easiest way to spot a worn liner is to look at the damage and then think about how that surface will touch the flower.
| Condition | Status | Action |
|---|---|---|
| Light organic staining or discoloration | Normal wear | Continue using |
| Pollen accumulation | Contamination | Hand-wash and lay flat to dry |
| Wrinkled surface | Maintenance needed | Iron or mist and press inside the Microfleur |
| Singed or brown edges | Heat damage | Replace if the fabric weakens |
| Charred holes or thinning | Replacement required | Replace immediately to prevent damage to pads and platens |
Pads should be replaced if they still feel damp after drying, start to smell, or show scorched or thinned spots. Clips need replacement when they stop snapping on firmly or start feeling loose. Platens should be replaced if you see any warping, cracked vents, or melted areas.
When wear starts showing up as weak pressure, trapped moisture, or transfer marks, the next move is to match the symptom to the part causing it.
Troubleshooting Poor Results and Key Takeaways
Common Problems Linked to Specific Parts
If the finished press looks off, match the symptom to the part below. The table makes it easy to spot the part causing the issue and what to do next.
| Problem | Likely Part Issue | Fix |
|---|---|---|
| Browning or scorching | Pads or liners overheated; cycle ran too long | Shorten bursts and replace scorched pads |
| Damp or sticky flowers | Saturated pads or moisture on the platens | Wipe platens between cycles and confirm pads are dry before starting |
| Curling, wrinkling, or fabric marks on petals | Creased or debris-covered liners | Hand-wash liners, dry flat, and iron or mist before use |
| Uneven flattening | Loose clips or warped platens | Re-clip all sides firmly and check platens for warping |
| Sticking to liners | Dirty liners or overlapping flowers | Wash liners and make sure flowers do not touch or overlap during loading |
| Shifting specimens | Insufficient clip tension | Use extra clips for long or heavy specimens |
For layered blooms, remove dense inner petals before preparing flowers for pressing. That small prep step can save a lot of frustration later.
Conclusion: The Parts That Matter Most for Consistent Pressing
Once you fix the symptom, the next result usually comes down to a few basics: clean, dry, flat parts and even compression.
Each part in a microwave flower press has its own role. Platens hold the shape of the press and let moisture escape through the vents. Pads draw moisture away from the flower. Liners shield delicate petals and help keep the surface smooth and clean. Clips keep pressure even across the full press. Then there’s the layer order. Get that wrong, and even good parts can still lead to messy results.
If a part no longer fits well or starts affecting pressure or moisture flow, replace it.
FAQs
How often should I replace the pads and liners?
Replace cotton lawn liners once they’re stained enough to trap pollen that might carry over to the next batch. You can try washing them first, but sometimes a fresh liner is the safer call if you want to avoid leftover residue.
Wool pads tend to hold up for hundreds of cycles when you take care of them. In most cases, you won’t need to swap them out unless you see clear wear or damage. And if the liner has permanent stains, that’s usually normal - it won’t affect future batches.
Can I press more than one flower at a time?
Yes. You can press multiple flowers at once in your Microfleur press, as long as they don’t overlap.
For the best results, press flowers with similar colors together. It also helps to start with the lightest colors first, which can reduce pollen transfer.
If you’re working through a big batch, extra refill pads and liners let you keep pressing while your main set cools.
What flowers work best in a microwave press?
Many flowers and foliage do well in a microwave press. Good picks include zinnias, roses, sunflowers, tulips, daffodils, day lilies, geraniums, purple bells, ferns, and long leaves.
Start with fresh specimens and choose them with care. Small flaws don't disappear in the press - they tend to stick around. With layered flowers like daffodils, take out the hidden petals and press them on their own. And before you use your best blooms, test the timing with a few imperfect ones. It can save you a headache later.





















