










You can press flowers for a journal cover in about 1 to 4 minutes instead of waiting 3 to 7 days - but only if you use short microwave bursts, cool the flowers between rounds, and seal the cover after gluing.
If I want a cover that stays flat and holds up to daily use, I focus on six things:
- Pick flat flowers like pansies, daisies, violas, fern fronds, grasses, and small leaves
- Harvest dry blooms with no dew, bruises, or wet centers
- Load the press in the right order so moisture can escape
- Microwave in short bursts: start at 25 to 30 seconds, then use 10- to 20-second rounds
- Check after cooling, not while the press is still warm
- Glue lightly and seal only fully dry flowers to help stop warping, mold, and browning
A few numbers matter here. Thin flowers often dry in 80 to 90 seconds total, while thicker blooms can take up to 4 minutes across several short cycles. And if your journal is 5 x 8 inches or 6 x 9 inches, sizing flowers before you press them saves a lot of trouble later, especially if you track your results in a pressed flower journal.
What this comes down to is simple: flat flowers, short bursts, full drying, and a thin seal. That’s how I get a clean cover without burnt petals, damp centers, or bulky spots.
Pick the Right Flowers and Load the Press
Flowers that work best for journal covers
For journal covers, flat flowers are the easiest to work with. Pansies, violas, daisies, cosmos, hydrangea florets, fern fronds, grasses, and small leaves usually press well and sit flat against the cover surface.
Thicker blooms like roses, tulips, and daffodils take a bit more setup. You may need to remove inner petals, cut the bloom in half, or press it from the side. With trumpet-shaped flowers, trim the base first and flatten the bloom before pressing.
How to harvest and prep flowers before pressing
Choosing and preparing flowers for pressing should happen on a dry day, after the morning dew has fully dried off. Use fresh blooms that don't have bruises or damage, since small flaws tend to stand out once the flowers are pressed.
Trim stems short, then sort the flowers by thickness so they dry at a similar rate.
How to arrange flowers inside the press
Microfleur sells microwave flower press kits in two sizes: the 5-by-5-inch Regular for smaller flowers and leaves, and the 9-by-9-inch Max for larger blooms or several specimens at once.
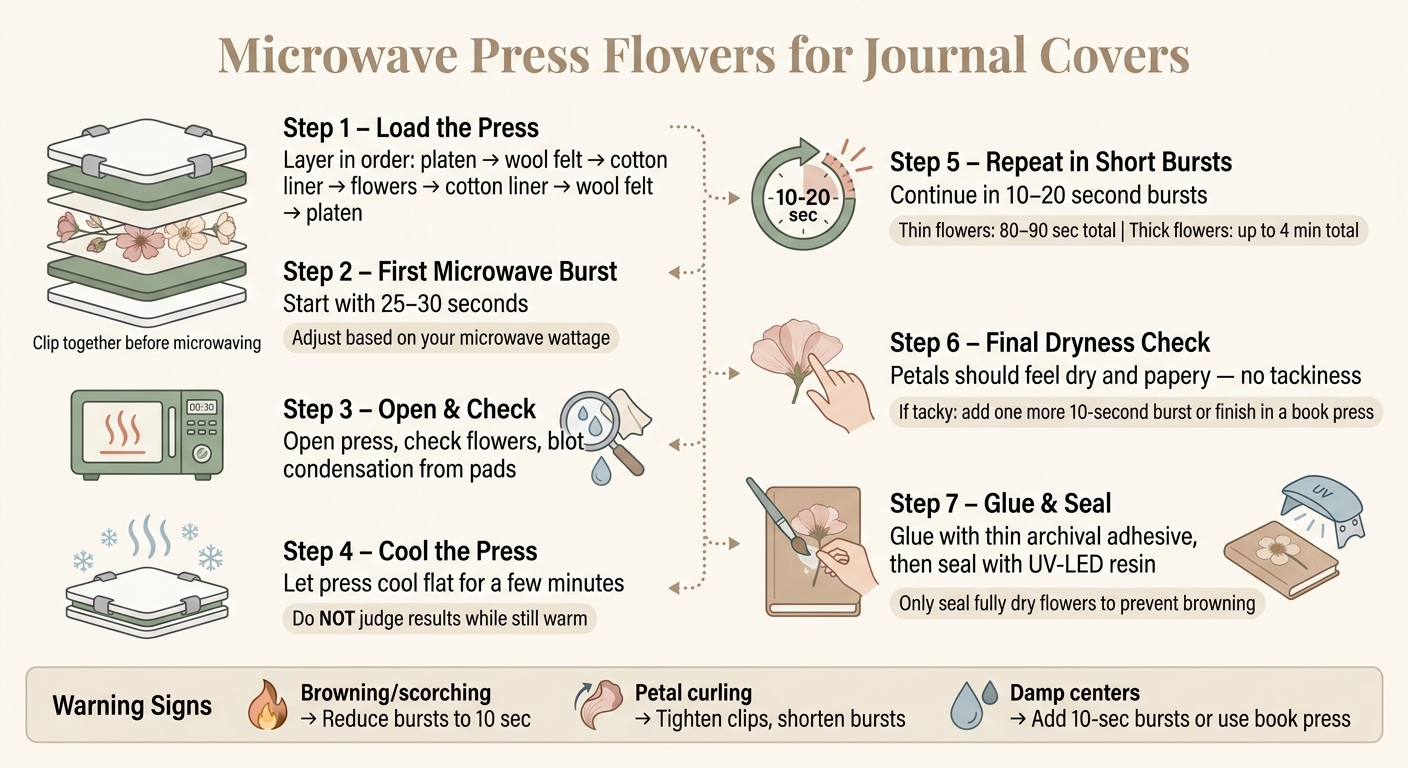
Both kits use the same layer order:
- platen
- wool felt pad
- cotton liner
- flowers
- cotton liner
- wool felt pad
- second platen
Clip the stack together before placing it in the microwave.
Lay each flower fully flat on the liner, with no overlap. Leave a little room between specimens so moisture can escape and the flowers don't stick to each other.
If you're pressing longer pieces, like fern fronds that go past the 5-inch press, you can clip two Regular kits side by side to fit the full length. Refill packs and replacement liners help if you're doing batch after batch. Microfleur also sells ebooks and online courses on flower pressing and pressed flower art.
Once the press is packed evenly, go straight into short microwave cycles and cooling.
sbb-itb-80d8183
How to Press Flowers in Minutes (Microwavable Flower Press Tutorial - Microfleur)
Microwave Timing, Cooling, and Safe Handling
How to Microwave Press Flowers for Journal Covers: Step-by-Step Guide
Start with short microwave cycles and check often
Once the press is loaded, use short microwave bursts instead of one long run. Timing changes based on your microwave’s wattage, so start with 25 to 30 seconds, then move in 10- to 20-second bursts. After each burst, open the press, check the flowers, and blot any condensation from the pads. Stop when the petals feel dry and papery.
Thin, flat flowers can be done in 80 to 90 seconds total, while thicker blooms or flowers with more moisture may need up to 4 minutes in cumulative bursts. Don’t wing it. Check between every cycle. And if your microwave tends to run hot, try a few spare flowers first to get the timing right.
Why cooling matters before you judge the result
Don’t judge the flowers while the press is still warm. Warm petals can feel soft and a little flexible even when they’re almost done. Heat does that. Let the press cool flat for a few minutes after each cycle, then check again.
After cooling, feel the centers for tackiness. If they still feel tacky, add another 10-second burst or move them to a book press to finish.
How to avoid browning, scorching, and under-drying
The biggest cause of damage is simple: cycles that run too long. As Microfleur's FAQ puts it:
"Too much heat burns flowers, pads, and liners. The most common reason for burned flowers, pads and liners is a pressing time that is too long." - Microfleur FAQ
If you spot browned edges, smell burning, or see petals starting to curl, cut your bursts down to 10 seconds and check more often. It also helps to press just one flower type per batch. Different flowers hold different amounts of moisture, so they won’t all dry at the same pace. If a flower is almost dry but the edges are getting brittle, stop microwaving and let it finish in a book press.
Use this quick check if a batch looks off after cooling.
| Problem | Likely Cause | Fix |
|---|---|---|
| Browning or scorching | Cycle time too long | Reduce bursts to 10 seconds; check more often |
| Petal curling | Uneven drying | Tighten clips; shorten bursts |
| Damp or tacky centers | Thick or dense centers | Add 10-second bursts or finish in a book press |
| Brittleness | Over-drying | Reduce total microwave time; remove while slightly soft |
Dry, cooled flowers are ready for color protection and layout planning.
Protect Color and Plan the Cover Design
How to keep flowers brighter after pressing
Start with fresh blooms at peak color. If a flower is bruised or blemished, that damage will show up after pressing. Short microwave cycles can help hold color better, especially with high-pigment blooms like zinnias.
After the flowers are cool and fully dry, store them flat in clean paper or archival sleeves in a dry area. This helps them stay brighter and cleaner before you use them. Cleaner flowers also look better under glue and sealant. Once the flowers are dry and protected, move straight to the cover layout.
How to plan a cover layout that fits the journal
When the flowers are ready, plan the cover before gluing anything down. Sketch the layout first. Then keep the spine, edges, and any elastic closure clear so the journal can still handle daily use without trouble.
If a bloom feels too thick or layered, trim hidden petals or use single petals instead of the whole flower. That keeps the cover flatter and easier to seal.
Use nylon tweezers to place delicate pieces. A flat layout with safe margins makes sealing and everyday handling much easier.
Assemble and Seal the Journal Cover
Attach pressed flowers without tearing or warping
Now that your layout is set, start attaching the flowers from the largest pieces outward. Work on a clean, dry journal cover or chipboard base so the surface stays flat and easy to use. Begin with the biggest blooms to anchor the design, then tuck smaller petals and bits of foliage into the open spaces. Use nylon tweezers to place fragile pieces without crushing them.
Add a thin layer of clear-drying archival adhesive under each piece. A light hand matters here. Too much glue can seep through thin petals and leave marks you’ll still see after it dries. Let the adhesive dry all the way before touching the cover again.
After the adhesive dries, seal the surface so it can stand up to regular handling.
Seal the cover for everyday handling
Once the adhesive is dry, brush on a thin top coat. Use a thin brush-on sealant or UV-LED resin, such as Microfleur's Hand Crafter UV-LED Resin, to create a hard, smooth finish that helps protect the flowers from wear and moisture. Only seal flowers that are fully dry. If moisture gets trapped under the finish, the flowers can turn brown.
Cure the finish indoors in a dry room. This sealing technique is also essential when making pressed flower jewelry to ensure a professional, long-lasting finish.
Conclusion: Key Steps for Clean, Durable Journal Covers
Press dry flowers, place them with tweezers, glue them with a thin adhesive layer, and seal the cover for daily use.
FAQs
Can I press thick flowers for a journal cover?
Yes. Flat flowers are often the easiest to press, but the Microfleur microwave press is made to help cut down on browning and mold, which can happen with thicker blooms.
If you're pressing layered flowers like roses or sunflowers, take off any petals that won't be seen once the flower is flat and press those petals on their own. For larger blossoms like roses and lilies, the Microfleur Max can work well too.
How do I know when pressed flowers are fully dry?
Pressed flowers are dry when they look flat and feel dry to the touch after your microwave bursts. Take them out carefully.
If they still need more time, press them again in short bursts. Drying time depends on your microwave’s power, so start small. A good starting point is 25 seconds for the first burst until you get a feel for what “dry” looks and feels like with your setup.
What sealant works best for daily-use journal covers?
For daily-use journal covers, Mod Podge is the best pick for sealing. Brush a layer over your pressed flower design to help seal the flowers and make the cover hold up better over time.
That extra coat helps protect your botanical art while your journal gets used day after day.





















