










If I want better color and flatter flowers, I start with the driest blooms I can and use short microwave bursts instead of one long run.
That was the clear result from these tests. I saw that starting moisture had the biggest effect on color, shape, and drying time. Flowers with visible surface water browned more often, needed more cycles, and dried less evenly. Flowers that started surface-dry were easier to press and reached that papery, not brittle finish with less risk of scorching.
Here’s the short version:
- Drier flowers performed best
- 20 to 30 second bursts gave more control than one long cycle
- Opening the press and wiping moisture helped reduce trapped steam
- Reusable cotton/wool liners moved water away better than absorbent paper
- Thickness mattered more than looks when estimating drying time
- A flower was done when it felt dry, flat, and papery after cooling
For me, the biggest lesson is simple: wet flowers dry unevenly. Thin petals can overheat while thick centers still hold moisture. That mismatch leads to browning, curling, or a flower that looks done but still feels sticky once it cools.
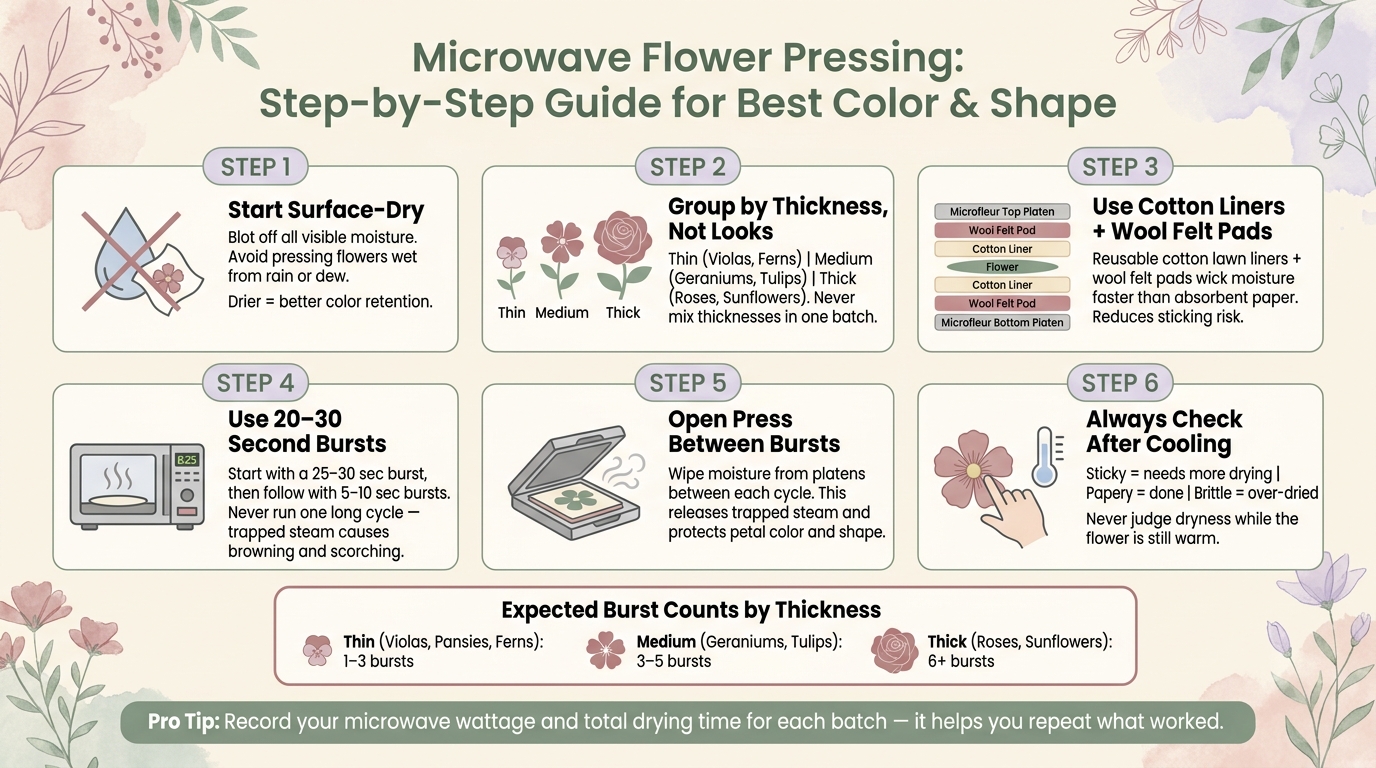
Microwave Flower Pressing: Step-by-Step Guide for Best Color & Shape
How to Press Flowers in Minutes (Microwavable Flower Press Tutorial - Microfleur)
sbb-itb-80d8183
Quick Comparison
| Factor | Better Result | Poorer Result |
|---|---|---|
| Starting moisture | Surface-dry or slightly wilted flowers | Flowers with visible moisture |
| Microwave timing | Short bursts, usually 20–30 seconds | One long cycle |
| Drying layers | Reusable cotton liners + wool felt pads | Damp absorbent paper |
| Thickness handling | Group by thin, medium, thick | Mixed thickness in one batch |
| Final dryness check | Cool first, then feel for a papery texture | Judge while still warm |
In plain terms, I’d prepare flowers for pressing by blotting off water and sorting by thickness, run short bursts, and check them only after they cool. That cuts down on browning and gives me a better shot at keeping color and shape.
Cycle Length and Moisture Release Results
The big win here was gradual steam release. Short, repeated cycles gave the best control over how heat and moisture moved out of the flower. That control is what helped protect color and shape.
Short Bursts Versus One Longer Cycle
Short cycles handled heat and moisture better. One long cycle made overheating more likely. Steam can get trapped inside the press, and that can darken petals, make them shrivel, or scorch liners and pads.
"The most common reason for burned flowers, pads and liners is a pressing time that is too long." - Microfleur
A good starting point is a 25- to 30-second cycle, followed by 5- to 10-second bursts. Wipe moisture from the platens between cycles to cut down steam buildup. That rhythm helps flowers stay flat and hold their color. For more advanced techniques, consult a pressed flower project book.
That leads straight into the next variable: how paper type affected moisture release.
| Cycle Pattern | Moisture Release | Color Result | Shape Result | Scorching Risk | Total Drying Time |
|---|---|---|---|---|---|
| Short Bursts | Gradual; platens wiped between cycles | Vibrant; pigments locked in quickly | Flat, stiff, wrinkle-free | Low | 1–4 minutes total |
| One Long Cycle | Trapped; steam builds inside the press | High risk of browning or darkening | May shrivel or stick to liners | High; pads and liners can burn or melt | Unpredictable; often results in damage |
How Results Changed as Flowers Got Wetter
Flowers with visible moisture were harder to finish cleanly. Surface-dry flowers were much more predictable.
Damp flowers released steam unevenly. Wetter samples showed more browning, slower drying, and less even flattening. Thicker parts held moisture longer, while thinner petals were already getting close to scorching. In plain terms, the flower dried at two different speeds at once. Wet flowers needed more checks and more cycles. Open the press between bursts so steam can escape; flowers pressed while still wet from rain or dew browned more often.
For mixed-thickness blooms, burst cycles made it easier to spot the gap between thin petals and thicker centers before the thinner parts overheated - something a long cycle cannot do.
Next, paper absorbency becomes the deciding factor once cycle timing is under control.
Paper Setup and Flower Thickness Comparison
Absorbent Paper Versus Reusable Liners
Once cycle timing was dialed in, the drying layers became the big variable.
Absorbent paper can soak up a lot of moisture, but it dries slowly. That means it may stay damp against the petals longer than you want. And when that happens, flowers are more likely to stick or soften in the wrong places.
Reusable liners worked better in one key way: they moved moisture out faster during short bursts. Cotton lawn liners paired with wool felt pads wick water away much faster. Microfleur's washable cotton liners also have a practical edge - you can clean them once stains start building up.
That gap came through most in drying speed and sticking risk.
| Factor | Absorbent Paper | Reusable Liners (Cotton/Wool) |
|---|---|---|
| Absorbency | High but slow; moisture lingers against petals | High and rapid; wool pads wick moisture away quickly |
| Moisture Checking | Difficult | Easy; press opens quickly between bursts |
| Sticking Risk | High; petals can bond to damp paper | Low if specimens are spaced apart |
| Reusability | Low; usually replaced per batch | High; liners are washable and felt pads are long-lasting |
| Fit for Thin or Thick Flowers | Better for thin flowers; thick specimens often mold before drying | Excellent for both; felt cushions thicker centers |
One small but important detail: felt pads can get damp after several batches. If that happens, swap them out or let them air dry between sessions so absorption stays steady.
Thin, Medium, and Thick Flowers
After paper choice, flower thickness had a big effect on how evenly moisture left the bloom.
Thin flowers like pansies, violas, and fern fronds dry fast and flatten with very little effort. They’re the easy cases. thick flowers are much trickier to prepare. The outer petals may feel dry, while the center stays soft and sticky. It’s a little like toast that looks done on the outside but is still soft in the middle.
For thick blooms, it helps to remove hidden inner petals or press petals on their own. That gives trapped moisture a way out.
| Thickness Group | Expected Cycle Range | Where Moisture Remained | Shape Retention | Color Risk | Final Texture |
|---|---|---|---|---|---|
| Thin (Violas, Pansies, Ferns) | 1–3 bursts (20–30 seconds each) | Edges dry first; base last | Excellent; flattens easily | Low; colors often appear more vivid | Papery and stiff |
| Medium (Geraniums, Tulips) | 3–5 bursts | Petal bases and overlapping areas | Good; profile cuts improve flattening | Moderate; fading risk if cycles run long | Stiff and parchment-like |
| Thick (Roses, Sunflowers) | 6+ bursts | Deep centers and dense centers | Variable; requires thinning or deconstruction | High; prone to browning if center stays damp | Leathery when under-dried, brittle when over-dried |
These thickness differences affected more than drying time. They also shaped color, form, and how dry the flower felt at the end.
Observed Effects on Color, Shape, and Dryness
Color Retention by Starting Moisture Level
With cycle length and paper type held steady, starting moisture was the main factor left to watch.
Surface-dry flowers held their color better. Wetter blooms turned brown sooner because they needed more total drying time. And that’s where trouble starts: extra microwave time increased browning when microwave flower pressing.
Shape and Texture After Cooling
Color and dryness didn’t always shift together.
A flower can look dry and still hold moisture, so check dryness after cooling and use touch instead of appearance. Sticky means damp. Papery means dry. Brittle means over-dried.
"If they are sticky, then they need another burst... If the flowers have a papery feel, but not crispy, then they are dried." - Microfleur
Conclusion: Key Takeaways for Faster, Better Pressing
The Clearest Patterns from the Test
Taken together, the tests point to one main rule: start as dry as possible. Starting moisture had the biggest effect on the outcome. Drier flowers needed fewer cycles and kept their color better.
Short bursts worked better than long cycles because they lowered the risk of scorching. A 20–25 second burst is a safer starting point when you're working with a flower type you haven't pressed before.
Thickness turned out to be a better signal of drying time than appearance. So instead of sorting blooms by how they look, sort them by thickness first. This is a standard technique when using a microwave flower press for consistent results. That's one of the fastest ways to get steadier results from batch to batch.
How to Apply These Results at Home
At home, the process is pretty simple: blot off visible moisture, group flowers by thickness, use 20–30 second bursts, wipe the platens, and let the flower cool before you check for that papery feel.
That cooling step matters more than it might seem. A flower can feel one way when it's warm and another once it settles. If it feels papery, it's done. If it still feels sticky, it needs more drying.
It also helps to write down your microwave wattage and the total drying time. Both can change the result, so having a record gives you a much better shot at repeating what worked.
These small habits cut down on guesswork and make color and shape easier to predict for your pressed flower projects.
FAQs
Can I press flowers right after picking them?
Yes. In fact, fresh flowers work best.
Just make sure they’re dry before you put them in the press. If they’re damp from rain or morning dew, they can dry unevenly or start to brown.
If a flower is thick, it helps to thin it out first. You can also press the petals on their own so everything dries the way it should.
Why do my flowers turn brown in the microwave press?
Flowers often turn brown when you press them for too long or let them get too hot. As Microfleur notes, almost anything will burn if it gets too hot.
The usual culprit is simple: the press stayed in the microwave too long. Short microwave bursts work best, with rest time between each round. You may also need to tweak the timing based on your microwave’s power.
How do I know when a pressed flower is fully dry?
A pressed flower is dry when it feels dry to the touch after a few short microwave bursts and the plastic panels show no visible moisture when you open the press to check or wipe them.
Keep microwaving in short intervals, then let the press rest, until that moisture is gone. Even if the flower looks almost dry, it can still release more moisture. If you’re not sure, check it again within a day or so.





















