










Peonies keep more color when I dry them in thin layers, use low microwave power, and stop the moment the petals turn papery.
The main problem is water. Peony petals are thick, packed, and slow to dry, so heat can darken pink petals, yellow white ones, and brown red edges in as little as 10 to 30 seconds if I go too long. The fix is simple: pick the right bloom, remove extra inner petals, use dry acid-free paper, and cool the press between rounds.
Here’s the full idea in one glance:
- Pick the bloom early: use peonies at the marshmallow stage
- Keep petals dry: never press blooms with surface moisture
- Thin the flower first: dense blooms dry better when flattened into fewer layers
- Use low microwave power: about 30% to 50%
- Heat in short rounds: start with 30 seconds, then use 10- to 30-second bursts
- Cool between rounds: trapped steam is a major cause of color loss
- Watch color by petal type: pink is easier, white marks fast, red darkens fast
- Store flat and dark: light, heat, and humidity can dull petals after pressing —a common challenge when using flower press kits for DIY crafts
A short comparison helps show where extra care matters most:
| Peony color | Main risk | What I do |
|---|---|---|
| Pink | Color can turn dull if overworked | Use light heat and check often |
| White | Yellowing or tan marks | Stop as soon as petals feel papery |
| Red | Fast darkening and brown edges | Use cooling gaps, not longer heating |
In short: less heat, less steam, and less petal bulk give me the best shot at saving peony color.
Choose the Right Peony Before You Press
Once the bloom stage is right, the next step for keeping color is choosing the right flower. Use peonies that are fresh, fully dry, and free of damage. Bruises, browning, and trapped moisture tend to stand out after pressing.
Pick Blooms at the Marshmallow Stage
Pick peonies at the marshmallow stage: soft, partly open, and fully dry.
Separate Thick Peonies Into Thinner Layers
Dense, many-petaled peonies press better when you thin them first. Remove some of the hidden inner petals so the bloom sits flatter and dries more evenly. Press those removed petals on their own.
Set petals in a single layer with no overlap. If petals touch, they can fuse as they dry. Once the bloom is thinned and laid flat, heat control matters most.
sbb-itb-80d8183
Adjust Your Approach for Pink, White, and Red Peonies
Once your blooms reach the marshmallow stage and you’ve thinned them into a flat layer, color starts to matter. Pink, white, and red peonies don’t react to heat the same way, so your microwave timing should shift a bit based on the bloom in front of you.
Here’s the quick guide:
| Peony Color | Color Behavior | Heat Control |
|---|---|---|
| Pink | Holds color well; may deepen slightly as moisture leaves. | Gentle heat; check after each short burst. |
| White | Prone to yellowing, tanning, or heat marks. | Stop when petals feel papery. |
| Red | Pigments darken fast; edges can brown. | Use cooling gaps instead of longer bursts. |
Final color varies by cultivar, bloom age, moisture, and microwave wattage.
Pink Peonies Press More Forgivingly
Pink peonies are the easiest to work with. They tend to hold their color well, even as moisture leaves the petals. You may notice the shade deepens a little, which is normal.
Still, don’t push your luck. Use gentle heat and check after each short burst. If you keep going once the petals start looking dull or muddy, the flower can lose that soft pink look in a hurry.
White and Red Peonies Need Tighter Heat Control
White and red peonies need a lighter touch. White petals can yellow, tan, or pick up heat marks fast, so stop the moment they feel papery. Red blooms have a different issue: their pigment darkens fast, and the edges can brown if the heat runs too long.
A good rule here is simple:
- Press white peonies first to help keep pale petals clean.
- For red peonies, use cooling gaps instead of longer bursts if you want more flatness.
That small pause between heat rounds can make a big difference. It gives the flower time to release trapped moisture without getting scorched, which is often where color problems begin.
Once you see how each color behaves, you can match your microwave flower pressing kit and heating pattern to that level of sensitivity.
Set Up the Press With the Right Paper and Tools
After the bloom stage and color, paper choice has the biggest effect on color loss. So before you start pressing, get everything in place: a microwave-safe flower press, absorbent liners, acid-free paper, and nylon crafting tweezers.
Use Absorbent, Smooth, Acid-Free Paper
Cotton lawn liners or blotting paper pull moisture out of thick peony petals fast. That matters because less trapped moisture means less color loss. Swap out damp liners between heating rounds so steam doesn’t build up. When the liners are dry and clean, the petals are set for placement.
Layer Petals Evenly Before Heating
Use nylon tweezers to place each petal flat between the cotton liners. They make it easier to position petals with care and help avoid transferring skin oils that can leave spots. Keep every petal separate. If petals overlap or even touch, they can stick together as they dry. Check the layout before heating, because you won’t be able to move the petals once the process starts. A flat, even layout is the last thing to handle before heating.
Heat in Short Bursts, Cool Between Rounds, and Store Flat
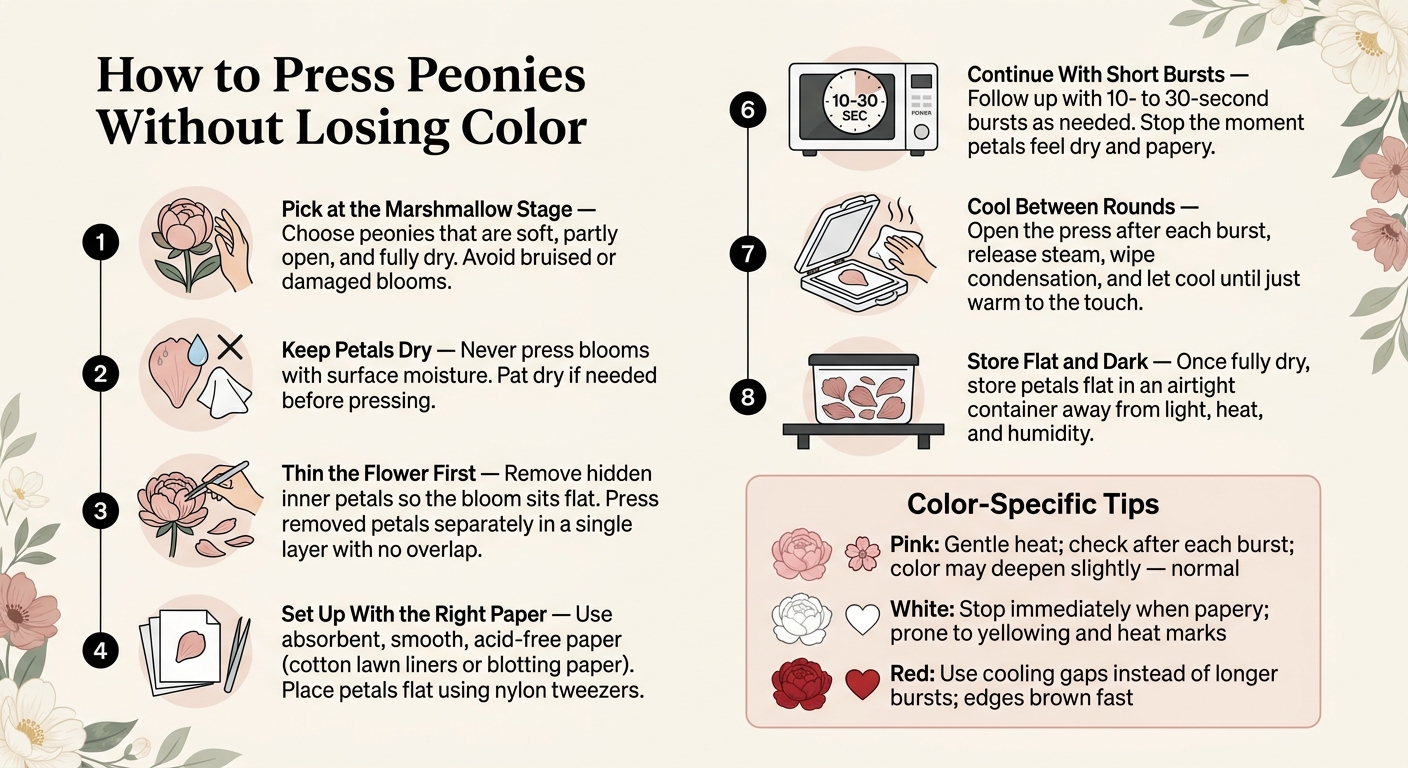
How to Press Peonies Without Losing Color: Step-by-Step Guide
Once the petals are flat and separated, switch to short, low-power microwave bursts to help keep their color. Start at 30% to 50% power and heat for about 30 seconds. After that, continue with 10- to 30-second bursts as needed. This slower approach helps the petals dry before the pigment starts to brown. Stop as soon as the petals are dry.
Build in Cooling Gaps to Protect Color
After each burst, open the press to release steam, wipe away any condensation, and let it cool until it's just warm to the touch. That short pause can make a big difference, especially for white and red peonies.
Finish Drying and Store Away From Heat and Light
A fully pressed peony petal should feel dry, flat, and papery. It shouldn't have any cool or bendy spots. Check the center closely, since moisture often lingers in the thicker middle even when the outer edges seem dry.
Use nylon tweezers to lift the finished petals from the liners. If one area still feels soft, press it again with a fresh, dry liner for one or two short bursts. Once the petals are fully dry, store them flat in an airtight container away from light, heat, and humidity.
Conclusion: The Key Steps for Saving Peony Color
Peony color holds up best when moisture leaves fast and evenly.
Three choices have the biggest impact: bloom stage, paper, and heat. Start with a fresh, fully dry peony at the marshmallow stage. Thin dense blooms so they press flat instead of trapping moisture. Then use dry, smooth, absorbent, acid-free paper, and swap out any liners that turn damp. From there, heat control does the heavy lifting.
Keep the microwave in short bursts, and adjust based on your microwave’s wattage. If the press feels hot, let it cool before the next round. That small pause can make a big difference.
After the flower is dry, storage helps protect the color you worked to keep. Store finished flowers flat in a dry, dark spot, away from heat and light. Small changes at each step help keep peony color bright.
FAQs
Why did my peonies turn brown while pressing?
Peonies usually turn brown because of too much heat or moisture during pressing.
If the press gets too hot from nonstop use, it can scorch the petals. Let it cool down between cycles.
Browning can also happen when flowers stay in the press too long or when moisture gets trapped inside. Use dry liners, and give the press a break between short bursts so that moisture can escape.
Can I press fully open peonies or only marshmallow-stage blooms?
You can press both, but each one needs a slightly different approach if you want the best result. Peonies are thick, petal-heavy flowers, so pressing a whole bloom can be tricky.
For blooms that are fully open, remove a few petals from the back so the flower can dry flatter and won’t get gummy. You can also take the flower apart and press the large petals or the center on their own. That helps each part dry all the way through and hold its shape better.
How do I know when a pressed peony is fully dry?
Check the press panels for moisture. After each short microwave burst, open the press and wipe away any steam or dampness.
Keep going in short intervals until you don’t see any moisture. Once the peony looks flat and feels dry to the touch, it’s ready to come out.





















