










If you want the short answer: I’d use a binder for fast viewing and a box for bulk storage. Both work, but only if the flowers are fully dry first and kept in a cool, dark place at 30% to 50% humidity.
Here’s the simple breakdown:
- Box: better for storing a lot of flowers in less shelf space
- Binder: better for flipping through flowers and finding one fast
- Box downside: slower to browse
- Binder downside: fills up sooner and can get heavy
- Both need: acid-free materials, low moisture, low light, and light handling
If I were making cards, resin pieces, or gifts often, I’d keep my main set in a binder. If I had extra stock, I’d keep that in a flat storage box. That working-set plus backup-stock setup is often the easiest way to stay organized.
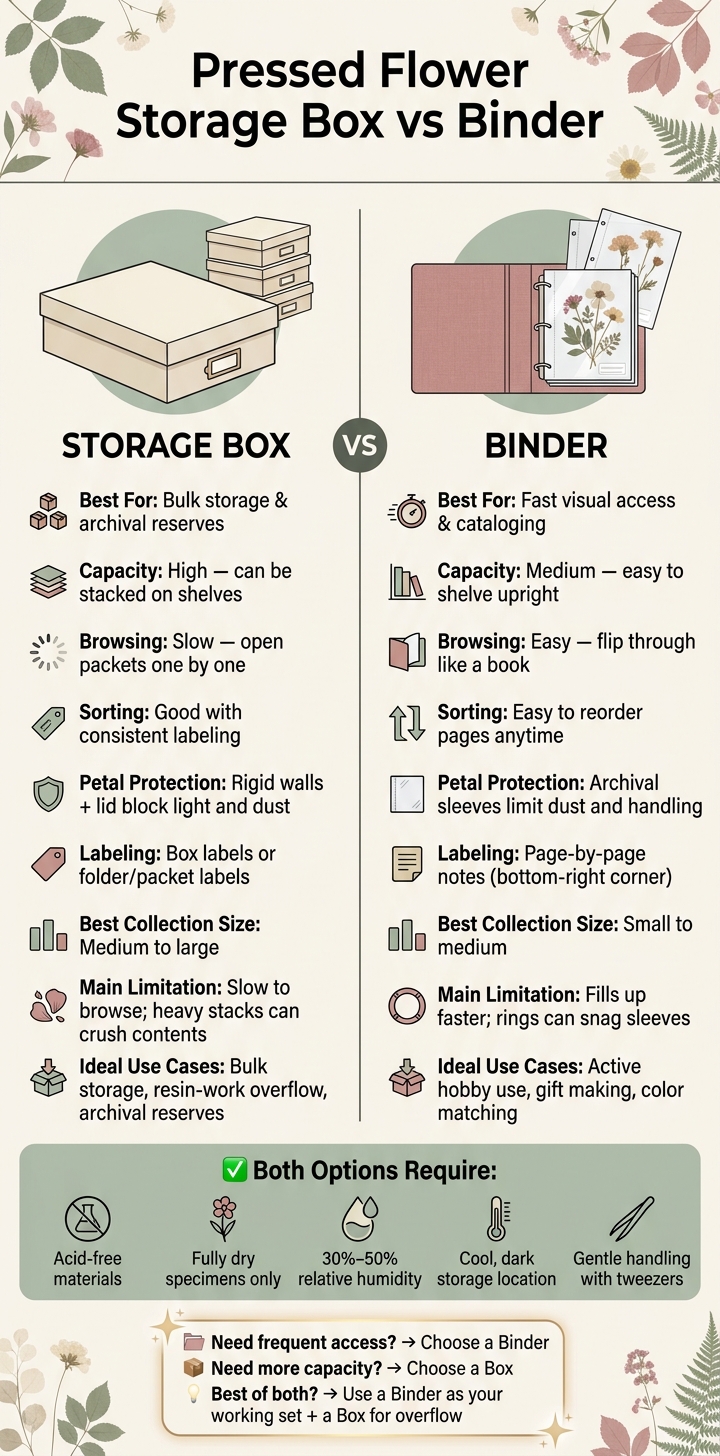
Pressed Flower Storage Box vs Binder: Quick Comparison Guide
An easy practical way to store dried pressed flowers
sbb-itb-80d8183
Quick Comparison
| What matters | Storage box | Binder |
|---|---|---|
| Best for | Bulk storage | Fast access |
| Capacity | Higher | Medium |
| Browsing | Slow | Easy |
| Sorting | Fine with labels | Easy to reorder |
| Petal safety | Strong outer protection | Less handling during viewing |
| Labeling | Packet or folder labels | Notes on each page |
| Best collection size | Medium to large | Small to medium |
Bottom line: I’d pick a binder if I need to see and choose flowers often, a box if I need to store more at once, or both if I want daily access without crowding my main collection.
Pressed flower storage box: Best for bulk storage
A shallow archival box works well when you need to store a lot of pressed flowers at once. It keeps specimens flat inside labeled envelopes or acid-free paper sleeves, which makes sorting much easier. Just make sure every flower is fully dry before it goes in. A sealed box can hold in leftover moisture, and that can damage the specimens.
After packing the box, store it flat in a cool, dry, dark place. Don’t stand it on its side. If you do, the specimens can shift and warp over time. At that point, the system lives or dies on labeling.
Space, sorting, and labeling inside a box
Use one labeled enclosure for each specimen. Include the flower name, collection date, and project on every packet. That matters even more when you’re storing a large batch at once. Good labels save a lot of time later when you need to track down one flower from a big collection.
If your labeling is inconsistent, though, the box gets frustrating fast. Finding one specific specimen can turn into a slow, packet-by-packet search. This format works best when you stick to the same labeling method from the start.
Protection and viewing tradeoffs
A closed box blocks light and cuts down air exposure, which helps protect color and petals.
The downside is access. You can’t flip through a box the way you can with a binder. In most cases, browsing means opening packets or envelopes one by one. Use tweezers when lifting specimens so you don’t crush the petals.
If fast browsing matters more than storing a larger number of flowers, the binder format is a better fit.
Pressed Flower Binder: Best for Visual Access and Cataloging
If you want fast browsing and simple cataloging, a binder is usually the better pick. It keeps pressed flowers visible, sortable, and easy to move around, especially when you use PVC-free, acid-free pages. That part matters. Non-archival sleeves can hold acids that yellow pressed flowers over time.
A binder is safe for storage when three things line up: acid-free materials, fully dry specimens, and dry storage. Keep binders at 30% to 50% relative humidity, and place a small silica gel packet inside. Only store specimens that are fully dry.
Page-based sorting and easy rearranging
Binders make it easy to see what you have and change the order whenever you need to. You can sort pages by flower type, color, season, or project. And when your plans shift, the binder can shift with them. If you pressed lavender in July and want to use those pages for a gift project in October, you can just move them.
This setup works best for small-to-medium collections. Once you start building a large set, binders can get heavy and a bit awkward to handle.
Protection, visibility, and labeling on each page
Sheet protectors and glassine interleaving help cut down on how often you touch the flowers. That’s a big plus, because less handling means less chance of transferring skin oils, which speed up decay in dried plant material.
When you do need to move a specimen, use fine tweezers and keep the backing sheet flat with both hands. Picking it up by one corner might seem harmless, but brittle petals can snap fast.
A binder also makes labeling more consistent because each page gives you a clear place for notes. Put a label in the bottom-right corner with the botanical name, collection date, and location notes. Use a pigment-based archival pen such as Sakura Pigma Micron. Standard ballpoint or gel ink can fade in light and may bleed if moisture gets in.
That visibility-versus-capacity tradeoff is the heart of the box-vs-binder choice.
Box vs binder: Side-by-side comparison
If you want the short version, this table gives you a quick recap of the tradeoffs.
| Feature | Storage Box | Binder |
|---|---|---|
| Capacity / Footprint | High capacity; can be stacked on sturdy shelves | Medium capacity; easy to shelve upright |
| Sorting & Rearranging | Sheets slide in and out | Easy to flip through and reorder individual pages |
| Petal Protection | Rigid walls and a lid limit dust and crushing | Archival sleeves limit dust and handling |
| Viewing Access | Requires removing sheets to view | Immediate; flip through like a book |
| Labeling Options | Box labels or folder labels | Page-by-page notes |
| Best Use | Bulk storage, archival reserves, and resin-work overflow | Cataloged collections, active hobby use, and color matching |
| Main Limitation | Heavy stacks can crush contents | Rings can snag sleeves or crease pages |
Just keep this in mind: storage conditions matter as much as the format itself. A great binder or box won't help much if the setup around it is poor.
Which format fits hobby use, gift making, and resin work
For day-to-day hobby use, a binder usually makes more sense. You can flip through pages fast, compare colors, and pull what you need without much fuss.
For gift making, a binder also works well. It makes selection easier, which helps when you're matching petals to a card, frame, or small handmade piece.
For resin work, the best setup is often split: use a box for overflow and a binder for selection. Think of the binder as your working set and the box as backup stock.
A simple decision rule and hybrid setup
Choose a binder if access matters most. Choose a box if capacity matters most.
A simple hybrid setup often works best: keep active favorites in a binder, and store overflow in a box. The next step is storage care, which matters no matter which format you use.
Storage rules for both options and final takeaway
Storage rules that apply to pressed flowers in any system
No matter which format you pick, storage conditions matter more than the container. That’s why the box-versus-binder choice mostly comes down to how you plan to use the flowers.
Store only fully dry flowers. If moisture gets trapped, you can end up with mold, rot, and discoloration. This is why microwave flower pressing is so effective for moisture removal. Use acid-free envelopes or paper, keep specimens flat, and place them in a cool, dry spot with about 30% to 50% humidity.
Once you’ve handled moisture and paper quality, the next big risks are light and handling. Keep your flowers in a dark cabinet or closet, check them now and then for curling or fading, and use tweezers when you handle them.
The bottom line: use a binder for frequent access, a box for bulk storage, or both for a working-plus-backup system.
FAQs
How do I know my flowers are fully dry before storage?
Your flowers are ready for storage when they feel brittle to the touch. If you used a press, check the cardboard and blotting paper too. They should be fully dry so no humidity gets trapped inside.
If you're using a sealant or spray, wait until the flower is fully dry and brittle before you apply it. Even a little leftover moisture can lead to mold, mildew, rotting, or damage over time.
What kind of acid-free sleeves or paper should I use?
Use acid-free, lignin-free, buffered paper for sleeves. It helps keep pressed flowers from yellowing, turning brittle, or leaving stains as time goes on.
For labels, go with a thinner acid-free paper and glue it to one corner of the sleeve. Thick buffered paper can be a pain to feed through a home inkjet printer. For finished leaf storage, acid-free envelopes are a smart pick too.
When should I switch from a binder to a box?
Consider switching once your pressed flower collection outgrows what a binder can hold without getting stuffed. A storage box gives you a dedicated spot for larger batches of blooms, foliage, and extra liners.
It’s a smart pick if you press flowers in high volume or use them for projects like resin art or gift-making. That extra room helps keep your materials protected, sorted, and easy to grab when you need them.





















