










If I want the best color and shape from a wedding bouquet, I need to start fast, dry the flowers well, and accept that pressed flowers will end up flat.
Here’s the short version:
- Press within 1 to 2 days for the best shot at cleaner color
- Try not to wait past 5 days
- Dry petals before pressing to help stop mold
- Take thick blooms apart or trim them down so they dry more evenly
- Press flowers in a single layer with space between each piece
- Use short microwave cycles if I want same-day drying
- Check the center of each flower after cooling before framing
- Store flat, dark, and dry, then frame behind UV-protective glass
The main tradeoff is simple: I can keep color and outline better by pressing early, but I lose all 3D shape. A rose will not look like a full rose anymore. It becomes pressed art.
A few facts stand out from the article:
- Microwave pressing can dry flowers in under 4 minutes
- Slow weighted pressing can take 4 to 6 weeks
- Thick flowers like roses, tulips, and daffodils need prep first
- Surface moisture can lead to mold, browning, and dark spots
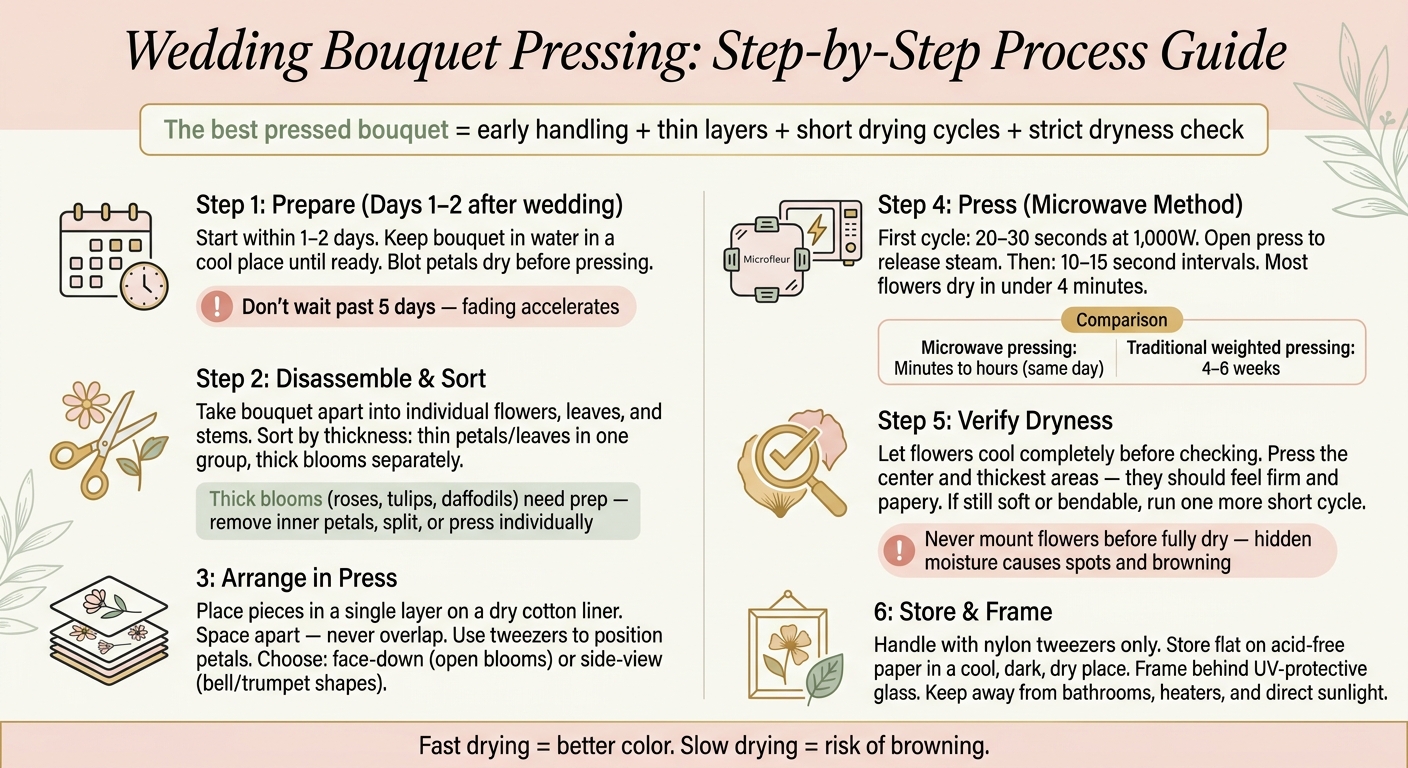
Wedding Bouquet Pressing: Step-by-Step Process Guide
DIY Pressed Flowers Wedding Bouquet Preservation
sbb-itb-80d8183
Quick Comparison
| Part of the process | What I do | Main risk if I skip it |
|---|---|---|
| Timing | Start in 1 to 2 days | More fading and breakdown |
| Drying prep | Blot petals dry | Mold and browning |
| Thick bloom prep | Remove bulk, split, or separate petals | Wet centers and brown spots |
| Arrangement | Space pieces apart, no overlap | Sticking, uneven drying, warped shape |
| Microwave pressing | Use 20 to 30 seconds first, then 10 to 15 seconds | Scorching or trapped steam |
| Dryness check | Cool first, then test center | Hidden moisture after framing |
| Storage | Keep flat on acid-free paper in a cool, dark, dry place | Yellowing, fading, or spots |
So if I had to sum it up in one line: the best pressed bouquet starts with early handling, thin layers, short drying cycles, and a strict dryness check before framing.
How to Prepare Fresh Wedding Flowers for Pressing
Start pressing within 1 to 2 days after the wedding, while the petals still feel firm and the color still looks rich. Wait too long, and the flowers start to fade fast. As Michelle Besu of Wild Coast Flower Preservation says:
"Flowers that sit in a vase for a week before shipping have already started breaking down, which affects what we can do with color and clarity."
Until you're ready to prep them, keep the bouquet in water and place it somewhere cool. Before anything goes into the press, make sure the petals are dry to the touch. Any surface moisture can lead to mold.
Once the bouquet is out of water, take it apart into individual flowers, leaves, and stems. Then sort everything by thickness. Put thin petals, delicate flowers, and leaves together. Group bulkier blooms and thicker stems separately. Pieces with similar thickness dry at a more even pace, which helps the press apply steady pressure across the batch. Flat blooms are the easiest to work with, while thicker flowers usually need trimming first.
Which Flowers Press Well and How to Handle Thick Blooms
Flat flowers usually press the cleanest. Pansies, violas, cosmos, poppies, and zinnias are good picks because they dry more evenly. Flat leaves and greenery tend to do well too.
Thick blooms need a little prep before pressing. Roses, tulips, and daffodils can be harder to press whole, and they may brown if you don't thin them first. Taking out some of that bulk helps the flower keep a cleaner outline and lowers the chance of brown centers.
| Flower | Preparation Technique | Why It Helps |
|---|---|---|
| Roses | Remove inner petals; press individual petals or split the bloom in half | Reduces thickness and helps prevent browning |
| Tulips | Cut vertically in half for two flatter pieces | Creates a flatter surface and reduces bulk |
| Daffodils | Remove inner petals that won't show when flat; press in profile | Speeds drying and helps preserve shape |
| Trumpet-shaped flowers | Unfold the bloom so it lies flat | Helps the flower lie flush against the paper |
The rule is simple: reduce bulk before the flower goes into the press.
Microfleur notes:
"Flowers with lots of layers of petals can be thinned out. Remove the petals that you won't see when the flower is flat and press those petals separately."
Color and Shape Preparation Checklist
Good prep has a big effect on how your pressed flowers look once they're framed. Before you start pressing, check each piece and make these small fixes:
- Set aside any blooms already browning or wilted
- Trim damaged edges cleanly with small scissors
- Shorten or remove stems unless you want them in the final design
- Blot petals dry if there's any surface moisture
- Leave space between pieces so they dry evenly
- Never overlap pieces; they can fuse as they dry
Bruises, cracks, and wilted spots don't disappear in the press. If they're in the fresh flower, they'll still show in the finished piece. A few extra minutes here can make a big difference.
How to Arrange Blooms to Protect Color and Shape
After you sort the bouquet by thickness, place each piece where you want it before you close the press. This is the moment to decide how every flower should look in the frame, a key part of flower pressing for beginners. Pick either a side view or a flat-face view, then use tweezers to nudge petals and stems into place.
Flowers can be pressed from the side to show their outline, or opened flat to show the full face of the bloom. Side views tend to work best for bell-shaped or trumpet-shaped flowers. Flat pressing is a better fit for flowers with an open face, like cosmos. Give each piece a bit of room so the pressing paper can pull out moisture evenly.
Group Thin and Thick Pieces for More Even Drying
Keep thin petals and leaves together in one layer, and place thick stems in another. Pieces with a similar thickness dry at a similar pace, which helps the whole batch press more evenly.
Use the chart below to match each part of the bouquet with the right setup.
Comparison Table: How to Prepare Different Bouquet Parts
| Bouquet Part | Placement | Shape Risks | Color Risks | Recommended Treatment |
|---|---|---|---|---|
| Thin blooms (e.g., Cosmos, Poppies) | Face down, spaced apart | Petal curling or tearing | Fading if drying is too slow | Use tweezers to spread petals flat before closing the press |
| Layered blooms (e.g., Daffodils) | Press thinned bloom flat; place removed petals separately | Bulky spots; uneven flattening | Browning from trapped moisture | Keep removed petals in their own layer |
| Thick roses | Press individual petals flat in a single layer | Center stays bulky and wet | Browning in the center | Press petals individually using extra absorbent pads |
| Leaves | Flat, best side down; no overlapping | Curling or wrinkling at edges | Turning brown instead of staying green | Group with other flat, low-moisture items |
| Stems | Separate layer; split if thick | Creates uneven pressure | Mold if moisture is trapped against petals | Keep away from delicate petals |
How to Press Flowers with a Microwave Press
Once your bouquet pieces are sorted and arranged, a microwave flower press gives you a fast way to lock in color and shape before moisture starts causing browning. The Microfleur press uses vented platens, wool pads, cotton liners, and clips. It can dry flowers the same day.
Group flowers by thickness from the last step, then load the press in separate layers. Place the prepared pieces on a dry cotton liner in a single layer, cover them with the top liner and wool pads, and clip the platens shut.
Use Short Heating Intervals and Check Between Cycles
With the press loaded, heat the flowers in short bursts. Start with 20 to 30 seconds; 30 seconds tends to work well in a 1,000-watt microwave. After each cycle, open the press so steam can escape, then close it again. If steam stays trapped inside, flowers can scorch or turn brown.
After that first burst, switch to 10- to 15-second intervals and check the flowers after every cycle. Most bouquet flowers dry in under 4 minutes. If you catch a toasted smell or see the edges getting darker, cut the interval length. Stop once the flowers feel stiff, papery, and warm.
Comparison Table: Microwave Pressing vs. Weighted Pressing
| Feature | Microwave Pressing (Microfleur) | Traditional Weighted Pressing |
|---|---|---|
| Speed | Minutes to hours; ready same day | 4 to 6 weeks |
| Moisture Control | Active; steam released between cycles | Passive; absorbed slowly by paper or cardboard |
| Color Retention | High; fast drying helps preserve bright hues | Variable; slow drying can lead to browning |
| Shape Control | Immediate flattening under heat and pressure | Gradual flattening |
Check Dryness, Fix Problems, and Store Flowers for Framing
After the final microwave cycle, let the flowers cool before you check for hidden moisture. It’s worth slowing down here. If you mount or seal flowers before they’re fully dry, leftover moisture can lead to spots and browning over time.
How to Verify Dryness Before Mounting or Sealing
Start with the center and the thickest parts. Those areas dry last.
A flower that’s ready should feel firm and papery. The liner should feel dry as well. Wait until each flower has cooled all the way before you do the final check, since microwave heat can hide dampness. If the flower feels cool to the touch or still bends easily, it probably has moisture left and needs more time.
Thicker flowers, like roses and other layered blooms, often need more press time than thin petals or leaves. If a thick bloom still feels soft after it cools, run one more short microwave cycle and check again.
Frame-Ready Storage Checklist and Workflow Recap
Once the flowers pass the dryness check, handle them with nylon tweezers, not your fingers. Dried petals break easily, and skin oils can stain or tear them.
Store fully dried flowers flat on acid-free paper in a cool, dark, dry place until you’re ready to frame them. After framing, keep the piece away from bathrooms, heaters, and direct sun to help limit fading and yellowing.
Here’s the workflow from drying to storage, so you can move through the process without handling the flowers twice.
| Step | Action |
|---|---|
| Prepare | Disassemble the fresh bouquet and sort by thickness |
| Sort | Group flowers and leaves by thickness before loading the press |
| Arrange | Place pieces in a single layer without overlap |
| Press | Use short microwave intervals and recheck between cycles |
| Verify | Check the center and thickest areas for a firm, papery feel; let flowers cool before the final check |
| Store & Frame | Store flat on acid-free paper in a cool, dark, dry place; frame behind UV-protective glass |
FAQs
Can I press my bouquet after 5 days?
It’s best to press flowers as soon as you can. Fresh blooms usually give the best results, with better color and cleaner detail. After five days, flowers may already start to break down, and that can affect both color and clarity.
If you’re using a Microfleur microwave press, you can dry flowers in just minutes. That speed can help preserve color, even if the bouquet isn’t at its peak anymore.
Which wedding flowers keep color best?
Flowers like lisianthus, zinnias, and other delicate blooms often press well and hold onto their color. If you want to speed things up, a Microfleur microwave flower press can dry flowers in far less time.
With fuller flowers, it helps to trim away extra petals that won’t be visible once the flower is flat. Press those petals on their own instead of tossing them. And start with fresh blooms. Any wilting, bruising, or small flaws will still be there after pressing, so there’s no hiding a tired flower.
How do I know flowers are dry enough to frame?
Flowers are ready to frame when they’re fully dry. If there’s any moisture left, mold can form and the flowers may break down over time.
Pressed flowers should feel crisp and dry when you touch them. If you’re using a Microfleur microwave press, you can dry blooms in just a few minutes. Before you frame them, you can also apply a clear acrylic sealer to help protect the arrangement from moisture and UV rays.





















