










If I want the short answer: closed bezels are easier to use, and open bezels give a more see-through look. That’s the core choice.
Here’s what changes in practice:
- Open bezels have no back, so I need tape to hold resin in place.
- Closed bezels have a metal back, so I can pour resin without sealing the bottom first.
- Open bezels let light pass through both sides, which makes pressed flowers look like they’re floating.
- Closed bezels block light from the back, so flower color can look stronger from the front.
- Open bezels need more cleanup and one extra curing step on the back.
- Closed bezels are usually the better pick for first projects and small earrings.
One detail drives almost everything here: the back of the bezel. No back means more prep and more leak risk. A solid back means less setup, but no transparent finish.
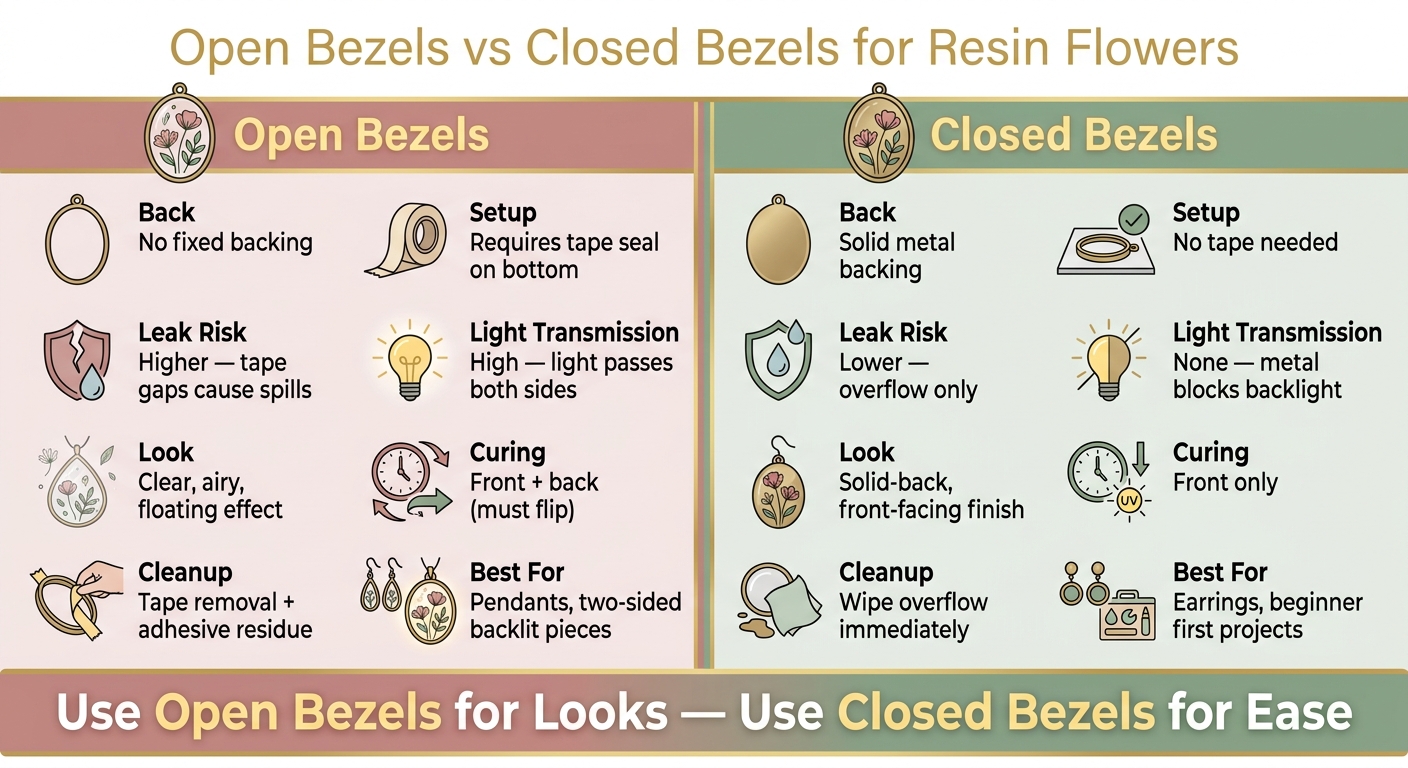
Open Bezels vs Closed Bezels for Resin Flowers: Side-by-Side Comparison
Tips for Working with Resin and Open Back Bezels
sbb-itb-80d8183
Quick Comparison
| Feature | Open Bezels | Closed Bezels |
|---|---|---|
| Back | No fixed backing | Solid metal backing |
| Setup | Needs tape seal | No tape needed |
| Leak risk | Higher | Lower |
| Look | Clear, airy, two-sided | Solid-back, front-facing |
| Light | Passes through | Blocked by metal back |
| Curing | Front + back | Front only |
| Cleanup | Tape removal + sticky residue | Mostly overflow cleanup |
| Best for | Pendants, two-sided pieces | Earrings, first-time resin work |
I’d sum it up like this: use open bezels for looks, use closed bezels for ease. And no matter which one I pick, I need flowers that are fully dry before they go into resin, or they can brown over time.
Open Bezels: Setup, Workflow, and Trade-Offs
An open bezel is a metal frame with no back. That open underside gives it its look, but it also makes the setup a bit fussier. Before you pour any resin, you need a temporary seal. Press the bezel down firmly onto a strip of packing tape. If there's even a small gap between the metal edge and the tape, resin can slip out and make a mess. That seal shapes the rest of the process.
Wipe the bezel with rubbing alcohol, then place it on flat cardboard so the tape stays level while the resin cures. Once the bezel is steady, the open back starts to affect the final look too.
Why Open Bezels Produce a Light, Transparent Look
With the bezel sealed, the open back changes how the flower appears in resin. Light moves through both sides, which gives the flower a suspended, almost floating look. The process usually starts with a thin base layer of resin to seal the bottom and hold the flowers in place. After that first layer cures under a UV lamp, place your pressed flower face-up with tweezers and add a second layer to cover it.
Where Open Bezels Get Harder to Work With
The tape seal is the weak spot. If the bezel isn't pressed down well, or if your surface isn't fully level during curing, resin can seep underneath and leak out. Larger bezels or uneven shapes can be harder to manage for the same reason: the tape may not touch every edge evenly.
Cleanup takes a little more work too. After you peel off the tape, cure the underside directly under the lamp. It can still feel tacky because the back was blocked from UV light. Then remove any adhesive left behind with soapy water or a toothpick.
Those extra steps are the main trade-off with open bezels.
Closed Bezels: Easier Containment and More Predictable Results
A closed bezel has a permanent back, so the resin stays in place without tape. With an open bezel, you have to seal the back first. Here, that whole step disappears. That makes closed bezels easier to handle, especially when you're just getting started, even if the look is a bit less airy.
Why Closed Bezels Are Simpler for Beginners
Since the back is already fixed, resin stays put while you work. Start by wiping the bezel with rubbing alcohol. Then add a thin base layer, set the pressed flower in place with tweezers, and flash-cure that first layer so the flower doesn’t shift.
After that, fill the bezel to the top and let surface tension create a slight dome. If resin spills over, wipe it right away. If a drip dries on the metal edge, you can scrape it off later with a toothpick.
What the Solid Back Changes
That solid back changes how the finished piece looks. It blocks backlight, so the flower appears more opaque. In an open bezel, light can pass through from both sides, which gives the flower more of a suspended, see-through look.
So the trade-off is pretty simple: a closed bezel gives you easier containment, while an open bezel gives you more clarity. That difference shows up most when you compare finish, clarity, and use case - which is exactly what the next section covers.
Open Bezels vs Closed Bezels: Side-by-Side Comparison
Use this quick side-by-side view to see what changes in practice. The table cuts it down to the parts that matter most.
| Feature | Open Bezels | Closed Bezels |
|---|---|---|
| Handling | Alcohol clean + tape seal; high leak risk if tape gaps | Alcohol clean only; minimal risk - top overflow only |
| Flower Placement | Visible from both sides | Front only |
| Light Transmission | High - transparent, floating look | None - solid metal backing |
| Finish | Domed on both sides | Domed front, flat back |
| Curing Stability | Requires flipping to cure the back | Stable; cures front-side only |
| Cleanup | Must remove tape adhesive residue | Wipe away any overflow immediately |
| Best Use | Airy, backlit designs; pendants with two-sided visibility | Solid-back, front-view designs; earrings and first projects |
Flower Placement, Finish, and Curing Differences
The biggest differences don't stop at leak control. Placement, surface finish, and curing steps all shape how the piece turns out.
Both bezel styles begin the same way: with a thin anchor layer. Then the flower is set in place with tweezers before the next pour. After that, the paths split a bit.
With an open bezel, the flower stays visible from both sides, which gives the piece that light, floating feel. You can also dome both sides, so the final result looks finished front and back. With a closed bezel, the flower is meant to be viewed from the front only. The front can be domed, but the back stays flat against the metal.
Curing is another clear split. Open bezels need to be flipped so the back can cure (or use a double-sided UV resin light), while closed bezels cure from the front without that extra step. Why does that happen? The tape used under an open bezel blocks UV light from reaching the underside, so that back surface stays tacky until it goes under the lamp directly.
Put simply, open bezels suit airy, backlit pieces with two-sided visibility. Closed bezels make more sense for solid-back, front-view designs, especially earrings and beginner-friendly projects.
Which Bezel Style Works Best for Pendants, Earrings, and First Projects
The best bezel style usually comes into focus once you think about the piece you're making.
Pendants and Earrings: Matching the Bezel to the Look You Want
Pendants give you room to go either way. An open bezel creates a transparent, backlit look, while a closed bezel makes flower color show more strongly from the front. In pendants, that often comes down to style. In smaller pieces like earrings, it matters even more.
Earrings can be tricky with open bezels because the tape seal on small pieces is more likely to fail. Closed bezels make that part easier. You skip the tape step, avoid sticky residue, and usually get a cleaner fill at a small size.
Beginner Recommendation and Final Takeaway
If this is your first project, flower prep matters just as much as bezel choice. Start with closed bezels. They remove the temporary backing step and make leaks less likely. Your flowers also need to be fully dry before they go into resin. If any moisture gets trapped inside, the blooms can rot or turn brown over time. Microfleur's microwave flower press kits dry and press flowers quickly while helping preserve color, so the flowers are ready for resin.
Use open bezels when you want transparency and two-sided visibility. Use closed bezels when you want a simpler setup and more predictable results. Either way, work in thin layers and let the resin cure fully under your UV lamp before you handle the piece.
FAQs
Can I make open bezels without leaks?
Yes. To stop leaks, open bezels need a temporary seal before you pour in the resin.
Use resin tape or a smooth, non-stick backing, then press it firmly against the frame. Once the resin cures under a UV lamp, peel off the backing to leave a clean finish.
Why do flowers look brighter in closed bezels?
Flowers often look brighter in closed bezels because the solid backing bounces light back through the petals. If the base is light-colored or metallic, it can make the flowers’ natural color look more vibrant.
With open bezels, light passes through the piece instead. As a result, the flowers usually won’t look quite as bright.
Which bezel size is easiest for beginners?
There’s no single easiest bezel size. The best pick comes down to the size of the pressed flowers you want to use.
If you’re just starting out, go with a bezel that gives your dried flowers enough room to sit comfortably. That way, you won’t have to deal with fussy trimming or awkward overlapping right away. Microfleur also offers starter bundles and project kits that can make the process feel a lot simpler.





















