










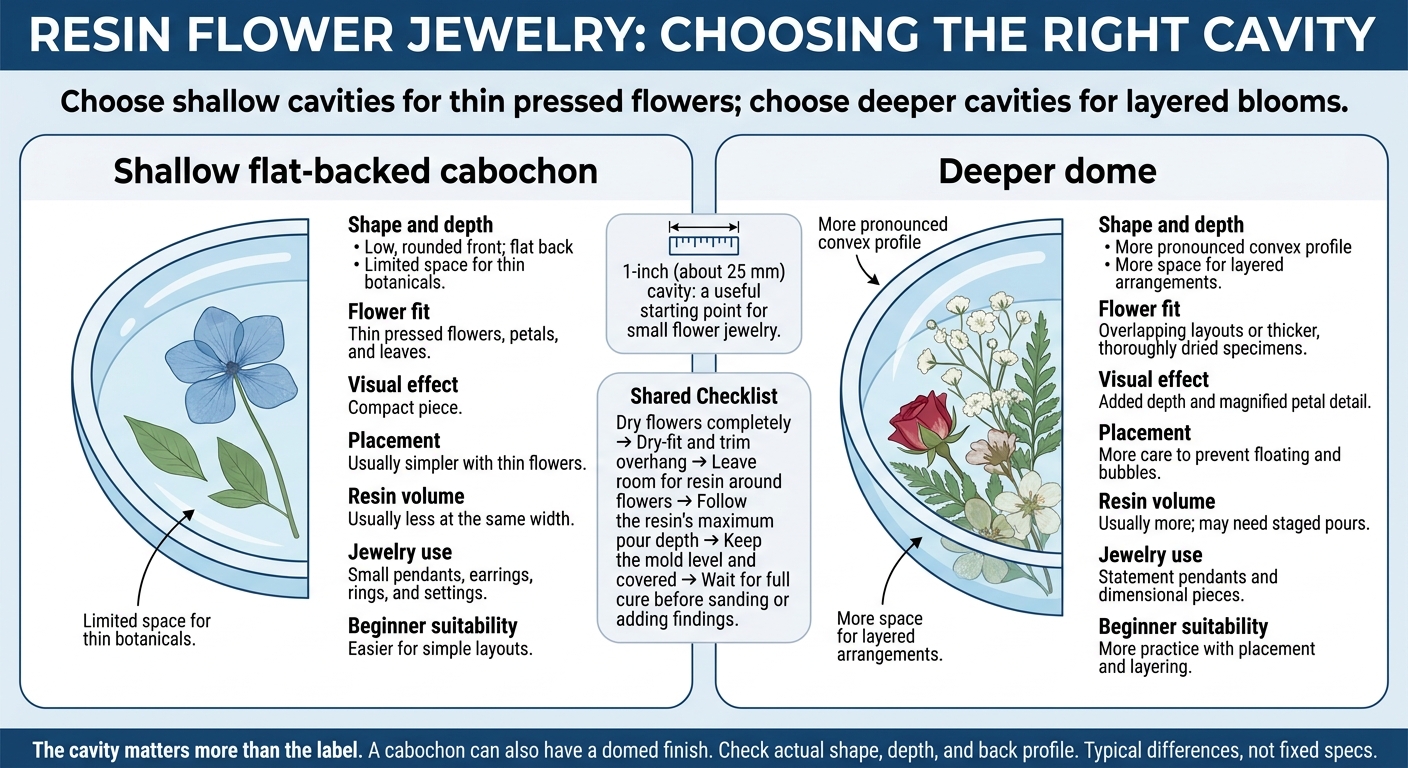
I’d choose a shallow cabochon for thin pressed flowers and a deeper dome for layered blooms. Before pouring, dry-fit your flowers and check the cavity’s depth and back - not just its name. A 1-inch (about 25 mm) cavity is a useful starting point for small flower jewelry.
Quick Comparison
| What to check | Shallow cabochon | Deeper dome |
|---|---|---|
| Shape and depth | Low, rounded front; flat back | More curved profile; more room |
| Flower fit | Thin pressed flowers, petals, and leaves | Layered flowers or thicker dried blooms |
| Look | Compact piece | Added depth and magnified petal detail |
| Placement | Simpler with thin flowers | More care to prevent floating and bubbles |
| Resin amount | Usually less at the same width | Usually more; may need staged pours |
| Jewelry use | Small pendants, earrings, rings, and settings | Statement pendants and dimensional pieces |
| Beginner use | Easier for simple layouts | More practice with placement and layering |
My prep checklist is the same for both: dry flowers completely, leave room for resin around them, follow the resin’s pour-depth limit, and keep the mold level and covered while it cures. I’d wait for a full cure before sanding sharp edges or adding findings.
<u>The cavity matters more than the label.</u> A cabochon can also have a domed finish, so I’d match the mold to your flowers and planned backing rather than treat the two names as fixed categories.
Cabochon vs Dome Molds for Resin Flowers
Part 4: pressed flower in UV resin to create cabochon for jewelry first and second layer
sbb-itb-80d8183
Shallow Cabochon Molds for Pressed Flowers
Round and oval cabochons turn pressed flowers into small focal pieces for pendants, earrings, rings, and necklaces. Their low profile works well with thin flowers and flat-backed jewelry settings. A 1-inch (about 25 mm) cavity fits many flower and leaf inserts.
Fitting Thin Flowers in Shallow Cavities
Choose shallow cavities for pressed flowers, petals, and thin leaves. Save deeper molds for bulkier blooms. Shallow molds use less resin and are beginner-friendly, especially with UV resin. Dry botanicals completely before embedding them - trapped moisture can cause browning or rot inside the resin.
Position the flower with tweezers, then trim any overhang so resin can reach the edges. A 1-inch punch helps cut leaves to a uniform size.
Pour a thin first layer to hold the flower in place, then fill as directed. Use a toothpick to guide resin around petal edges and pop bubbles. With UV resin, clear silicone helps light reach the resin. If the petals need more room, switch to a dome cavity.
Flat Backs for Settings and Findings
Flat backs fit bezels, settings, and glued findings. Once the resin has fully cured, scrape or sand away any overflow along the rim.
Deeper Dome Molds for Layered Flowers
When pressed flowers need more space than a shallow cabochon offers, try a dome mold. Its deeper cavity makes room for layered arrangements and gives statement pendants a rounded shape. Curved resin magnifies petal detail, but it also makes bubbles, dust, and uneven placement easier to see. The extra depth calls for care during placement and finishing.
Room for Flowers and Background Layers
Deeper molds hold overlapping flowers, leaves, stems, and background layers. Silica gel works well for drying dimensional blooms, though microwave flower pressing offers a faster alternative for flatter elements.
Stay within your resin’s maximum pour depth. Deep cavities may require staged pours or a deep-pour epoxy. Some deep-pour epoxies take about 3 days to harden before you can remove the piece from the mold.
Positioning Flowers and Leveling the Mold
Pour a base layer, place the flower, then add the remaining resin in stages. This helps prevent flowers from floating or shifting while the resin cures. Position open buds faceup so trapped air can escape.
Keep the mold level and cover it with a clean container to block dust and hair. At first, check for bubbles every 15 to 30 minutes and pop them until the resin starts to set. Before mixing, use a resin calculator to measure the volume needed to fill the mold.
Cabochon vs Dome Molds: Comparison Table
Here’s how shallow cabochon molds and deeper dome molds compare when working with resin flowers.
These are typical differences, not fixed specs. check the cavity’s shape, depth, and back profile or choosing and preparing flowers rather than relying on the mold name.
| Criterion | Shallow flat-backed cabochon molds | Deeper dome molds |
|---|---|---|
| Shape | Gently rounded front with a flat back | More pronounced convex profile |
| Usable depth | Limited space for thin botanicals | More space for layered arrangements |
| Flower fit | Small pressed flowers, petals, and thin leaves | Overlapping layouts or thicker, thoroughly dried specimens |
| Visual effect | Compact, flat presentation | More depth |
| Placement | Usually simpler with thin flowers | Needs more control to prevent floating |
| Resin volume | Usually lower at comparable widths | Usually higher at comparable widths |
| Jewelry use | Small pendants, earrings, rings, and charms | Statement pendants and dimensional pieces |
| Beginner suitability | Easier for beginners using simple layouts and starter kits | Often takes more practice with placement and layering |
Match the cavity to your flower’s actual thickness and the backing you plan to use. Doming is a finish, not a mold type: you can still add a resin dome to a flat-backed cabochon.
Neither mold type guarantees a perfect release. For clean flower inserts, check the silicone for dust and nicks before pouring, and avoid overfilling.
Preparing, Casting, and Finishing Resin Flowers
Once you’ve chosen a mold, prepare the flowers and plan the pour around its depth.
Pressing, Drying, and Measuring Flowers
Make sure petals, centers, and stems are completely dry - thin, crisp, and paper-like - before mixing resin. Trapped moisture causes browning and decay, so discard any browned or moldy botanicals. Microfleur microwave flower press kits can dry flowers in about 1.5 to 3 minutes while helping preserve their color.
Test-fit the dried arrangement in the empty mold or bezel. Keep it below the rim and trim any overhang before pouring. Shallow cabochon molds work best with flat-pressed flowers. Once everything fits, pour the base layer.
Pouring Resin and Finishing Cured Edges
Start with a thin base layer for shallow cabochons. Deeper dome molds may need staged pours to hold the flowers in place and fully encase them without overfilling.
Gently guide resin into the cavity’s edges to reduce trapped air between the petals and the visible surface. Coat the botanicals with resin, then position them with tweezers or a toothpick. Use a fine tool to lift bubbles without pressing the petals.
Cover curing pieces with a clean plastic container to keep dust and hair off the surface. Wait until the resin has fully cured before cleaning up the rim and back.
Check for sharp spots and sand only where needed. Wear a mask and use dust control while sanding, then clean the piece before adding findings.
Conclusion: Match the Mold to Your Flowers and Project
Start your final check with flower thickness and cavity depth. Choose shallow cabochons for thin, flat-pressed flowers and flat backs that sit flush in jewelry settings.
Use deeper domes for layered arrangements that need more room and visual depth. Match the cavity depth to the flower’s thickness and contour - not just its widest span. Leave enough usable depth for the background, a thin resin base layer, and the final sealing coat.
For repeated pieces, keep the cavity profile consistent. Match flower thickness to cavity depth, and choose cavities with smooth interiors and matching dimensions for uniform size and finish. Estimate the resin volume before mixing.
FAQs
How much resin clearance do my flowers need?
Before pouring, check that your pressed flowers fit inside the mold without touching the edges. Use enough resin to cover the flowers completely, filling nearly to the top while leaving a small gap. Avoid overfilling - it can hide flower details or mean extra cleanup.
If you’re pouring multiple layers, make sure the flowers are sealed and the first layer has cured before adding the final resin layer.
Will a dome distort my flower arrangement?
A dome mold won’t distort your flower arrangement when you use properly dried flowers. Resin’s natural surface tension creates a smooth, rounded finish that adds depth to the design. Flat, pressed flowers fit neatly inside the mold, letting the resin surround them without visual distortion.
A Microfleur microwave flower press dries flowers quickly while preserving their color and shape for resin projects.
How can I sand edges without dulling the resin?
Wet-sand with high-grit sandpaper to keep the resin cool and clear. Start with 400- or 600-grit sandpaper, then move to 1,000 or 2,000 grit for a smoother finish. Restore the high-gloss shine with a thin topcoat of newly mixed resin or a specialized polishing compound.
For less sanding, let the resin form a natural dome within the mold.





















