










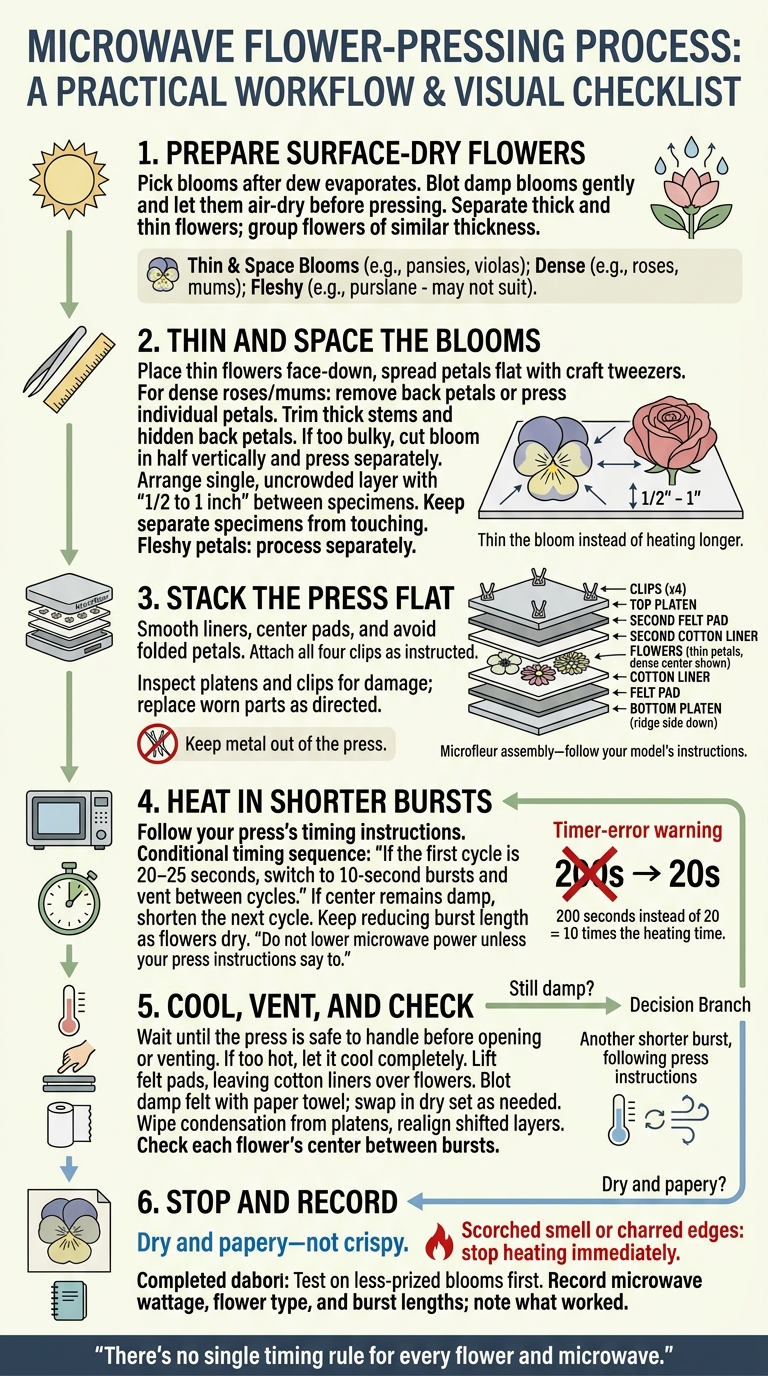
If your microwave press burns flowers, I’d start with shorter heating bursts - not more heat for a damp center. Thin thick blooms, blot surface water, keep flowers apart, and make sure the pads and liners lie flat.
My checklist is simple:
- Follow your press’s timing instructions. A mistaken 200-second cycle instead of 20 seconds means 10 times the heating time.
- Let steam escape between bursts once the press is safe to handle. Dry damp pads and platens before reheating.
- Separate thick and thin flowers, avoid overlap, and check each center as it dries.
- Stop at dry and papery - not crispy. A scorched smell or charred edges means <u>stop heating immediately</u>.
I’d test on less-prized blooms first and record the wattage and burst lengths. There’s no single timing rule for every flower and microwave.
How to Prevent Microwave Flower Press Burns
How to Press Flowers in Minutes (Microwavable Flower Press Tutorial - Microfleur)
sbb-itb-80d8183
Use Shorter Heating Bursts
Outer petals dry faster than dense centers. Long cycles can overheat the petals while the center stays damp. If the center still feels damp after the first burst, shorten the next cycle rather than repeat the full time. Keep reducing the burst length as the flowers dry.
Follow your microwave flower pressing timing sequence.
If the first cycle is 20–25 seconds, switch to 10-second bursts and vent between cycles. A timer error like 200 seconds instead of 20 can burn flowers, pads, and liners.
Match Symptoms to Fixes
Check the symptoms below to decide what to do next.
| Symptom | Likely cause | Adjustment |
|---|---|---|
| Scorching after a long cycle | Heating continued too long | Use short bursts on the next batch. |
| Press too hot to handle | Heat buildup from repeated bursts | Let it cool completely before the next cycle. |
| Condensation on platens | Trapped steam | Dry the platens before the next cycle. |
| Edges darken during later cycles | Excessive heat or over-drying | Stop when the flowers feel dry and papery. If they still feel sticky or damp, use another short burst. |
Do not lower microwave power unless your press instructions say to. Many microwaves pulse at full power even on lower settings, so short bursts still matter.
With shorter cycles in place, the next step is controlling moisture and layering.
Manage Moisture in Flowers and Press Materials
If shorter bursts still scorch petals, check for trapped moisture next.
Start with flowers free of surface water. Pick blooms after the dew evaporates, as picking time matters for moisture control. If they arrive damp, blot them gently and let them air-dry before pressing.
Vent Dampness Between Bursts
Follow the liner and pad instructions. Wash liners as directed, dry them flat, and replace them only when they no longer hold their shape.
Between bursts, wait until the press is safe to handle. Then vent it, lift the felt pads, and leave the cotton liners in place. Blot damp felt with a paper towel, and swap in a dry set as needed. Dry liners and felt help the next cycle heat evenly.
Stop Heating Once Flowers Are Dry
Check each flower’s center between bursts, and separate blooms of different thicknesses.
Microfleur says finished flowers should feel papery, but not crispy.
Group flowers of similar thickness before pressing, and stop heating once they’re dry.
If one part dries much more slowly than the rest, check thickness and overlap next.
Reduce Thick Centers and Avoid Overlap
If thin petals still scorch, bulk or crowding is usually the cause. Thick centers hold more moisture than thin petals, so the edges can dry - and scorch - while the center is still drying. Thin the bloom instead of heating longer. Overlapping flowers can trap moisture where they touch and may stick together.
Prepare Thin and Thick Flowers Separately
Base your prep on the thickest part of each bloom, not its overall size. Separate dense blooms from flat ones before pressing.
| Flower condition | Preparation |
|---|---|
| Thin flowers, such as pansies or violas | Place face-down and spread the petals flat with craft tweezers. |
| Dense roses or mums | Remove back petals or separate the bloom into individual petals for pressing. |
| Fleshy petals | Process separately. Very fleshy flowers, such as purslane, can turn mushy before drying and may not suit microwave pressing. |
| Overlapping specimens | Arrange in a single, uncrowded layer with 1/2 to 1 inch between specimens. Keep petals and leaves from separate flowers from touching. |
Trim hidden back petals and thick stems before pressing. If a bloom is still too bulky, cut it in half vertically. Press each half separately, then reconstruct the flower after drying. For dense roses or mums, pressing individual petals lets you rebuild a thinner flower.
Use tweezers to move stray petals or leaves before closing the press. Once the blooms are thinned and spaced, check that the press layers sit flat.
Align Press Layers for Even Drying
If flowers still burn after you shorten bursts and manage moisture, check the stack next. A folded liner or shifted pad can create uneven pressure, drying some flowers too fast while leaving others damp. Realign the layers before the next burst.
Check Liners, Pads, and Closures
For a Microfleur press, place the bottom platen ridge side down. Add a felt pad, cotton liner, flowers, second liner, second pad, and top platen, in that order. Smooth the liners, center the pads, and lower the top layers without folding petals. Attach all four clips as instructed.
Remove loose pollen and check the pads for folds. Inspect the platens and clips for damage or a loose fit. Follow the Microfleur assembly and heating instructions, and replace worn parts as directed.
Once the stack lies flat, focus on safe handling between bursts.
Handle the Press Safely Between Cycles
Open the press carefully. Keep the liners over the flowers while lifting the pads, wipe condensation from the platens, and realign any shifted layers before reheating. This helps prevent uneven reheating and scorching. Keep metal out of the press.
Prevent Burning in Your Next Batch
Run through this checklist before each batch to put the fixes above into practice.
Use a Pressing Checklist
Start with newly picked, surface-dry blooms.
Before heating: Read your Microfleur model’s instructions, and use only surface-dry flowers. Thin bulky blooms, leave even spacing between specimens, and stack the press flat.
During heating: Heat in short bursts, venting between cycles. Stop when the flowers feel papery and dry - not crispy.
Log each batch: Record the microwave wattage, flower type, and burst length. Note what worked so your next batch needs fewer adjustments, or check out these flower pressing tips for more help.
FAQs
Can I salvage partially scorched flowers?
Scorched flowers can’t be saved. Burning usually happens when you heat flowers for too long or don’t let them air out between microwave bursts.
To avoid scorching, start with 20- to 25-second heating intervals, then switch to 10-second bursts. Open the press between intervals to check the flowers and let moisture and heat escape. For thick blooms, press each petal separately so they dry evenly.
How do I adjust timing for my microwave’s wattage?
Microwave power varies, so test with spare flowers before using your best blooms. Start with 20 to 25 seconds on high, then heat in 10-second intervals to find the right timing.
Between bursts, open the press to let steam escape and check whether the flowers are dry. Wipe moisture off the panels before heating again. These checks help keep the flowers from scorching as they dry.
Is petal browning always a sign of burning?
No, brown petals don’t always mean the flowers are burned. Too much microwave heat can burn them, but some varieties naturally lose color even when pressed carefully. Slower pressing methods can also cause browning or mold over time.
To reduce discoloration with a microwave press, heat in short bursts, let the flowers air out between intervals, and avoid over-drying them.





















