










I’d start with thin flowers or single petals, blot away surface moisture, and leave ½ to 1 inch between pieces in the press. Your April florist blooms can become cards, framed art, bookmarks, gift tags, or resin keepsakes.
My approach is simple:
- Prepare: Remove thick parts and damaged petals; group flowers by thickness.
- Press: Follow your Microfleur kit’s heating and cooling instructions. Stop when the flowers feel papery, not soft.
- Make: Plan your layout before gluing, and test a spare petal before using resin.
- Store: Keep unused flowers flat, dry, and out of sunlight.
<u>Some color and shape changes are normal.</u> I’d begin with a card or small frame, then try larger pieces.
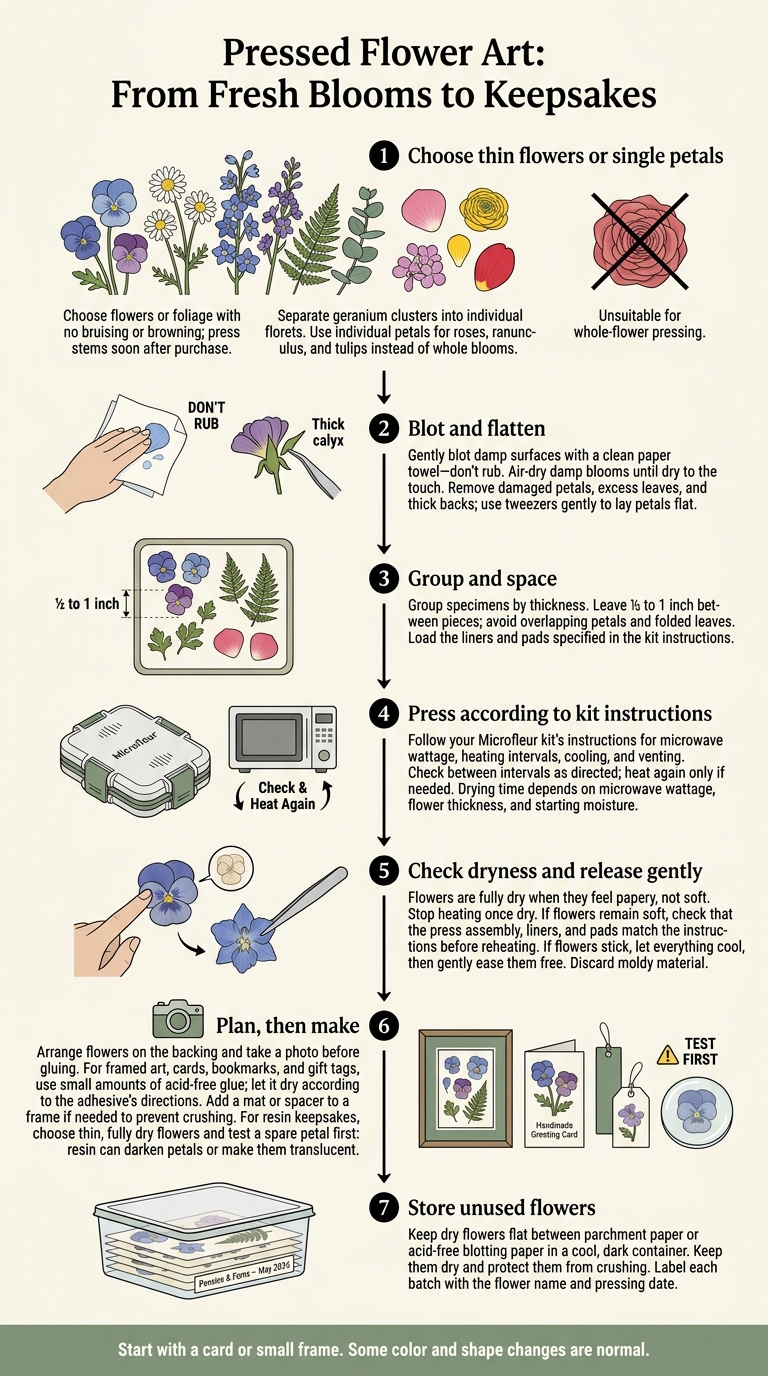
Pressed Flower Art: From Fresh Blooms to Keepsakes
How to Press Flowers in Minutes (Microwavable Flower Press Tutorial - Microfleur)
sbb-itb-80d8183
Choose and Prepare April Florist Flowers
Choose thin-petaled flowers or foliage, such as ferns and eucalyptus, with no bruising or browning. If pansies or violas aren’t available, use small daisy-type blooms, delphinium, or larkspur. Press stems soon after purchase.
Choose Thin Flowers, Petals, and Leaves
Look for flowers with a single layer of petals and a small, thin center. Ferns and eucalyptus add texture without much bulk.
Separate geranium clusters into individual florets. For roses, ranunculus, and tulips, use individual petals instead of whole blooms.
Remove Moisture and Thick Parts
Gently blot damp surfaces with a clean paper towel - don’t rub. If blooms arrive damp, blot them, then let them air-dry until they feel dry to the touch. Remove damaged petals, excess leaves, and thick backs so each flower lies flat.
Use tweezers with a light touch to lay petals flat. Group specimens by thickness, leaving about ½ to 1 inch between them so they don’t stick together during pressing.
Match Common April Florist Stems to Projects
Thickness and moisture matter more than size. Use this guide to match each stem to a project.
| Flower | Recommended Preparation | Likely Difficulty | Best Art Use |
|---|---|---|---|
| Pansies / violas | Press whole, face down; keep petals from overlapping | Easy | Cards, bookmarks, small frames |
| Small daisy-type flowers | Press face down; remove bulky centers if needed | Easy | Frames, bookmarks |
| Geraniums | Separate clusters into individual florets | Moderate | Cards, small frames |
| Roses | Separate petals; remove thick bases | Moderate | Resin keepsakes, framed art |
| Ranunculus | Separate petals instead of pressing layered heads | Moderate | Framed art, decorative accents |
| Tulips | Separate petals and blot excess moisture | Moderate | Large frames, gift tags |
| Foliage | Flatten fern fronds or individual leaves; avoid folds | Easy | Cards, frame accents |
Preparation and project matches:.
Move the flattened stems, grouped by thickness, to the microwave press.
Microwave-Press Flowers and Solve Drying Problems
Gather Your Press and Supplies
Once your flowers are flattened and grouped by thickness, load the press with the liners and pads specified in the kit instructions.
Microfleur microwave flower press kits dry flowers quickly. The 5 × 5-inch Regular works for small arrangements, while the 9 × 9-inch Max fits larger blooms or multiple specimens.
Have the press plates, fabric liners, felt pads, paper towels, and any tools listed in the kit instructions ready.
Arrange Flowers and Heat in Short Intervals
Place the prepared flowers between the liners and pads, leaving enough space so they don’t overlap. Close the press, then follow the kit instructions for wattage, heating intervals, cooling, and venting. Drying time depends on the microwave’s wattage, flower thickness, and starting moisture.
Check between intervals as directed, and heat again only if needed. Flowers are fully dry when they feel papery.
Address Bruising, Browning, and Other Problems
Light-colored flowers brown more easily than sturdier blooms.
| Problem | Prevention or Next Step |
|---|---|
| Bruising | Handle flowers gently when loading and unloading the press. |
| Brown or scorched edges | Use shorter intervals as directed, and stop heating once the flowers are dry. |
| Lingering moisture | If flowers still feel soft, check the press assembly before reheating. Make sure the liners and pads match the instructions. Discard moldy material. |
| Sticking | Let everything cool, then gently ease the flowers free. |
| Wrinkling | Smooth the petals before closing the press, and keep their edges from overlapping. |
| Fading | Fast drying can help retain color. |
Once dry, the pressed flowers are ready for frames, cards, bookmarks, tags, or resin pieces.
Make Home Decor and Gifts
Once the flowers are fully dry, lay out the pieces on the backing and use craft tweezers to adjust them. Take a photo before gluing so you can refer to the layout as you work.
Your pressed blooms are now ready to become decor and gifts.
Create a Framed Flower Arrangement
Add a small amount of acid-free glue to the backs of the petals. Let it dry according to the adhesive’s directions before framing. If needed, add a mat or spacer to keep the glass from crushing the flowers.
Make Cards, Bookmarks, and Gift Tags
Attach thin flowers or single petals to cardstock with small dots of acid-free glue. Keep designs flat and simple for cards, bookmarks, and gift tags.
Try Resin Keepsakes
Choose thin, fully dry flowers for resin or bezel pieces. Test a spare petal first - resin can darken petals or make them translucent.
Store Unused Pressed Flowers
Store dry flowers flat between sheets of parchment paper or acid-free blotting paper in a cool, dark container. Keep them dry and protect them from being crushed. Label each batch with the flower name and pressing date.
Conclusion: Start With a Card or Small Frame
Once your flowers are dry, handle them gently and pick your first project. Some color change is normal, especially in pale petals.
Start with a card or small frame before moving on to resin jewelry or larger arrangements. Microfleur offers tutorials, the Microfleur Mastery Online Course, and supplies for both practice and more complex designs.
FAQs
Can I press florist flowers that have started wilting?
Avoid pressing flowers that have started to wilt or deteriorate - they often lose their color during pressing. For the best results, choose healthy florist blooms at their peak, before they show signs of aging.
How can I keep framed flowers from fading?
Choose newly picked blooms in good condition, and make sure the petals are completely dry before pressing. Moisture can cause discoloration. Press promptly, checking the flowers and letting them air out between short heating bursts to prevent burning. Until you’re ready to frame them, store them in a cool, dry, dark place.
Use suitable backing and keep the frame out of direct sunlight to slow fading. Microfleur’s faster pressing helps preserve the flowers’ natural pigments before they degrade.
Should I seal pressed petals before adding resin?
Yes, seal pressed petals before adding them to resin. This helps protect delicate petals from the resin’s chemical reaction, which can fade their colors or make them translucent.
Apply a thin layer of clear, acid-free sealant or a light coat of decoupage medium. Let it dry completely before embedding your pressed blooms in resin.





















