










If you check flowers by the clock alone, you can ruin them. I’d use seconds for microwave pressing and days for air drying - but I’d judge both by moisture, touch, color, and damage risk first.
Here’s the short answer:
- Microwave press: check after 20–30 seconds, then keep checking in short bursts until the flower feels papery, dry, and not sticky.
- Air drying: check every 3–7 days over 1–3 weeks until the flower feels stiff, dry through the center, and not cool or soft.
- Main risk in the microwave: scorch marks, browning, and brittle petals from too much heat.
- Main risk in air drying: mold, rot, drooping, and faded color from slow drying or poor airflow.
- Best rule: the center tells the truth. Outer petals can look dry while the middle is still wet.
This means you should stop treating check times like fixed deadlines. A thin bloom may dry in about 1–4 minutes total in a microwave press, while thicker flowers can take more cycles. Air-dried flowers often need days or weeks, and humid rooms can stretch that even more.
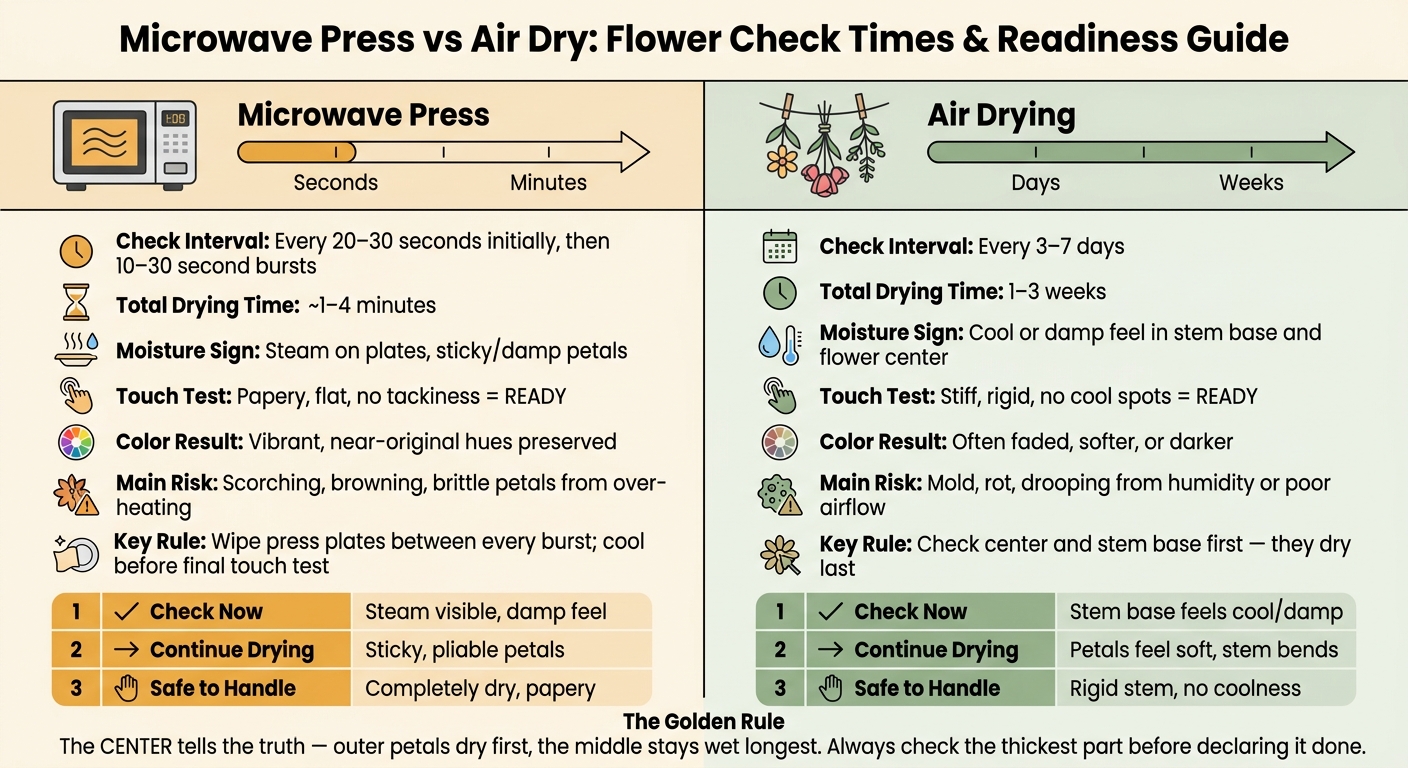
Microwave Press vs Air Dry: Flower Check Times & Readiness Guide
Microwave vs Press vs Book | Which Dries Flowers Best?
sbb-itb-80d8183
Quick Comparison
| Method | When I’d Check | What I’d Look For | Ready Sign | Main Problem |
|---|---|---|---|---|
| Microwave press | Every 20–30 sec, then shorter bursts | Steam, damp liners, sticky center, color change | Papery, flat, dry, no tackiness | Heat damage |
| Air drying | Every 3–7 days | Soft center, cool feel, mold, droop | Stiff, dry through the middle, no cool spots | Mold and fading |
If I had to sum it up in one line: microwave pressing needs close checks in a short span, while air drying needs patient checks over a long span.
Microwave press check times: short intervals, cooling, and repeat checks
Check the flower after every burst. Pay attention to moisture, how it feels, and whether the color is still holding. Start with a 20- to 30-second burst to push out most of the moisture. Then move to shorter 10- to 30-second bursts as the flower gets closer to dry and more likely to scorch. Between bursts, let steam escape and wipe any condensation off the press plates.
"The most common reason for burned flowers, pads and liners is a pressing time that is too long." - Microfleur FAQ
If the press feels too hot to hold, pause and let it cool before the next burst.
| Interval Length | Moisture Signs | Touch Test | Correct Next Action |
|---|---|---|---|
| 20–30 sec (Initial) | Heavy steam on plates; damp liners | Petals feel soft and limp | Wipe plates; release steam; reassemble |
| 10–30 sec (Repeat) | Light steam; liners slightly damp | The center still feels tacky | Wipe moisture; repeat short burst |
| Ready | No moisture on plates; liners feel dry | Thin and papery | Stop heating; allow to cool; remove |
What to inspect after each microwave cycle
Each check should tell you whether the center is dry, not just the petals. After every burst, look for steam rising from the press and feel whether the liners are still damp. Those are clear signs the flower needs more time.
It helps to be a little skeptical of the outer petals. They usually dry first, while the middle stays damp. Gently press the thickest part of the flower - often the center or base - and check for any stickiness. If that area still feels tacky, keep going, even if the edges look dry.
When to stop heating to avoid scorching and color loss
The gap between done and too far is small. Once the flower feels thin and papery - but not brittle - stop heating. Past that point, the odds of browning, scorching, and faded color go up fast. If the flower turns crisp or brown, stop right away and shorten the next burst.
If you're using a Microfleur press, stick with the instructions for your press size and microwave wattage. Even then, flower type and petal thickness can change the timing, so use the flower's condition as your guide.
Air-drying works in the opposite way: longer waits between checks, with condition mattering more than the clock.
Air-dry check times: wider intervals over days and weeks
Air-dry checks happen less often than microwave press checks. In most cases, you’ll check flowers every few days across 1 to 3 weeks. Choosing thicker blooms usually requires more drying time and a closer eye. That slower pace makes it easier to judge moisture, touch, and mold. The tradeoff is simple: color tends to fade more over time.
| Check Point | Microwave Press | Air Drying |
|---|---|---|
| Moisture Sign | Stickiness on petals | Dampness in stems or flower centers |
| Dryness Cue | Papery or crispy | Stiff and flat |
| Color Hold | Vibrant, high retention | Usually softer in color |
| Handling Risk | Very low due to rapid moisture removal | Highest in humid, low-airflow spaces |
What to look for during air-dry inspections
Focus on the stem base and the flower center first. Those areas dry last, so they tell you the most. If they still feel cool or soft, or if you spot mold, the flower isn’t done yet.
You should also watch for drooping or any soft patches. Poor airflow makes mold more likely, so a flower drying in a humid, still room may need more attention.
How to tell when an air-dried flower is ready
A flower is ready when it’s dry all the way through the center, stiff to the touch, and safe to handle gently. The best way to check is to lightly feel the center and the thickest parts. If there’s any bend, softness, or even a faint cool feel, moisture is still trapped inside and it needs more time.
These slower check-ins are easiest to compare by looking at four things: moisture, touch, color hold, and handling risk.
Moisture, touch, color, and handling risk: side-by-side beginner checks
When you're checking a flower, don't go by time alone. Look at moisture, touch, color, and how risky it is to handle at that stage.
This quick side-by-side view helps you judge the flower after each check, not by the clock.
| Feature | Microwave Press | Air Drying |
|---|---|---|
| Moisture | Condensation on the press plates; petals feel sticky | Petals feel cool or damp to the touch |
| Touch | Papery and stiff when ready | Often wrinkled or slightly flexible until fully dry |
| Color | Vibrant; near-original hues are preserved | Often faded, dull, or darker |
Handling hazards matter just as much as dryness cues. A flower can look done and still get damaged the second you touch it.
| Handling Hazard | Microwave Press Risk | Air-Dry Risk |
|---|---|---|
| Heat | High; petals can scorch and pads or liners can burn | None |
| Moisture | Trapped steam causes sticking; wipe press plates between cycles | High; slow drying in humid spaces can lead to mold or rot |
| Brittleness | High if over-processed past the papery stage; petals may tear if removed while still hot | High once fully dry; petals snap easily, and partly dry petals can bruise or detach when moved |
| Color Damage | Browning from over-heating | Slow fading over time |
Once the flower shows dry cues, leave it alone until it has cooled or fully settled.
Cooling before touch tests and flower removal
Microwave-pressed flowers need to cool before you judge them. A petal can seem fine while it's warm, then feel a bit sticky once it cools. If that happens, it needs another short burst.
Air-dried flowers don't come with heat risk, but partly dried petals are still easy to damage. They can bruise, bend, or fall off with very little pressure.
How beginners can avoid damage while checking progress
Use clean, dry fingers or nylon crafting tweezers when checking delicate blooms. Oils from your skin can leave marks on petals. Open press layers slowly so petals don't stick to the liners and tear.
Check the thickest part first, then stop when it feels dry and safe to handle. If that spot still feels soft, cool, or a little flexible, the flower isn't ready to remove or store yet.
Choosing the right check schedule and final takeaway
Pick the schedule that fits how closely you can watch the flower. Microwave pressing calls for short, frequent checks. Air drying works on longer gaps between checks.
Here’s the quick version:
| Status | Microwave Press Signs | Air Dry Signs |
|---|---|---|
| Check Now | After first 20–30 seconds; wipe moisture from the press plates | After 3–7 days of drying |
| Continue Drying | Petals feel sticky or damp; liners feel very moist | Cool, limp, or flexible petals |
| Safe to Handle | Papery, stiff, and flat; no stickiness anywhere | Fully dry and rigid; no cool moisture feel |
Key points to remember before crafting or storage
At each check, judge the flower by moisture, touch, color, and how easily it could be damaged during handling.
A microwave-pressed flower is ready when it feels dry and papery, with no damp spots at all, even in the thickest part of the bloom. An air-dried flower is ready when it feels crisp all the way through, with no hidden moisture tucked inside thick centers.
The main difference is timing. Microwave pressing runs on seconds and needs close attention for a short burst. Air drying runs on days or weeks and asks for patience over a much longer span. In both cases, the clock helps, but texture and moisture are what make the call.
FAQs
How do I check the center without damaging the flower?
To check if flowers are dry without damaging them, skip poking or pressing the center. Instead, look for a few clear signs and use a light touch.
Open the press between short microwave bursts so you can wipe moisture off the plastic panels and let steam escape. That small step makes a big difference.
The flowers are ready when:
- The panels no longer show moisture
- The flowers look flat
- The petals feel dry and papery
Use short, timed intervals to help prevent over-drying or burning.
What should I do if the outer petals feel dry but the middle is still damp?
Keep drying the flowers in short, controlled microwave bursts. After each round, open the press, wipe off any moisture you see on the plastic panels, and let the steam out.
If you're working with thicker blooms or flowers with lots of layers, take off a few extra petals or press the center on its own. That helps the flower dry more evenly and lowers the chance of mold. Stick with short intervals so you don't dry the flowers too much or scorch them.
How does humidity affect air-dry check times?
Higher humidity slows evaporation, so air-dried flowers need more time to dry all the way through. Air drying works by letting the surrounding air pull moisture from the flowers over several days or even weeks. When the air already holds a lot of moisture, that process gets sluggish.
A Microfleur microwave press sidesteps that issue. It uses controlled heat to remove moisture in minutes, so flowers dry fast no matter how humid your home feels.





















