










I’d start with a card or gift tag: both let you practice with just a few fully dried tulip petals. For all 7 projects, match the flower’s shape to the space - small fragments for tiny pieces, flat blooms for larger displays.
Here’s how I’d choose:
- Greeting cards: Thin petals or side-profile blooms keep cards flat for mailing.
- Framed art: Larger, flattened blooms fit behind glass with a mat.
- Bookmarks: Narrow petals work on a 2 × 6-inch cardstock base sealed on both sides.
- Journal covers and pages: Flat petals add detail without blocking folds or the spine.
- Resin pendants: Tiny, dry fragments fit inside bezels or molds.
- Tray inserts: Broad petals sit beneath a clear cover or cured resin.
- Gift tags: Small leftover pieces leave room for a name and ribbon.
My rule: <u>dry the tulips completely before attaching or sealing them</u>. I’d use tweezers, small dabs of glue, and light handling, then keep finished pieces away from moisture and direct sunlight. For resin, follow the maker’s safety and curing instructions.
Quick Comparison
| Project | Tulip shape | Finish |
|---|---|---|
| Greeting cards | Thin petals or side-profile blooms | Glue; optional clear film |
| Framed art | Flat blooms, petals, and stems | Matted glass or acrylic frame |
| Bookmarks | Narrow petals or thin leaves | Lamination or contact film |
| Journals | Flat petals or small fragments | Thin sealant or clear film |
| Resin pendants | Tiny petals or fragments | Fully cured resin |
| Tray inserts | Broad petals or flat blooms | Clear cover or cured resin |
| Gift tags | Small petals or fragments | Glue; optional clear film |
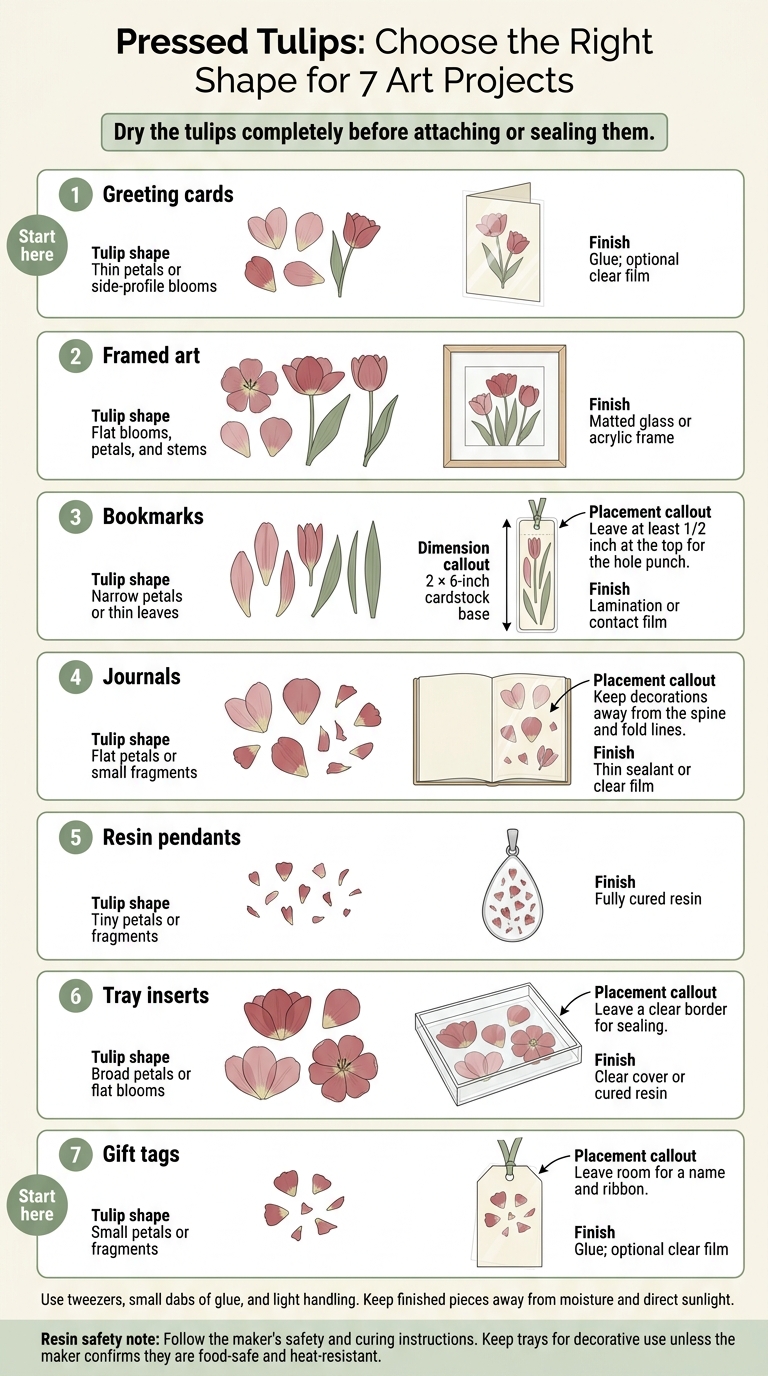
Pressed Tulips: Choose the Right Shape for 7 Art Projects
How To Press Tulips | How to press flowers | Pressed Flower Framed Art DIY Part 4
sbb-itb-80d8183
Prepare Tulips and Gather Supplies
Pick tulips after the dew dries, and discard any brown or soft blooms. Dry them completely before using them in frames or resin projects.
Separate thick tulips into layers so they press flat. Leave space between pieces to keep them from sticking together or developing mold. For faster drying, use a Microfleur microwave flower press kit in short bursts.
Gather tweezers, acid-free paper or cardstock, scissors, PVA glue or Mod Podge, and parchment paper. These materials are essential for making a pressed flower card or other paper crafts. Acid-free backgrounds help prevent pressed flowers from turning brown and crumbly over time. Handle the flowers with tweezers rather than your fingers to avoid damage and oil marks.
Once the tulips are dry and flat, choose a project that suits their shape.
1. Pressed-Tulip Greeting Cards
Greeting cards work best with flat, simple layouts that hold together in the mail.
Best Tulip Shapes
Choose a side-profile bloom for a single-flower card. When choosing and preparing flowers for cards, look for specimens with low moisture content. For petal fans and hearts, use individual petals. Narrow strips or stems make simple outlines.
Materials and Assembly
Arrange the pieces on blank cardstock, then photograph the layout before gluing so you have a reference. Position the petals with tweezers. Use a fine brush or toothpick to apply tiny dabs of glue to their backs. Keep overlaps light and leave out thick centers so the card closes flat.
Protection and Storage
Let the card rest 20 minutes before handling and 24 hours before mailing. A clear protective overlay can help keep the petals in place during mailing. Store the card away from moisture and direct sunlight to reduce fading.
2. Framed Pressed-Tulip Art
A frame gives pressed tulips room to show off their shape and color.
Best Tulip Shapes
Choose a flattened bloom, a side-profile flower, or individual petals. For thicker tulips, preparing flowers for pressing by separating the petals, leaves, and stems so each piece dries flatter.
Materials and Assembly
Attach the dried pieces to acid-free backing with acid-free glue. Leave space between them rather than crowding the layout. Use tweezers or a toothpick to make small adjustments.
Protection and Display
Use a matted frame to keep the glass from touching the flowers. Display your art in a cool, dry spot with indirect light.
3. Pressed-Tulip Bookmarks
Turn pressed tulips into bookmarks for a small, flat project.
Best Tulip Shapes
Choose narrow petals, thin leaves, or a slender side-profile bloom. These shapes lie flat and seal cleanly.
Materials and Assembly
Once you have followed flower pressing tips to ensure the blooms are dry and flat, shape the bookmark around them.
Cut cardstock to 2 × 6 inches. Gather laminating sheets or contact film, scissors, tweezers, and a scraper. Arrange the tulip pieces before sealing, leaving at least 1/2 inch at the top for the hole punch.
Protection and Use
Seal both sides and use the scraper to press out bubbles. Trim the edges, leaving a narrow clear border, then punch a hole in the open space at the top. Add a ribbon or tassel. Fully enclosing the tulip pieces keeps your book’s pages clean.
4. Pressed-Tulip Journal Covers and Pages
Best Tulip Shapes
Journal covers and title pages need flatter pieces than cards or frames. Choose large, flat petals for focal points, and use tiny flowers or small petals for delicate accents in page corners and on pockets. Skip thick centers and layered blooms so the journal closes flat and seals cleanly.
Materials and Assembly
Gather acid-free cardstock or watercolor paper, acid-free PVA glue or Mod Podge Matte, and a small paintbrush. Arrange the tulips on the cover or page, then apply glue only to the strongest parts of each piece.
Use tweezers to lift petals gently by their centers or sturdy edges. This helps prevent tears and fingerprints.
Protection and Use
Keep decorations away from the spine and fold lines. Once the glue dries, brush a thin coat of Mod Podge over exposed petals to hold their edges down.
For a sturdier keepsake, try the resin pendant idea next. You can also find more inspiration in this pressed flower project book.
5. Pressed-Tulip Resin Pendants
For jewelry, stick to the smallest pressed tulip pieces.
Best Tulip Shapes
Choose one tiny petal or trimmed fragment. Whole blooms are too bulky for bezels and molds.
Materials and Assembly
Gather UV resin, a bezel or clear silicone mold, precision tweezers, a toothpick, and a UV lamp. Clear silicone molds help UV light reach the resin evenly.
Brush on a thin base layer, place the petal, and cure before sealing it. Overfill slightly to create a smooth dome. Follow the manufacturer’s curing time and safety guidance.
Petal Handling
Start with a fully dry petal. Gently position it with tweezers, holding it by its sturdier edge or center. Use a toothpick to pop bubbles along the edges.
Protection and Use
Work in a ventilated space and wear appropriate protective gear. Seal the petal completely to protect it from moisture and air.
If the surface remains tacky after curing, give it another UV cycle. Wait until the resin is fully cured and no longer tacky before adding jewelry hardware.
6. Pressed-Tulip Tray Inserts
Best Tulip Shapes
Choose broad petals or single-layer flattened blooms. Both sit flat beneath a clear cover or resin.
Materials and Assembly
Gather your tray insert, acid-free glue, a toothpick, and the kit’s clear cover or resin. Lay out the flowers before gluing, leaving a clear border for sealing. Attach each piece with a small dab of glue - don’t coat the petals.
Petal Handling
Lower the cover slowly so the petals don’t shift.
Protection and Use
Follow the kit’s instructions. If needed, use a toothpick to guide resin into the corners. Keep the tray for decorative use unless the maker confirms it’s food-safe and heat-resistant. Wait until it’s fully cured and the surface is dry and non-tacky before using it.
Save small leftover petals for pressed flower gifts like gift tags.
7. Pressed-Tulip Gift Tags
Gift tags are a great place to use your smallest leftover pressed tulip petals and pieces.
Best Tulip Shapes
Choose single petals from larger tulips, slender leaves, or small fragments that fit beside the recipient’s name. One or two petals can suggest a tulip shape. Keep the arrangement simple and flat.
Materials and Assembly
Gather handmade seed paper, cardstock, or watercolor paper, tweezers, a hole punch, ribbon, and adhesive. Arrange the flowers in one corner or along one side, leaving room for the recipient’s name and the punched hole.
Photograph the layout before gluing so you can refer back to it. Punch the hole away from the petals.
Petal Handling
Place tiny fragments with tweezers to avoid transferring oils from your fingers. If a petal sticks to the paper, bend the paper away to release it.
Protection and Storage
Let the glue dry before adding a laminating sheet or clear sticker film. Use a craft stick to smooth the covering around the petal edges, keeping bubbles to a minimum. Store finished tags flat in a cool, dry place.
Choose Tulip Shapes for Each Project
Choose tulip shapes that fit your project’s space and handling needs. Using pressed flower kits can simplify the preparation process. The guide below pairs each project with a form, handling level, and finish.
| Project | Recommended tulip form | Handling | Finish | Best for |
|---|---|---|---|---|
| Greeting cards | Single-layer petals or small fragments | Low | Glue; flat storage | Personal messages and keepsakes |
| Framed art | Larger blooms, stems, curved silhouettes | Moderate: brittle pieces | Glass or acrylic | Wall art and floral keepsakes |
| Bookmarks | Narrow petals or slender stems | Low to moderate | Lamination or acrylic sleeve | Reading accessories and gifts |
| Journal covers and pages | Flat petals or small fragments | Low on pages; moderate on covers | Clear film or sealant | Journals and scrapbooks |
| Resin pendants | Tiny petals or fragments | High: precision and curing | Cured UV or epoxy resin | Jewelry and bag charms |
| Tray inserts | Larger blooms and stems | High: placement and finishing | Glass or cured resin | Trays and home accents |
| Gift tags | Small petals or fragments | Low | Glue or wax seal | Gift wrapping and name tags |
Start with a Card or Gift Tag
A greeting card or gift tag is the simplest place to practice petal placement. Choose single petals, small fragments, or narrow side-profile blooms.
Arrange the petals before gluing, fitting the tulip shape to the available space. Keep petals from overlapping so the piece stays flat, and use tweezers to handle fully dry, papery flowers. If you are new to the process, learning how to use a flower press correctly ensures your blooms retain their color and structure. This layout works best for small, flat formats.
For cards and tags, apply a light adhesive finish with PVA glue or acid-free Mod Podge. Let them dry flat before handling.
FAQs
How can I tell if my pressed tulips are fully dry?
Pressed tulips should feel crisp and completely dry, with no moisture or dampness, before you use them in art projects.
A book press takes two to three weeks to dry tulips. A Microfleur microwave flower press cuts that time to just a few minutes, typically pressing and drying the flowers in one session.
How long will pressed tulip art keep its color?
The provided sources don’t state exactly how many years the colors will last. A Microfleur microwave flower press is designed to keep tulip colors bright during drying while preserving their delicate petals and individual shapes for lasting botanical art.
Should I seal tulip petals before adding resin?
Yes - seal your tulip petals before adding them to resin. Make sure the pressed flowers are fully dry and properly prepared to help prevent dark or wet spots on the delicate petals. Sealing them first helps protect their appearance and gives your finished piece a clean, professional look.





















