










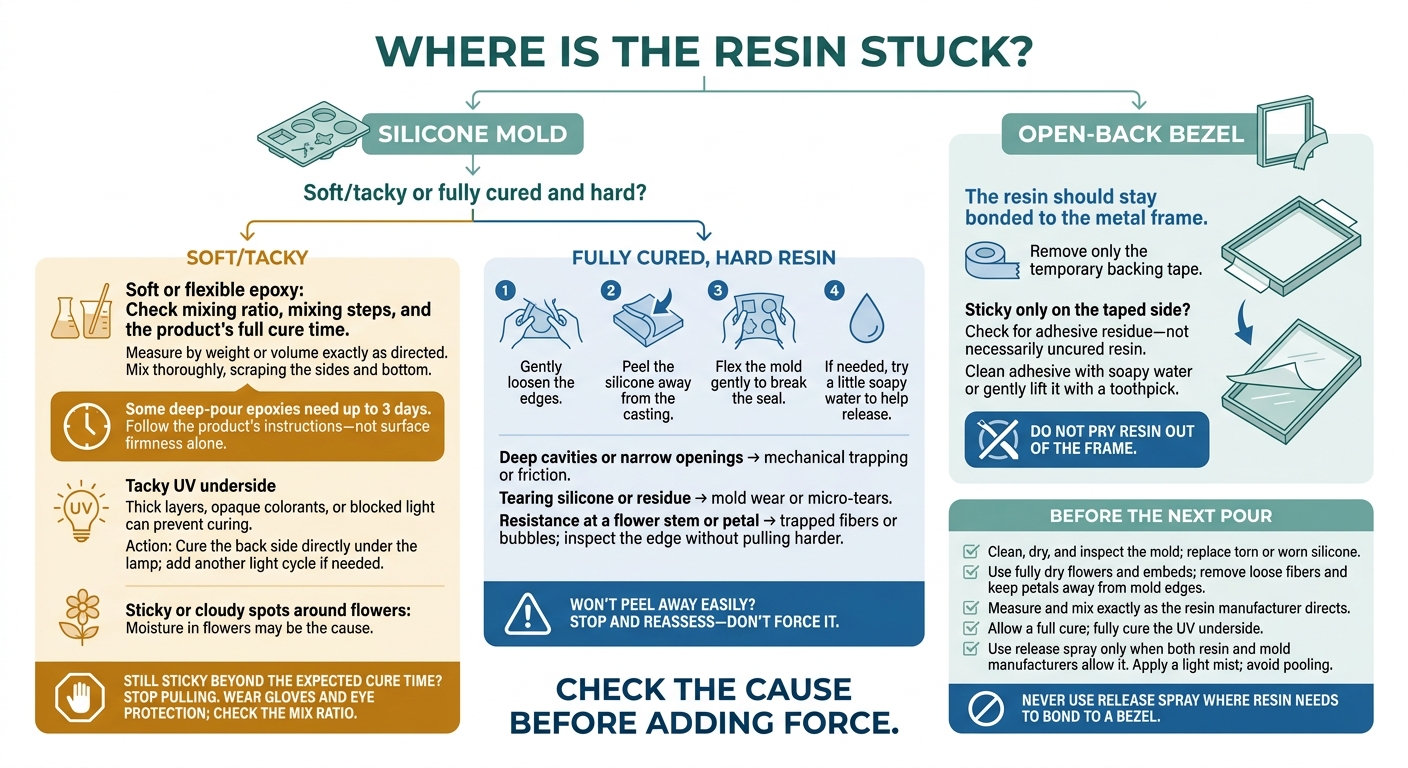
I check the cure before pulling harder: soft or tacky resin needs a cure check; hard resin may be caught in mold details or worn silicone. Some deep-pour epoxies need up to 3 days, so I follow the product’s cure time - not just how firm the surface feels.
Here’s what I check first:
- Soft epoxy: I review the mixing ratio, mixing steps, and cure time.
- Tacky UV resin: I check whether thick layers, dark colorants, or the mold blocked the light.
- Hard, stuck resin: I gently peel the silicone away, using a little soapy water if needed.
- Sticky bezel backs: I check for tape adhesive. The resin should stay in the metal frame.
For the next pour, I start with a clean, dry, undamaged mold and fully dry flowers. I use release spray only when both manufacturers allow it - and never where resin needs to bond to a bezel.
My rule: <u>check the cause before adding force</u>. More pulling won’t fix a cure problem.
Resin Jewelry Stuck? Check Before You Pull
Why is My Resin Stuck to the Mold?
sbb-itb-80d8183
What Causes Resin Jewelry to Stick?
Start with the symptom: is the resin still soft, or has a hardened piece become trapped? That distinction helps separate curing problems from a casting that’s physically stuck.
A bezel isn’t a mold. The resin should stay bonded to the metal frame. On an open-back bezel, only the backing tape should release.
Why Is Resin Soft or Tacky?
Incorrect ratios, poor mixing, or removing epoxy from the mold too soon can leave it soft. Deep-pour formulas may need up to three days to cure.
UV resin can stay tacky underneath when thick layers, opaque colorants, or blocked light prevent it from curing. Moisture in flowers can also leave sticky or cloudy spots.
Why Does Hardened Resin Stay Stuck?
Even fully cured resin can get stuck in worn silicone, deep cavities, or narrow openings. Petals, stems, and trapped fibers may snag along the edge. Tearing or residue usually points to mold wear or micro-tears.
Tape adhesive can also make hardened resin in a bezel feel sticky. If only the taped side feels tacky, the problem may be adhesive residue - not uncured resin.
What Do the Symptoms Tell You?
Use the piece’s look and feel to identify the most likely cause.
| Visible symptom | Likely cause | Recommended response |
|---|---|---|
| Soft or flexible epoxy | Early demolding, incorrect mixing, or too little curing time | Check the product’s mixing ratio and cure instructions. |
| Tacky UV underside | Light blocked by the mold, tape, or opaque colorant | Cure the back side directly under the lamp. |
| Hard casting that tears silicone or leaves residue | Mold wear or micro-tears | Use soapy water to release the casting. |
| Hard resin stuck in a deep cavity or narrow opening | Mechanical trapping or friction | Gently flex the mold to break the seal. |
| Resistance at a flower stem or petal | Trapped flower fibers or bubbles | Check the edge without pulling harder. |
How Can You Prevent Sticking Before Pouring?
Prevent sticking by getting the resin mix, mold, and flowers ready before you pour.
How Should You Measure Resin and Clean the Mold?
Check whether your resin ratio is by weight or by volume, and measure exactly as directed. Mix thoroughly, scraping the sides and bottom of the cup. Work on a clean, level surface within the recommended temperature range.
Check the mold for dust, oils, residue, and wear. Replace torn molds. If the manufacturer allows it, wash silicone molds with mild dish soap and warm water, or clean bezels with rubbing alcohol. Dry the mold, flowers, and any embeds completely before pouring. If the mold still grips after cleaning, use release spray only as directed.
When Should You Use Mold Release Spray?
Use mold release spray only if both the resin and mold manufacturers allow it. A light mist can help with demolding and reduce friction during release. Avoid heavy coats or spray pooling in fine details. Skip it in bezels where the resin needs to bond to the metal frame.
How Should You Prepare Pressed Flowers?
Flower prep matters just as much as mold prep. Use fully dry flowers, remove loose fibers, and test the arrangement in the empty mold before pouring. Keep petals and fragments away from the mold edges. When placing flowers with tweezers, grip them at the center or on a sturdy stem - not at the petal edges.
How Can You Remove Stuck Resin Safely?
If fully cured resin is stuck in the mold, work it loose gently. Don’t force it out.
Is the Resin Ready to Demold?
Wait until the resin reaches its full cure time before demolding. If it feels soft or tacky, leave it in the mold longer. For UV resin, add another light cycle if any part still feels tacky.
If the resin stays sticky beyond its expected cure time, stop pulling. Put on gloves and eye protection, then check the mix ratio.
Once the resin has fully cured, try the release methods below.
How Do You Release Fully Cured Resin?
Peel the silicone away from the casting. Start by gently loosening the edges, then flex the mold to break the seal. If the piece won’t release, try a little soapy water to help the silicone pull away.
For bezel jewelry, leave the frame attached and remove only the temporary backing tape. If the back feels sticky, check for tape adhesive first. Clean off the adhesive with soapy water or gently lift it with a toothpick. Don’t pry the resin out of the frame.
When Should You Stop Demolding?
Stop and reassess if the resin feels tacky or won’t peel away easily. Give it more curing time rather than pulling harder.
Conclusion: Keep Resin from Sticking Again
After the piece releases, fix any issues with cure time, moisture, or mold wear before your next pour. Start with dry flowers and an intact silicone mold. For UV resin, fully cure the underside before demolding.
Clean, dry, and inspect the mold before every pour. Wash it with soapy water or rubbing alcohol, then let it dry completely. Check corners and fine details for residue, debris, or tiny tears. Replace molds that show visible wear or micro-tears.
If the resin keeps sticking, keep a simple pour log to help spot patterns. Record the resin brand, mix ratio, cure time, mold condition, release agent, and UV lamp cycles. For each pour, focus on the three basics that prevent most sticking problems: a clean mold, dry flowers, and a full cure.
FAQs
Can I save resin that stays tacky after curing?
You can often save tacky resin. If it’s sticky where it touched tape or didn’t get direct light, flip the piece over and cure the back under a UV lamp. If the cure is incomplete or there are low spots, add a thin layer of resin and cure it again.
For tape residue, gently clean the area with soapy water and a toothpick. Let the piece dry completely before adding any new layers.
How can I tell if my mold needs replacing?
Check your silicone mold before each use for nicks, scratches, or tiny tears on the inside. These flaws can make resin stick to the mold, which may tear when you remove the piece.
If resin pieces keep sticking or come out with surface flaws despite proper preparation, it may be time to replace the mold. Keep the inside clean and dust-free to help it last longer.
How do I free trapped flower bits without damaging my jewelry?
Use a toothpick to gently lift the petal edges or nudge flower pieces into place. Don’t press down on the petals. If air pockets get trapped underneath, carefully guide them to the surface with the toothpick.
To pop surface bubbles, briefly pass a lighter, small torch, or heat gun over the resin. Keep the heat moving so you don’t scorch the resin or damage the mold.
Related Blog Posts
- Pressed Flower Tray Problems and Fixes
- Pendant Molds vs Bezels for Flower Resin
- Silicone vs Plastic Resin Molds
- Pressed Flower Resin Bubbles: Guide for Beginners





















