










My starting rule for fewer resin bubbles: dry the flowers fully, pour thin layers, and release trapped air before the resin sets. I’d practice with 1 small pendant before using flowers you can’t replace.
Here’s the process I’d follow:
- Prepare: Check flower centers for moisture, use clean, dry tools, and keep the workspace level.
- Choose resin: Use two-part epoxy for deeper casts or dense blooms; use UV resin for thin pieces where light can reach the resin.
- Pour and check: Follow the mixing instructions, place flowers face-up when possible, and guide bubbles out with a toothpick. Use heat only if the resin label permits it.
- Cure safely: Follow the label’s ventilation, protective gear, and curing instructions. <u>Demolding does not mean full cure.</u>
- Inspect: Repair small surface pits only after full cure. I’d remake pieces with damp flowers or uncured resin rather than cover the problem.
The goal isn’t just a smooth surface - it’s fully cured jewelry you can wear.
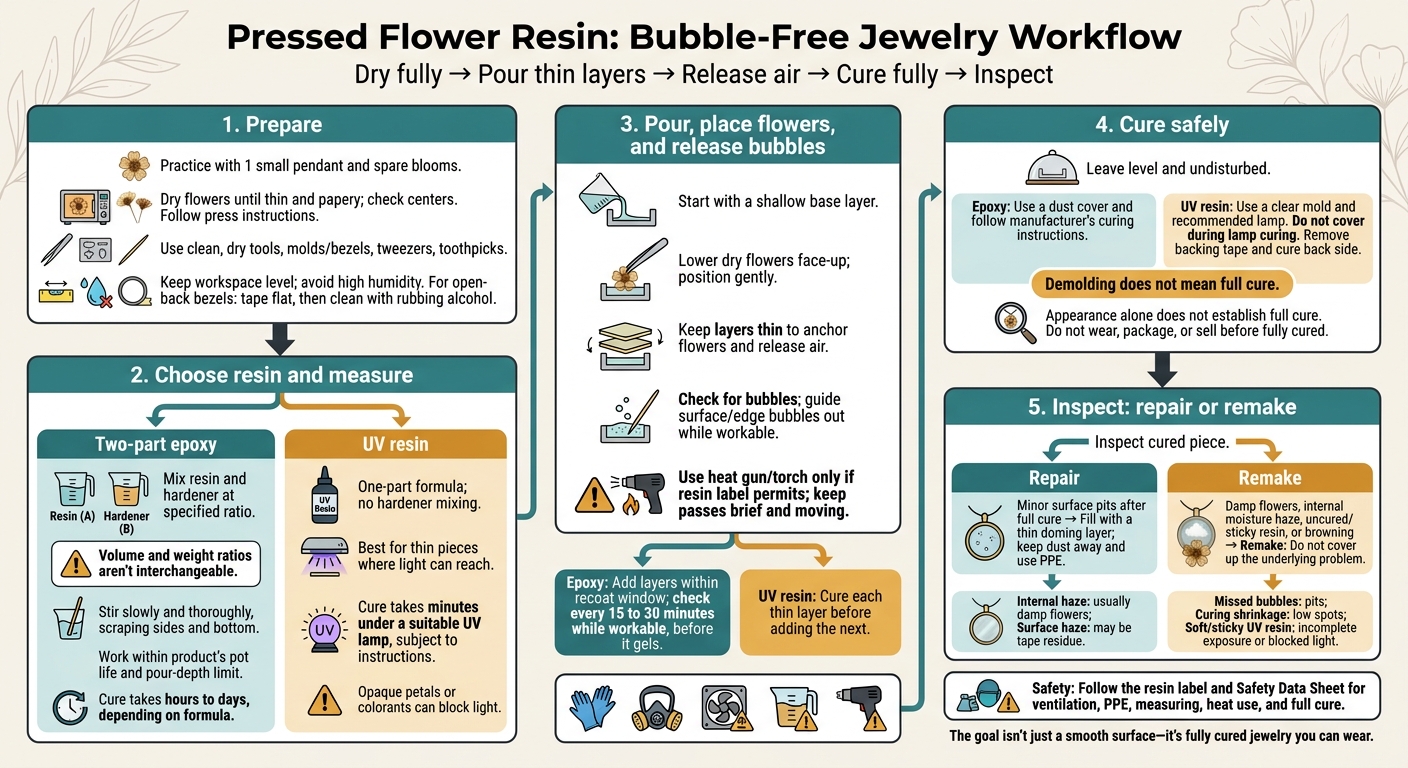
Pressed Flower Resin: Bubble-Free Jewelry Workflow
Popping Air Bubbles | Resin Clean-Up | Pressed Flowers
sbb-itb-80d8183
Prepare Your Flowers, Resin, and Workspace
Get your flowers, resin, and tools ready before mixing. Start with a small pendant or earrings and spare blooms before working with sentimental flowers. Dry the flowers first - trapped moisture can create bubbles later.
Dry Flowers and Check for Moisture
Press flowers flat and let them dry until they feel thin and papery. Check the center, too; dry petals don’t always mean the whole flower is dry.
Microfleur microwave flower press kits can cut drying time and help preserve color. Follow the kit’s instructions rather than using a fixed microwave time. Keep fully dried blooms in a dry spot with good air circulation. Handle them with fine tweezers or toothpicks to prevent finger oils and pressure marks.
Choose Between Two-Part Epoxy and UV Resin
Use a clear resin labeled for jewelry or small castings. Volume and weight ratios aren’t interchangeable, so follow the product’s measuring instructions.
| Feature | Two-part epoxy | UV resin |
|---|---|---|
| Mixing | Mix resin and hardener at the specified ratio. | One-part formula; no hardener mixing. |
| Working time | Limited pot life once mixed. | No set working time until exposed to UV light. |
| Layer depth | Stay within the formula’s stated pour limit. | Use thin layers so light can cure the resin fully. |
| Curing | Takes hours to days, depending on the formula. | Cures in minutes under a suitable UV lamp. |
| Flower coverage | Useful for dense flowers that would block UV light. | Opaque petals can block UV light, leaving the resin underneath sticky. |
Measure your chosen resin exactly before adding flowers.
Set Up a Safe, Level Workspace
Gather clean, dry tools, molds or bezels, tweezers, toothpicks, gloves, and a dust cover. Make sure your work surface is level. Tape open-back bezels flat, then clean them with rubbing alcohol.
Follow the label and safety data sheet for ventilation and personal protective equipment (PPE). Wear nitrile gloves and a resin-rated respirator. Avoid high humidity: moisture can leave resin tacky and affect pressed flowers.
Mix Resin, Add Flowers, and Remove Bubbles
Measure and Mix Epoxy Correctly
With the flowers dry and your workspace ready, measure the resin using the method on the label. Stir slowly and thoroughly, scraping the cup’s sides and bottom. Finish mixing before the resin starts to thicken.
Place Flowers in Thin Resin Layers
Thin layers help keep the flower in place while giving you time to position it and release trapped air. Start with a shallow base layer to anchor the flower. Using tweezers, lower the dry flower into the resin face-up so air can escape. Adjust the bloom with a toothpick or fine tool, taking care not to press too hard on delicate petals. Keep each layer thin so the flower stays anchored rather than floating.
For UV resin, cure each thin layer before adding the next. For epoxy, add layers within the recoat window.
Find and Release Bubbles Before Curing
Check for bubbles after mixing, pouring, and placing the flower. Gently lift bubbles you can reach with a toothpick. Use a heat gun or torch only if the label allows it, and keep the pass brief and moving. With epoxy, check during the working time, before the resin gels.
| What you can spot before cure | Likely cause | Prevention | Possible correction before full cure |
|---|---|---|---|
| Surface bubbles | Air introduced during mixing or pouring | Stir slowly and pour gently | Lift with a fine tool or use brief, moving heat if permitted. |
| Petal-edge bubbles | Air trapped beneath petals | Place flowers face-up and lower them into a shallow base layer | Gently guide the air out with a toothpick. |
| Pits | Bubbles breaking at the surface | Remove surface air while the resin is still fluid | Let bubbles rise out before the resin starts to gel. |
After removing the bubbles, leave the piece level and undisturbed until it cures.
Cure Resin and Check the Finish
Once the bubbles are out, protect the piece as it cures. Use a dust cover for epoxy, but do not cover UV resin during lamp curing. Follow the manufacturer’s cure time and instructions. For UV resin, use a clear mold and the recommended lamp, and follow the label’s exposure time. Opaque colorants can block the light and leave resin uncured.
Demolding time is not full cure. Follow the product’s full-cure instructions; appearance alone won’t tell you whether it’s ready. For UV pieces, remove any backing tape and cure the back side. The underside may not receive direct light, and flowers can shade the resin. Don’t wear, package, or sell the piece before it fully cures.
After curing, check the finish for trapped moisture, missed bubbles, or poor exposure.
Spot Haze, Pits, and Tacky Resin
Look for haze, pits, and tacky spots. These can point to problems with drying, mixing, or curing. Internal haze usually means the flowers were still damp, while surface haze can come from tape residue. Missed bubbles cause pits; resin shrinkage during curing causes low spots.
Soft or sticky spots often mean the UV exposure was incomplete or something blocked the light. Browning or discoloration points to moisture or oxidation. If you see either, remake the piece.
Decide Whether to Repair or Remake
After full cure, fill minor pits with a thin doming layer. Keep dust away and wear PPE while working. If defects keep returning, check that the flowers were fully dry, the resin was poured in thin layers, and the piece stayed level and undisturbed during curing.
Conclusion: Pressed Flower Resin Jewelry Checklist
- Before pouring: Dry flowers completely. Clean and dry your tools, molds, and bezels. Use UV resin for thin, open pieces or two-part epoxy for deeper casts. Measure epoxy exactly as the label directs.
- Before curing: Pour thin layers and use a toothpick to release bubbles. Check slow-curing epoxy every 15 to 30 minutes while it’s still workable. Keep the piece level. Cover epoxy to keep dust out, but don’t use a dust cover during UV lamp curing.
- After full cure: Check for haze, pits, and tacky spots before wearing the jewelry.
- Safety: Wear nitrile gloves and a resin-rated respirator. Review the Safety Data Sheet before you start.
FAQs
Should I seal pressed flowers before adding resin?
Yes, seal pressed flowers before adding resin. This helps preserve their color and keeps them from turning translucent. Apply a thin coat of sealant to delicate petals, then let it dry fully before embedding the flowers in resin.
The flowers must be completely dry before sealing. Any leftover moisture can cause rot, fading, or problems with the resin curing.
How can I test whether my flowers are fully dry?
Pressed flowers are fully dry when they feel brittle and papery, not flexible. If they bend or feel springy, moisture is likely still trapped inside. Check for dampness or coolness to the touch, too. Leftover moisture can cause rot, fading, or problems with resin curing.
Can I fix bubbles trapped inside cured resin?
Yes. Apply a thin layer of resin over the cured surface. Before that layer cures, use a toothpick to pop or lift out visible bubbles. Then briefly pass a lighter or small torch over the surface to clear any remaining tiny air pockets.
For future projects, pour slowly and check the mold’s corners and edges for hidden bubbles before curing.





















