










Pressed flowers usually lose color for six simple reasons: too much moisture, too much heat, too much light, too much air, poor storage, or blooms with thick, wet centers. If I want better color, I need to start with choosing and preparing the right flowers, dry it in short microwave rounds, keep liners dry, and store the finished pieces away from sun and humidity.
Here’s the short version:
- Brown petals often mean trapped moisture
- Crisp or dark edges usually mean too much heat
- Gray or blotchy spots can point to moisture left in the flower
- Flat color fade over time often comes from UV light, heat, or damp air
- Thin, low-moisture blooms tend to keep color better than thick blooms like peonies or lilies
- Short microwave cycles work better than one long cycle
- Dry papers, even pressure, and dark storage help flowers keep their look longer
A small color shift is normal. In many cases, flowers dry into a softer shade. But muddy brown patches, scorched edges, and late-stage fading are often avoidable.
One useful detail: in microwave pressing, even a 10–20 second timing change can affect the result, and thick flowers often need to be taken apart before pressing. That’s why the problem is not just the flower itself. It’s also the prep, the heat, the papers, and the storage.
If I had to sum up the whole article in one line, it would be this: better color comes from lower moisture, lower heat, and lower light exposure from start to finish.
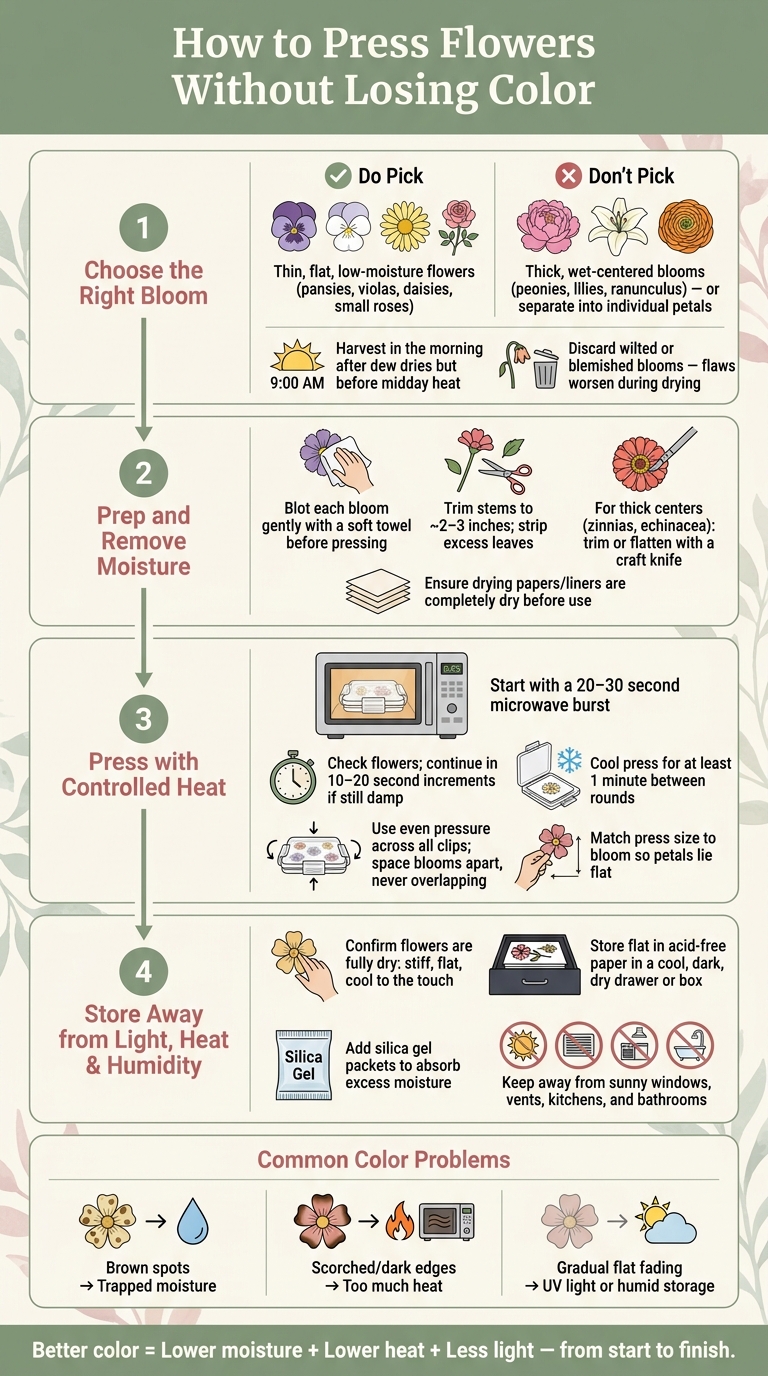
How to Press Flowers Without Losing Color: Step-by-Step Guide
A Guide On How To Press Flowers Part 1 | How to retain color, how to press white flowers, etc.
sbb-itb-80d8183
Choose Blooms That Hold Color Better
Pick thin, flat blooms with low moisture. They dry faster and usually keep more of their color. The best picks are blooms that dry evenly, because those tend to fade the least.
How Bloom Condition Affects Final Color
The condition of the flower when you press it has a big effect on the final look. Wilted, bruised, or diseased blooms often dry dull and spotty. Small flaws don't stay small here - they usually get worse as the flower dries. So if a bloom isn't fresh, toss it.
Freshness at harvest matters just as much as flower type. Pick flowers in the morning, after the dew has dried but before the midday heat starts to make them limp. That's the sweet spot: the blooms are fresh, and surface moisture is lower.
| Flower Type | Recommended Prep | Press whole or separate? |
|---|---|---|
| Pansies, Violas, Violets | Press at peak freshness; trim stems | Whole |
| Daisies, Primroses | Blot surface moisture; handle gently | Whole |
| Ferns, Herbs, Leaves | Choose small, flat blooms | Whole |
| Small Single-Petal Roses | Trim stem; ensure no surface dew | Whole |
| Large Roses, Lilies | Browns easily - trim thick centers; remove damaged petals | Separate into petals |
| Peonies, Ranunculus | Browns easily - remove petals from the base | Separate into petals |
| Wilted or Blemished | Discard; imperfections worsen during drying | N/A |
How to Prep Thick Blooms Before Pressing
Roses, lilies, peonies, and ranunculus hold moisture in their centers. That's where browning and uneven color often start. The fix is simple: take them apart before pressing.
With large roses or peonies, separate the petals and press each one on its own. For flowers with thick, raised centers - like zinnias or echinacea - use a small craft knife to trim or flatten the middle before the bloom goes into the press. That gives the flower a better shot at drying evenly. After the petals are dry, you can put the flower shape back together with tweezers when you're ready to make your final piece.
It also helps to strip away extra leaves and stems. Trim stems to about 2–3 inches. Less plant material means less moisture, and that makes it easier for the press to dry everything evenly on the first pass.
Once you've picked the right bloom, the next threat to color is heat and moisture during pressing. Using a microwave flower press can help lock in color by drying blooms quickly.
Control Moisture and Heat During Pressing
Once you choose a flower that keeps its color, the next thing that can ruin it is steam and heat during pressing. In most cases, color starts to fade when moisture gets trapped or the heat is too high.
Remove Surface Moisture Before the First Cycle
Don't press flowers right after rain, heavy dew, or watering. Wet petals hold steam inside the press, and that steam can lead to browning.
Before you load anything, gently blot each bloom with a soft towel. Use light pressure so you don't bruise thin or delicate petals. It also helps to check your drying papers before starting a new batch. If the pads are damp, they press moisture against the flower instead of pulling it away. Swap them out or let them dry all the way first.
Lay the blooms flat, face down, and leave a small gap between each one.
Use Short Microwave Cycles, Not One Long Burst
Start with a 20–30 second burst, then open the press and check the flowers. If they still feel soft or damp, keep going in 10–20 second increments. Let the press cool for at least one minute between rounds.
The total number of cycles depends on your microwave wattage and the thickness of the flower. If you're pressing keepsakes, test the timing on spare blooms first. That small test can save the flowers you care about most.
Fix Fading, Browning, and Scorching
If a flower changes color, the pattern usually tells you what went wrong.
| Visible Symptom | Probable Cause | Correction | Check Next |
|---|---|---|---|
| Over-dried, brittle petals | Excessive heat or too many cycles | Reduce power; shorten or cut cycles | Stop when petals feel dry but still slightly flexible |
| Brown spots or mold | Trapped moisture | Blot blooms before pressing; space flowers apart | Make sure drying papers are completely dry before use |
| Dark, scorched, or crisp edges | Overheating | Increase cooling breaks; use shorter bursts | Check progress more frequently |
If color loss keeps happening, check the drying papers and pressure next.
Set Up Your Press and Drying Papers Correctly
If color loss still shows up after you’ve checked timing and moisture, the press setup is often the problem. In many cases, it’s holding moisture instead of letting it leave. Wool felt pads and cotton liners help soak up moisture and keep petals flat, but they only do that well when they’re dry and sitting smoothly against the petals.
Change Damp Papers and Keep Pressure Even
After each cycle, swap out any damp liners before you load the press again. Dry, flat liners help petals dry more evenly and cut down on wrinkles or color changes. If blooms overlap, they can hold moisture and stick to each other.
Use every clip in the press so the pressure stays even from edge to edge. If one side gets more pressure than another, flowers can come out patchy or only partly dried.
Match the Press Size to the Flower
A flower can still discolor even when you’ve picked the right petals if the press is too small. Match the press size to the bloom so the petals can lie flat without being crowded. Stack each layer in the kit’s set order to keep the liners flat and give steam a path out.
Once the flowers are dry, store them away from light, heat, and humidity.
Store Finished Flowers to Keep Color Longer
After using flower pressing kits, storage is the last step that helps protect color. Before you frame or store anything, check that each flower is fully dry. It should feel stiff, flat, wrinkle-free, and cool to the touch. If the petals still feel soft or warm, they need more time. Any trapped moisture can lead to browning or rot later, even after the flowers are put away.
Once the flowers are dry, keep them flat in acid-free paper or protective folders. Store them in a cool, dark, dry drawer or box. Adding silica gel packets to the container can help pull extra moisture from the air.
How Light, Humidity, and Heat Fade Pressed Flowers
UV light is one of the biggest long-term threats to pressed flower color. Even flowers that are fully dried will fade faster in direct light. A framed piece placed away from direct sunlight will usually keep its color longer.
Humidity can also cause fading. Moisture in the air may soften pressed petals and lead to discoloration or mold, even months after pressing. That’s why it’s smart to avoid storing or displaying finished pieces in kitchens, bathrooms, or other damp spots.
Heat plays a part too. Warmer conditions can speed up fading, so keep finished flowers away from sunny windows, vents, and enclosed spaces that get hot.
Color-Loss Checklist
Use these checks before you frame the flowers or file them away.
| Step | What to Check |
|---|---|
| Dryness before storage | Do flowers feel stiff, dry to the touch, and completely cool? |
| Storage environment | Is the storage spot cool, dark, dry, and away from direct sunlight? |
| Heat sources | Are flowers stored away from warm windows, vents, and enclosed hot spaces? |
| Humidity control | Is a silica gel packet included to absorb excess humidity? |
FAQs
Why do pressed flowers turn brown?
Pressed flowers often turn brown or lose their color for a simple reason: they weren’t dried all the way, or they dried too slowly. When moisture lingers, petals can darken. And if the drying process drags on or shifts from one condition to another, flowers can also come out wrinkled.
If you want blooms to keep more of their color, dry them fully and use a fast, controlled method. One good option is the Microfleur microwave flower press. It helps flowers dry more evenly before you use them in projects like resin.
Which flowers keep color best?
Flowers with thin, flat petals and less moisture tend to hold their color best. Good picks include pansies, violas, daisies, primroses, single-petal roses, and zinnias. Ferns, evergreens, and many leaves press well too.
It’s best to skip thick or fluffy blooms like peonies, ranunculus, and large mums. They hold more moisture, so they often dry unevenly. For the best results, choose flowers that are fresh and dry, with no dew or rain on them.
How should I store pressed flowers?
Once your flowers are pressed and dry, you can store them and use them later. Microfleur includes storage tips in its instructions to help keep your pressed blooms in good shape.
If you want more detail, Microfleur also offers guides, ebooks, and project kits that cover flower pressing and long-term storage.





















