










Before I open resin, I check the safety data sheets (SDS) for both resin and hardener and set up the required ventilation. My checklist has 7 items: 5 types of PPE and 2 workspace controls.
- Chemical-resistant gloves: Match the material and thickness to the SDS.
- Chemical-resistant apron or smock: Cover my torso and lap against drips.
- Eye protection: Use chemical splash goggles or suitable full-face protection.
- Respiratory protection: Choose the required vapor cartridges and dust filters for the task.
- Protective sleeves: Keep wet resin off my forearms.
- Silicone work mat: Protect my table and follow the maker’s cleanup instructions.
- Dedicated lidded waste container: Keep contaminated waste separate and follow local disposal rules.
My rule: <u>PPE does not replace ventilation</u>, and “odor-free” does not mean safe. For surface protection, I compare reusable silicone mats with disposable covers by cleanup and waste. Before mixing, I also check the mixing ratio, respirator seal when needed, and plan for curing, sanding, and cleanup. If you are new to the hobby, you might also want to review how to use a flower press to prepare your botanicals before they ever touch resin.
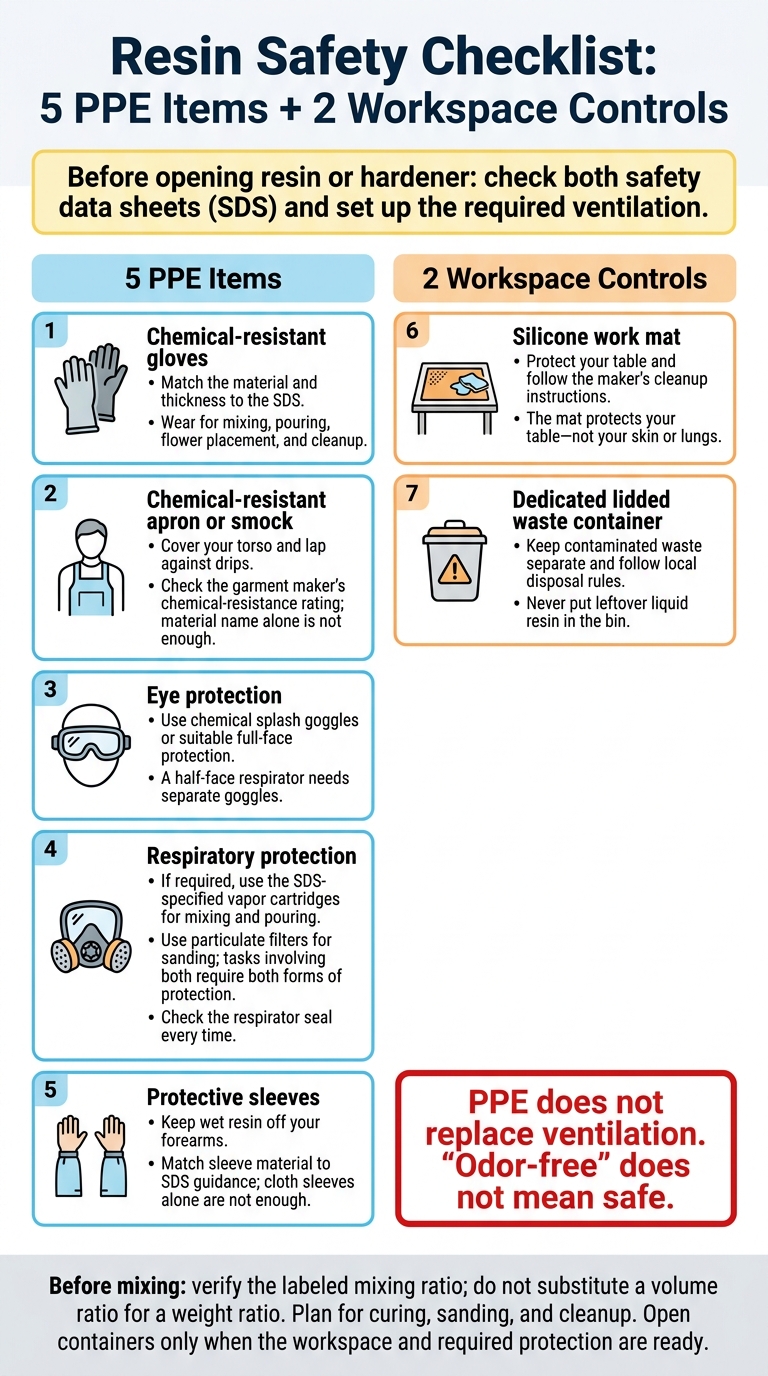
Resin Safety Checklist: 5 PPE Items + 2 Workspace Controls
Before You Craft With Resin, Watch This | Resin Safety Precautions
sbb-itb-80d8183
Check the SDS and Prepare Ventilation
Read the safety data sheets (SDS) for the resin and hardener. Confirm the exact glove material and respirator the manufacturer specifies. For UV resin, also check the curing method and exposure time - these differ from two-part epoxy. Set up ventilation and personal protective equipment (PPE) before opening either container.
Follow the mixing method on the label. Do not substitute a volume ratio for a weight ratio. Turn on ventilation before opening the containers, and keep it running during mixing, pouring, and curing. If respiratory protection is required, use the exact respirator the SDS lists for organic vapors.
Store dried flowers in a separate, dry area. Bring only fully dried flowers into the resin workspace. Keep children and pets out of the resin area, and cover the piece during curing to keep dust and hair off it. Once the workspace is ready, start with gloves.
1. Chemical-Resistant Gloves
Gloves are your first line of defense whenever you work with wet resin. Wear chemical-resistant gloves for mixing, pouring, flower placement, and cleanup. Choose nitrile or vinyl gloves that match the material and thickness listed on the SDS. Avoid latex exam gloves.
Pick a size that fits comfortably and lets you control small tools and petals. Use tweezers or a toothpick to place flowers rather than pressing petals with bare fingers.
Keep your gloves on during cleanup. If they get wet during the project, dry them fully before continuing - water can affect the finish.
With your hands protected, cover your clothing and forearms next.
2. Chemical-Resistant Apron or Smock
A regular fabric apron can soak up resin, letting it reach your clothing or skin. Wear a chemical-resistant apron or smock while mixing and pouring to catch drips and splashes.
After gloves, protect your torso and lap with a non-absorbent garment made for resin work. Check the SDS and the garment maker’s chemical-resistance rating. The material name alone isn’t enough to confirm protection.
Make sure the garment covers your torso and lap, especially during seated pours. Adjust the straps to keep it in place, with no loose edges that could dip into wet resin.
Put on gloves before handling a resin-spotted garment so you don’t spread uncured resin. For resin-resistant materials, let the resin harden fully, then peel it off only if the surface allows that method. For splash-prone pours, add eye protection next.
3. Eye Protection for Resin Splashes
With your hands, clothing, and forearms covered, protect your eyes from resin splashes and sanding dust. Put on chemical splash goggles before mixing resin and hardener. Keep them on while pouring, sanding, and finishing with a heat gun. Marketing claims won’t prevent splash injuries.
A full-face respirator protects your eyes and lungs. A half-face respirator protects only your lungs, so you’ll need separate goggles. Adjust the straps so your goggles or full-face respirator form a snug seal. Keep eye protection on during heat-gun or torch work, too.
Keep the resin and hardener safety data sheets (SDS) within reach, and review their eye-exposure first-aid instructions before you start. If your SDS calls for respiratory protection, the next step is choosing the right equipment.
4. Respiratory Protection for Dust or Vapors
After protecting your eyes, protect your lungs from resin vapors and sanding dust. Sanding cured resin produces fine dust. Check the safety data sheet (SDS) for the respirator needed for your resin system’s vapors - marketing claims don’t mean the resin is safe to breathe.
Use the SDS-specified vapor cartridges when mixing and pouring, and particulate filters when sanding. A cloth mask or N95 won’t protect against vapors, and a vapor cartridge alone won’t block dust. If you pour and sand, use one respirator fitted with both the SDS-specified vapor cartridges and particulate filters.
Adjust the straps and check the seal every time you put it on.
Next, cover your arms.
5. Protective Sleeves
Once your gloves are on, cover exposed forearms with protective sleeves for mixing, pouring, flower placement, and cleanup. Sleeves also help close the gap between gloves and clothing.
Choose sleeve material that matches the Safety Data Sheet (SDS) guidance for your resin and hardener. Cloth sleeves alone aren’t enough.
Keep sleeves in place whenever your forearms could touch wet resin, especially when reaching into molds.
6. Silicone Work Mat
Place a silicone mat under your mixing cups and molds to catch drips. Pick one that covers the entire mixing and pouring area, and set it on a sturdy, level surface. Keep it flat so cups and molds don’t wobble while you place delicate flowers.
Let resin drips cure before peeling them off. Follow your resin’s cure time so you don’t smear wet resin during cleanup.
Using a heat gun to remove bubbles? Check the mat’s heat resistance first, and don’t hold the heat over one spot. Replace the mat if it scorches, melts, or develops a rough surface.
The mat protects your table - not your skin or lungs. Once your work surface is covered, use a lidded waste container for wipes, gloves, and resin scraps.
7. Dedicated Waste Container with a Lid
Once you’ve covered gloves and surface protection, keep uncured waste contained, too. Use a lidded, chemical-resistant polypropylene bin marked PP 05 for contaminated gloves, wipes, mixing cups, and flower scraps.
A large amount of curing resin can get hot enough to scorch materials or soften plastic. Never put leftover liquid resin in the bin. Pour excess mixed resin into small silicone molds instead. Let it cure and cool completely before closing the bin’s lid.
Keep uncured waste separate from cured scraps. Never pour resin or hardener down a drain or put it in regular trash. Follow the SDS and local household hazardous waste rules. Fully cured scraps usually go in regular trash, where local rules allow.
Next, compare silicone mats with disposable table covers.
Silicone Mats vs. Disposable Table Covers
Once your waste is contained, choose a surface layer for your cups and molds that suits how you work. A silicone heating mat works well for frequent resin projects. A disposable cover cuts cleanup time, but the entire sheet becomes waste.
| Feature | Silicone mat | Disposable table cover |
|---|---|---|
| Reusability | Reusable | Intended for single use |
| Cleanup | Peel off cured resin only if the manufacturer allows it | Fold inward to contain wet resin |
| Waste | Only cured resin scraps are removed | Entire cover becomes contaminated waste |
For larger pours, use a tray with raised edges. Flat covers protect the table, but they won’t contain a large spill.
For open-bezel pieces, keep the table level and leave headroom so resin does not run over the edge.
Use gloves, eye protection, and ventilation with either option.
Safety Checklist Before Mixing Resin
Before mixing, check the SDS for both the resin and hardener, and start ventilation before opening either container.
Have chemical-resistant nitrile or vinyl gloves, an apron or smock, protective sleeves, and eye protection ready. Keep the silicone mat in place and a dedicated, lidded waste container within reach.
If the SDS requires respiratory protection, use the specified respirator with the required organic-vapor cartridges and particulate filters for sanding. Check the respirator’s seal.
Open the resin and hardener only when every item is ready.
FAQs
How do I know my ventilation is adequate?
Keep air moving through your workspace during mixing, pouring, and curing to prevent fumes from building up. Don’t rely on smell to judge safety: resin vapors can be present even when a product is labeled non-toxic or odorless.
Even if the room seems well ventilated, wear a properly fitted respirator with organic vapor filters and N95-rated or equivalent particulate filtration. N95 filtration alone does not protect against organic vapors.
When should I replace my respirator cartridges?
Replace your respirator cartridges according to the manufacturer’s instructions for your specific mask. There’s no single replacement schedule that works for every respirator.
How often you need to replace them depends on how frequently you use the respirator, the concentration of vapors in your workspace, and the type of filters you use. Check the documentation that came with your respirator for guidance.
What should I do if resin touches my skin?
If resin gets on your skin, clean the area immediately. Follow the resin manufacturer’s safety data sheet for removal instructions and first aid procedures.
To prevent skin contact, always wear appropriate personal protective equipment when working with resin, including nitrile or vinyl gloves.





















