










For resin keychains, I start with small flowers that will dry flat and fit the mold. I test one spare bloom in a microwave flower press, using 20–30-second bursts as the press instructions allow, then shorter bursts as it dries.
My checklist is simple:
- Fit first: Leave 1/8 to 1/4 inch around the mold’s edges and keep flowers clear of the center post.
- Prep and press: Blot surface water, trim thick parts, and arrange petals without overlap.
- Heat, vent, and cool: Release steam between bursts and check dryness only after cooling.
- Check before resin: Look for a dry, papery feel, including the center, then test the layout in the empty mold.
<u>I don’t embed damp flowers.</u> If a bloom is scorched, curled, or too thick, I replace it or use a smaller, flat section.
Microwave Flower Pressing for Resin Keychains
✿ DIY Microwave Pressed Flowers for Resin Arts & Crafts ✿
sbb-itb-80d8183
Choose and Prepare Flowers for Keychain Molds
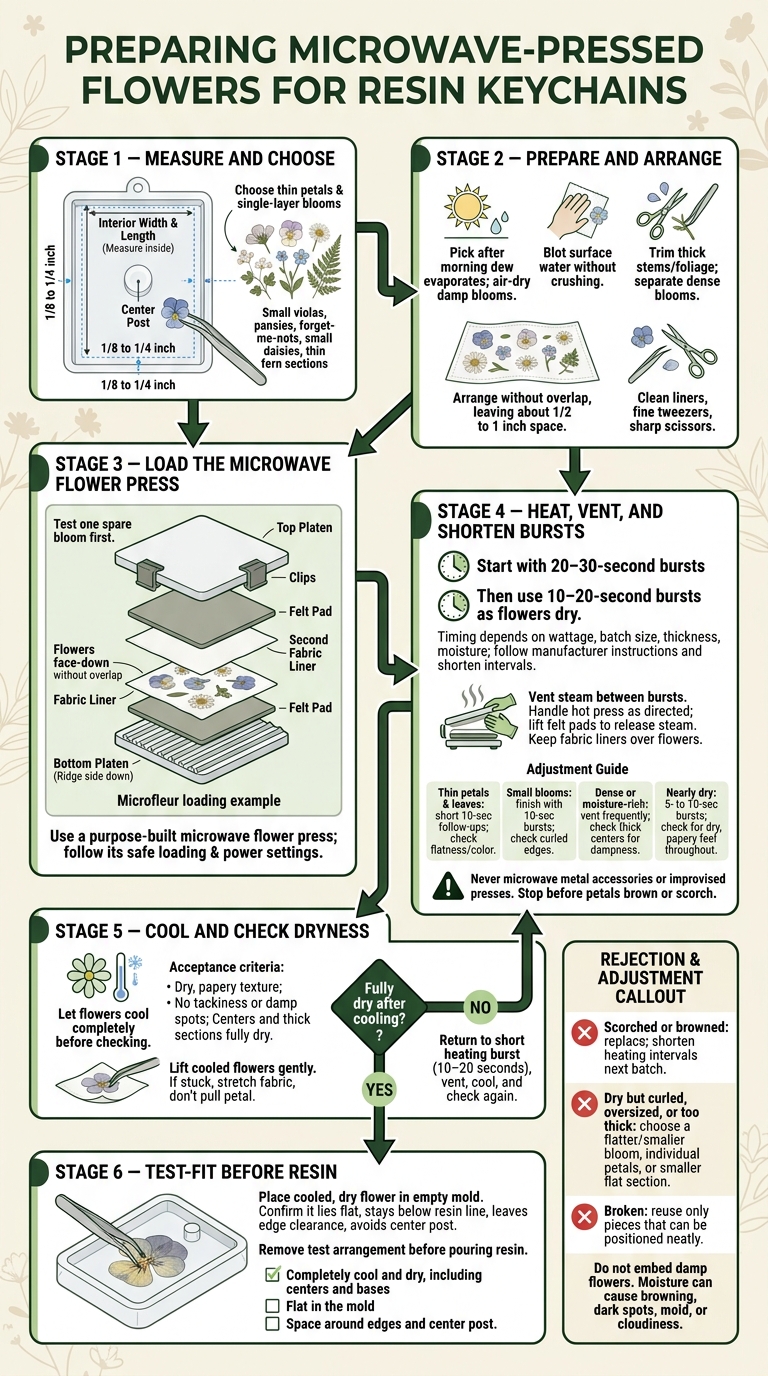
Start with the mold, then choose flowers that fit. Measure its interior width and length in inches, not the outer rim. Leave 1/8 to 1/4 inch of clearance on each side, with room around the walls and center post.
Choose Small Blooms and Thin Leaves
With the usable space measured, choose flowers that stay flat after pressing. Look for thin petals and single-layer blooms.
Try small violas, pansies, forget-me-nots, small daisies, and thin fern sections. Thin foliage such as ferns, herbs, grasses, and autumn leaves also works well.
Choose a Press and Gather Supplies
Use a microwave flower press with clean liners. Pick a size that fits your batch, and follow its instructions for microwave-safe use and loading.
Have clean liners, fine tweezers, sharp scissors, and your mold ready. Wash or replace stained liners so leftover pollen doesn’t transfer to the next batch.
Remove Surface Water and Thick Parts
Remove surface moisture and bulky parts before pressing so the flowers dry evenly. Pick flowers after the morning dew has fully evaporated. If blooms are still damp, let them air-dry before pressing.
Trim thick stems and excess foliage, then gently blot any surface moisture without crushing the petals. Separate dense blooms into individual petals or smaller sections so they press flat.
Arrange the pieces in their final shape, using tweezers to spread petals without overlap. Leave about 1/2 to 1 inch between pieces where the press allows.
Dry Flowers in Short Microwave Stages
Test one spare bloom first. Microwave time depends on wattage, batch size, thickness, and moisture. Use short bursts, and stop before petals brown or scorch.
Load, Heat, Vent, and Inspect the Press
Load the press. For a Microfleur press, set the bottom platen ridge side down, then add the felt pad and fabric liner. Place flowers face-down without overlap. Add the second liner, felt pad, and top platen, then attach the clips.
Heat in stages. Start with 20–30-second bursts. Vent steam between bursts and check color and moisture, then switch to 10–20-second bursts until dry. Follow the manufacturer’s recommended power setting, and shorten intervals when needed. Never microwave metal accessories or improvised presses.
Vent safely. Handle the hot press as directed. Open it and lift the felt pads to release steam, but keep the fabric liners over the flowers so they stay flat. Outside the microwave, blot wet felt pads with a paper towel before reassembling the press.
Cool completely. Let the flowers cool before checking dryness or lifting them from the liners. Small blooms should be flat enough to sit cleanly in shallow keychain molds.
Adjust Heating for Thickness and Moisture
Group flowers and leaves with similar thickness and moisture levels. Wetter flowers need staged drying - not one long, uninterrupted cycle.
| Specimen type | Heating approach | Inspection point |
|---|---|---|
| Thin petals and leaves | Use short 10-second follow-ups. | Check that petals are flat and their color hasn’t faded. |
| Small blooms | Finish with 10-second bursts. | Look for curled edges that could affect mold fit. |
| Dense or moisture-rich specimens | Vent frequently between bursts. | Check thick centers for dampness before embedding. |
| Nearly dry specimens | Use 5- to 10-second bursts. | Check for a dry, papery feel throughout. |
Flatter, fully dry flowers fit keychain molds better and need less trimming later.
Check Dryness and Flatness After Cooling
Once flowers cool, feel for a dry, papery texture with no tackiness or damp spots. Pay close attention to centers and thick sections. If a bloom still feels damp, give it another short burst.
Spread petals evenly and keep them flat without overlap to preserve the shape needed for small keychain molds. Lift cooled flowers gently with nylon crafting tweezers. If they stick, gently stretch the fabric instead of pulling on a petal.
Set aside any bloom that needs trimming or reshaping before test-fitting it in the mold.
Test Mold Fit and Solve Pressing Problems
Before adding resin, check that the flower is flat, fully dry, and fits the mold.
Trim Flowers and Test the Layout
Let the pressed flower cool, then use tweezers to place it in the empty mold. Keep the petals inside the edges and away from the center post. The flower should sit flat enough to stay below the resin line.
Remove the test arrangement before pouring resin.
Fix Damp Centers, Curled Petals, and Breakage
Don’t use a flower that still feels damp. Leftover moisture can cause browning, dark spots, mold, or cloudiness.
| Problem | Fix |
|---|---|
| Damp center | Heat for another 10–20 seconds. Wipe moisture from the press plates between cycles, then let the flower cool and check again. |
| Browning or scorching | Replace damaged blooms and use shorter heating intervals for the next batch. |
| Curled petals, still moist | Keep drying in short bursts until the petals feel papery. |
| Curled petals, dry | Choose a flatter bloom or use a smaller section. |
| Stuck specimen | Gently stretch the fabric liner or lightly bend the paper to release the flower. |
| Oversized flower | Use individual petals, small leaf sections, or a smaller bloom instead. |
| Handling breakage | Place usable pieces back into the dry mold layout. Replace blooms that are too damaged to position neatly. |
| Thick center | Choose a flatter bloom if the center is too thick for the mold. |
Conclusion: Check Flowers Before Embedding
Press only blooms that fit the mold and stay flat once dry.
Before adding resin, check that:
- Flowers are completely cool and dry, including their centers and bases.
- Blooms lie flat in the mold.
- The layout leaves space around the edges and center post.
FAQs
How do I adjust pressing time for my microwave’s wattage?
Microwave wattage affects drying time, so start with short test bursts and add time only as needed. Test imperfect specimens first: microwave on high for about 25 seconds, then use shorter bursts of 10–20 seconds. Open the press between bursts to let it air out and prevent overheating.
Stop when the flowers feel papery, thin, and dry, with no obvious moisture left. Burned pads or liners usually mean the pressing time was too long.
Can I press flowers to fit curved keychain molds?
Yes, but the bloom’s shape matters. Microwave pressing works best with thin, fairly flat flowers that have papery, single-layer petals. Thick or deeply curved flowers may dry unevenly or resist lying flat.
For curved keychain molds, arrange and flatten the petals to fit your planned shape before pressing. The flower should lie flat in the press. Once pressed, set it in resin in the curved mold.
How do I keep pressed flowers dry before embedding?
After microwave pressing, make sure the flowers are completely dry and check the press panels for any visible moisture. Store the dried flowers between paper towels. If you’re not using them right away, check them within a day or so to help prevent mold. Keep them free of moisture until you’re ready to embed them in resin in your keychain molds.





















